
Specifications


Installation
9
Oven Assembly
Stacking a CTBR-AP on top of a Mark V
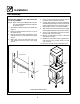
1. Lay the Mark V on its back.
2. Remove the 25” legs. Pry the casters out of the
old legs.
3. Attach the 6” legs with casters as follows:
NOTE: The locking casters must be installed
on the front of the oven.
a.) Ali gn the threaded stud in each leg with the
nut lo cated inside each bottom corner of
the oven frame. Turn the legs clo ckwise and
tighten to the nearest ful l turn.
b.) Align the two leg plate holes in each leg
with those in t he oven bottom. Secure
each leg using tw o 1/2” bolts.
c.) Pry the foot out of the 6” legs. Snap the
casters into the legs.
d.) Tiptheovenuponthecasters.
Attaching the 6’ legs and casters
Figure 5
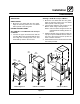
4. Remove the crown trim from the Mark V.
5. Bo l t the stacking plate to the top of the Mark V
with the studs facing up. See Fi gure 6.
6. Reinstall the crown trim.
7. Lay the CTBR-AP on its back. Attach the self
adhesive gasket tape to the front and side
edges on the bottom of the unit. See Figure 6.
8. Set the CTBR-AP upright on top of t he Mark V.
9. Remove the control compartment cover and
access panel from the CTBR-AP.
10. Align the front and rear bolt holes of the CTBR-
AP with the studs on the stacking plate. See
Figure 6.
11. Place a nut and washer on each of the studs
and tighten securely.
12. Replace the control compartment cover and
access panel.
13. Insert the flue extension over the flue on the
Mark V. Attach using screws provided.
NOTE: If the oven has a vent guard it must be
removed before installing the flue ex-
tension.
14. Place the flat plate of the flue brace on top the
CTBR-AP. The two holes in the end of t he
brace must line up with the holes in the flue ex-
tension. Attach the flue brace to the flue exten-
sion w ith the screws provided.
15. Place the top cap on top of the CTBR-AP.
NOTE: This will secure the flue brace.
Oven Leveling
1. Place a level on top of the oven. Loosen the set
screws on the side of each caster. Turn the ad-
justment collar clockwise to raise a nd counter
clockwise to lower the oven.
2. When the oven is level, tighten the casters by
turning the two set screws on the side of each
caster assembly.