
Programming instructions

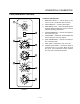

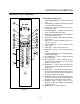

CONVECTION OVEN CONTROLS
1-6
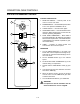
OVEN OPERATION
Oven Startup:
1. Toggle the POWER SWITCH (1) to ON. The oven
preheats to the lowest programmed first stage
temperature. The LEDS (16) for all products with
the same first stage temperature light.
While the unit preheats the TOP DISPLAY (2)
gives the set temperature. The BOTTOM DISĆ
PLAY (4) reads Lo if the oven is more than 10_ beĆ
low setpoint. When the oven reaches 10_ of
the preheat temperature an alarm sounds and
the bottom display reads Ready.
Single Product Cooking Procedure:
NOTE: If the led next to the desired product key is lit
skip step 1.
1. Press the desired PRODUCT KEY (17). The oven
preheats to the first stage temperature for the seĆ
lected product. When the oven reaches 10_ of
the preheat temperature an alarm sounds and the
bottom display reads Ready.
2. Load the product into the oven. Press the deĆ
sired PRODUCT KEY (17).
If the shelf timing function is toggled on for that
product key, the top display reads SHLF and the
bottom display reads the programmed prodĆ
uct's time. Press a SHELF KEY (18) to assign the
product to that shelf and start the cook cycle. The
top display reads SHLF, the bottom display gives
the shelf #. Within five seconds, the top display
reads SHĆ1, the bottom display gives the remainĆ
ing cook time.
If the shelf timing function is toggled off for that
product key, pressing the product key will start
the cook cycle. The TOP DISPLAY (2) reads
----. The BOTTOM DISPLAY (4) counts
down the cook time in minutes: seconds.
NOTE: If the selected product has a cook time
of greater than 59:59 the top display
reads Hr-- for the total number of
hours. The bottom display counts down
the cook time in minutes:seconds.
NOTE: If the selected product is a single stage
recipe the LEDS for all single stage prodĆ
ucts with the same cook temperature and
fan speed will light. If the selected product
is a multiple stage recipe no other product
LEDS will light.
NOTE: Press and hold the selected product key
for three seconds to cancel the cook
cycle for normal operation. To cancel the
cook cycle when using shelf timing,
press and hold the SHELF KEY (18) for 3
seconds or press TOGGLE/CLEAR (11)
and the corresponding shelf key.
3. When the cook time expires an alarm sounds
and the top display reads donE.
4. Press the selected product key to silence the
alarm. Remove the product. If shelf timing is
used, press the flashing SHELF KEY (18) to siĆ
lence the alarm.
Multiple Batch Cooking Procedure:
This procedure is for single stage recipes with the
same cook temperature and fan speed only.
NOTE: If the led next to the first desired product key
is lit skip step 1.
1. Press the first desired PRODUCT KEY (17). The
LEDS for all recipes with the same cook temperaĆ
ture and fan speed will light.
The oven preheats to the cook temperature for
the selected product. When the oven reaches
10_ of the preheat temperature an alarm
sounds and the bottom display reads Ready.
2. Load the product into the oven. Press the deĆ
sired PRODUCT KEY (17).
If the shelf timing function is toggled on for that
product key, the top display reads SHLF and the
bottom display reads the programmed prodĆ
uct's time. Press a SHELF KEY (18) to assign the
product to that shelf and start the cook cycle. The
top display reads SHLF, the bottom display gives
the shelf #. Within five seconds, the top display
reads SHĆ1, the bottom display gives the remainĆ
ing cook time.
If the shelf timing function is toggled off for that
product key, pressing the product key will start
the cook cycle. The TOP DISPLAY (2) reads
----. The BOTTOM DISPLAY (2) counts
down the cook time in minutes: seconds.
3. Load the second product. Press the appropriate
PRODUCT KEY (17). Press a SHELF KEY (18) to
activate shelf timing.
NOTE: Only products with lighted LEDS may be
selected.