
Programming instructions

COMBI CONTROLS
3-10
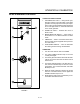
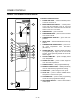
19. FAN SPEED SWITCH - used to select low or
high speed.
20. FLUSH/DRAIN SWITCH - used to flush/drain
the steam generator for decalcification.
NOTE: BC14DS, the direct steam unit, does not
have a flush/drain switch
21. FILL LAMP - illuminated until the steam generaĆ
tor is filled with water
NOTE: BC14DS, the direct steam unit, does not
have a fill lamp.
MANUAL OPERATION
1. Turn the SELECTOR SWITCH (3) to the desired
mode. The LED above the manual key lights.
2. Press the TEMPERATURE ARROW KEYS (8) to
set the stage one cook temperature.
3. Press the TIME ARROW KEYS (5) to set the stage
one cook time.
4. Press the STAGE TWO KEY (11).
NOTE: Stage two can be used for either a hold
mode or a second cook temperature. ExĆ
ample: Cook meats or poultry at a low
temperature for maximum moisture
retention, then set the second stage for
browning. To use the second stage for
holding, you must set an appropriate
hold time for the unit to count down from.
NOTE: If stage two is not required enter a cook
time of 00:00.
5. Press the TEMPERATURE ARROW KEYS (8) to
set the stage two cook temperature.
6. Press the TIME ARROW KEYS (5) to set the stage
two cook time.
7. Press the START KEY (14) to begin the cook
cycle. The STAGE ONE LED (9) lights. The TIME
DISPLAY (4) counts down the stage one cook
time.
If stage two is selected an alarm sounds at the
end of stage one. The time display counts down
the stage two cook time.
8. When all cook stages are complete the TIME
DISPLAY (4) flashes 00:00, the TEMPERATURE
DISPLAY (6) flashes 0 and an audible alarm
sounds. Press the STOP KEY (15) to silence the
alarm. The control maintains the stage one cook
temperature.
9. Turn the SELECTOR SWITCH (3) to OFF to shut
down the oven/steamer.
NOTE: Time and temperature settings may be
changed at any time during manual operaĆ
tion. Press the time arrow keys to change the
cook time. Press the temperature arrow keys
to change the cook temperature.
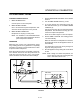
PROGRAMMED OPERATION
NOTE: See page 3-12 for programming instrucĆ
tions.
1. Turn the SELECTOR SWITCH (3) to the desired
mode.
2. Press the desired PRODUCT KEY (12). The LED
above the selected key lights.
3. Press the START KEY (14) to begin the cook
cycle. The STAGE ONE LED (9) lights. The TIME
DISPLAY (4) counts down the stage one cook
time.
NOTE: Press the STOP KEY (15) once to pause an
active stage one cycle. Press the START
KEY (14) to resume.
NOTE: Press the STOP KEY (15) twice to cancel
an active stage one cycle.
4. An alarm sounds at the end of stage one The
time display counts down the stage two cook
time.
NOTE: Press the STOP KEY (15) once to cancel
an active stage two cycle. Stage two
cycles cannot be paused.
5. When all cook stages are complete, the TIME
DISPLAY (4) flashes 00:00, the TEMPERATURE
DISPLAY (6) flashes 0 and an audible alarm
sounds. Press the STOP KEY (15) to silence the
alarm. The control maintains the stage one cook
temperature.