
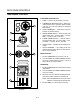
Programming instructions


DECK OVEN CONTROLS
2-8
PREHEAT CYCLE
NOTE: From a cold start it will take 2Ć3 hours to preĆ
heat the deck. From the sleep mode it will
take 1Ć2 hours to preheat the deck.
1. Toggle the power switch on the front of the steam
generator to ON.
NOTE: The generator fills for approximately
three seconds after being turned on. DO
NOT turn the generator on and off continĆ
uously. This can cause the generator to
overfill.
2. From a cold start - Turn both the POWER
SWITCH (2) and the STEAM SWITCH (1) on the
control panel to ON.
From the sleep mode - Turn the STEAM
SWITCH (1) on the control panel to ON.
NOTE: All three of these switches must be ON.
Steam will be injected into the oven to comĆ
plete the preheat cycle.
3. The display reads Prht. The computer controls
the panel temperature during the preheat cycle
as follows.
A.) High fire until the deck reaches 375_F.
B.) Low fire until the deck reaches 430_F.
The panel temperature is greater than 500_F
during the preheat cycle. When the deck temĆ
perature reaches approximately 430_F the
control injects two minutes of steam to lower
the panel temperature and purge any moisĆ
ture from the steam piping.
4. When the panel temperature is below 500_F and
the deck temperature is approximately 430_F
the display reads rdY.
Check the deck for excess water before baking.
1. Close the oven door. Press the steam button for
10 seconds.
2. Open the oven door. Carefully check the deck for
excess water.
CAUTION:
Steam is hot! If water is present, wait for the
deck to dry and repeat.
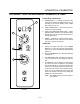
THE IDLE CONDITION
The computer maintains the following temperatures
when the oven is idle.
1. High fire maintains a panel temperature of
approximately 460_F.
2. Low fire maintains a deck temperature of approxĆ
imately 430_F.
OVEN OPERATION
1. When the display reads rdY, load product into the
oven.
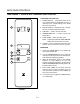
2. Press the desired PRODUCT KEY (14).
NOTE: To view the current temperature, press
the TEMP KEY (2). To return to the countĆ
down mode press the TIME KEY (4).
3. A buzzer sounds when the countdown is comĆ
pleted
4. If the product is not done, press the PLUS 1 KEY
(13) to add from 1-4 minutes of additional cook
time.
5. When the product is done press the selected
PRODUCT KEY (14) to silence the buzzer.
6. Remove the product from the oven.
WARNING!!
In the event of a power failure, all switches
should be turned off and no attempt should
be made to operate the appliance until powĆ
er is restored.
In the event of a shutĆdown of any kind, alĆ
low a five (5) minute shutĆoff period before
attempting to restart the oven.
NOTE: Units with casters - If the oven is moved, the
restraint must be reconnected after the oven
is returned to it's normal position.