
Programming instructions

OPERATION & CALIBRATION
1-31
PROGRAMMING SEQUENCE
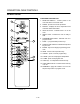
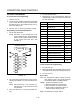
1. Press the ENTER key (9). The display reads
CODE and the program lamp lights.
2. Enter the code sequence 1Ć7Ć8Ć0 to activate the
programming mode. PIC1 will be displayed.
3. Press the PROD key (7) to be programmed.
4. Key in the desired temperature if different than that
shown in the display. Press the ENTER (9) key.
5. Key in the time desired if it is different than that
shown in the display. Press the ENTER (9) key.
PIC1 will be displayed.
NOTE: A steady : indicates time in minutes:secĆ
onds. A flashing : indicates time in
hours:minutes. To change the timing
mode, press the R TIME key (13).
6. Repeat steps 3-7 for up to seven programs.
7. Press the CNCL (11) key to exit the programming
mode and activate the automatic mode.
DISPLAY INDICATORS
ĆLOĆ the oven temperature is more than 15_F beĆ
low the set temperature. LO will be displayed
while the oven is preheating.
ĆHIĆ the oven set temperature is more than 15_F
above the set temperature.. ĆHIĆ will continue
to be displayed until the temperature returns
to to the set limits or exceeds the maximum
setting of 550_F.
EROR there is a temperature setting difference beĆ
tween two selected PROD keys (7).
HELP the temperature setting exceeds the maxiĆ
mum setting of 550_F. This will be shown as
an alternating HELP and PROB display.
PROB is displayed for the following conditions:
1. Defective temperature probe.
2. Stripped insulation on probe wires.
3. Poor connection of probe terminals.
4. Probe sensing temperatures above or
below the probe sensing range.
8888 an Intellitouch computer failure.
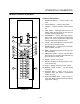
OPERATION
NOTE: Multiple product keys may be in operation at
the same time as long as the temperatures
within these programs are the same.
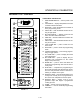
1. Turn SELECTOR SWITCH (1) to COOK.
2. The oven heats to the programmed setting of
PROD1 (7).
3. Press the desired PROD key (7).
4. When the READY (5) lamp lights, load the prodĆ
uct. Press a LOAD key (14) to initiate the timer.
NOTE: If the load key is pressed before the oven
temperature is within the ready range unĆ
desirable results may occur.
5. The lights associated with the selected product
and load keys illuminate.
6. When the program is complete the selected
product and load key lights flash and an audible
alarm sounds. Press the selected LOAD key (14)
to silence the alarm.
To cancel a load timer, press and hold the CNCL key
(11) and the selected LOAD key (12).
Press the R TEMP key (12) at any time to view the proĆ
grammed temperature setting.
Press the R TIME key (13) at any time to view the proĆ
grammed time setting.
Press the TEMP key (10) at any time to view the actual
oven temperature.