
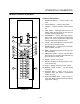
Programming instructions
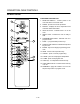
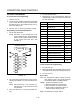

CONVECTION OVEN CONTROLS
1-28
CHAIN EVENT PROGRAMMING
NOTE: Program keys 1 and 2 can have up to six
events. Program keys 3Ć5 can have up to 4
events.
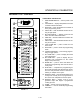
1. Press the PGM MODE ON/OFF key (13) to enter
the programming mode. PGM will blink. The norĆ
mal operation of the oven is halted.
2. Press the desired PGM # key (11) to select an
event chain to be programmed. The appropriate
PGM # will blink and remain lit. Event #1 time
and temperature are shown in the display. E1 is
displayed alternately with the temperature.
3. Rotate the TEMPERATURE dial (6) to set the
temperature.
4. Select LOFAN or HIFAN by pressing the COOK
HI/LO FAN key (9).
5. Select FAN CON or FAN CYC by pressing the
FAN CON/CYC key (12). CYC remains lit if cycling
fan is selected.
6. Rotate the TIME dial (5) to set the cook time.
NOTE: If the time is set to zero (0), the event is
ignored.
7. Press the EVENT # key (14). Event #2 time and
temperature are shown in the display. E2 is disĆ
played alternately with the temperature.
8. Set the desired temperature, fan speed, fan
mode and time.
9. Press the EVENT # key (14) to proceed to the
next event. Enter the event parameters as deĆ
sired. If HOLD mode is desired, it must be the last
event in any chain. Any events stored after a
HOLD mode will be ignored.
10. To program another chain of events, press a difĆ
ferent PGM # key (11) then press the EVENT #
key (14).
11. Store as many as five (5) programs using all the
PGM # keys.
12. Press PGM MODE ON/OFF (13) to exit the proĆ
gramming mode. PGM # disappears from the
display and normal oven operation resumes.
To add new programs or to change the parameters
of an existing program, repeat steps 1Ć12 as necesĆ
sary.
SELECTING A PROGRAM
1. To select a program sequence, press the desired
PGM # key (11). PGM # will be illuminated. At
this time the oven begins to heat up to the cook
temperature stored in the event #1 chain. EI is ilĆ
luminated and the E1 options are displayed. The
amount of time displayed is the sum total time of
all the programmed events.
2. Press the START TIMER key (7) to start a proĆ
grammed sequence of events.
3. Press the EVENT # key (14) to display the time
remaining in the current event chain. The time
will remain displayed for approximately 5 secĆ
onds.
4. Press the ACTUAL TEMP key (8) to display the
actual temperature within the oven.
5. Press the CANCEL key (15) to stop an active proĆ
gram sequence.
WARNING!!
A complete five minute shutdown must be
observed before the oven is relighted.