
Programming instructions


OPERATION & CALIBRATION
1-21
Cook with Pulse:
NOTE: PULSE light is on when pulse mode is on and
off when pulse mode is off.
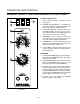
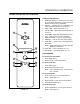
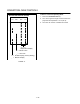
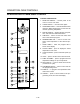
1. Turn the SELECTOR SWITCH (1) to the desired
position.
2. Enter cook time and cook temperature.
3. Press PULSE KEY (11). Enter the pulse time.
NOTE: Pulse time is a portion of the cook time
and does not increase the previously enĆ
tered cook time.
4. Load product into the oven.
NOTE: The display reads LOAD when the oven
is near the set temperature.
5. Push START/STOP KEY (7). The timer begins to
count down the cook time. The oven will be in
pulse mode for the set pulse time. Once the set
time has expired, the unit will automatically
switch to cook mode and continue counting
down.
6. When the cook timer reaches 00:00 the buzzer
sounds and the display reads DONE.
7. Push the START/STOP KEY (7) to turn the buzzer
off.
8. Remove the product.
WARNING!!
A complete five minute shutdown must be
observed before the oven is relighted.
2ND LEVEL PROGRAMMING
To Initiate Programming
1. Set the time to 1 minute.
0:01 01:00
2. Set the temperature to 151_F (66_C).
To Access Second Level Programming
1. Press and hold the TEMPERATURE key and the
START/STOP key simultaneously.
2. The control beeps and displays the software verĆ
sion for a few seconds.
3. The control then displays . The control has
entered the second level program.
To Change the Temperature Offset
1. Press the TEMPERATURE key.
2. The control displays or offset for a few secĆ
onds. It then displays the current offset which
should be 0_F or .
3. Rotate the DIAL to enter a 50_F (28_C) offset.
Use this to calibrate the oven if necessary.
To Set the Display Scales
1. Press the TEMPERATURE key.
2. The control displays the current setting from the
menu to the right. This menu controls 3 separate
parameters:
C.) The desired temperature scale (ie Celsius or
Fahrenheit)
D.) Electric or Gas oven
E.) The desired time display (ie hrs/min or min/
sec)
3. To adjust the setting turn the DIAL 1 click at a
time.