
Programming instructions


OPERATION & CALIBRATION
1-7
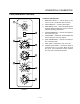
4. The top display reads SHLF. The bottom display
gives the numbers of the shelves that have been
assigned. Within five seconds the shelf with the
least amount of time remaining is displayed. The
led for the product with the least time remaining
flashes faster than the led for the other products.
NOTE: To view the remaining cook time for the
other products press and hold the SCAN
KEY (15). The bottom display cycles
through the remaining cook times for
each product. Only the led for the prodĆ
uct with the cook time displayed will be
lit.
5. When a cook time expires an alarm sounds. The
top display reads donE. The led for the finished
product lights. All other LEDS are dark.
6. Press the SHELF KEY (18) for the finished prodĆ
uct to silence the alarm. Remove the product.
Close the oven door. The TOP DISPLAY (2) reads
SHĆX for the shelf with the least amount of cook
time. The BOTTOM DISPLAY (4) counts down
the cook time for the other product.
7. When the cook time expires an alarm sounds
and the top display reads donE.
8. Press the SHELF KEY (18) to silence the alarm.
Remove the product.
Oven Cool Down:
1. Close the oven door. Press the COOL DOWN
KEY (8).
NOTE: Cool down cannot be activated with the oven
door open. Once the cool down cycle has beĆ
gun the doors may be opened to speed the
cooling process.
PROGRAMMING SINGLE STAGE RECIPES
Entering the Programming Mode:
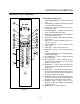
1. Press and hold the PROG KEY (10). The top disĆ
play reads CodE.
2. Use the product keys to enter the programming
access code: 3 1 2 4. Press the ENTER KEY (14).
The top display reads Prod.
3. Press the desired product key followed by the
ENTER KEY (14).
NOTE: During the programming process you may:
Press the TOGGLE/CLEAR KEY (11) to erase
the current setting or toggle between specifĆ
ic settings. Press the SCAN KEY (15) to move
to the next programming function keeping
the current setting the same. Press the PROG
KEY (10) to exit the programming mode.
Programming the Cook Time:
1. The top display reads P1:__. The bottom display
gives the current programmed cook time for
stage 1 in minutes:seconds. Press the TOGGLE/
CLEAR KEY (11). Use the product keys to enter
the new cook time. Press the ENTER KEY (14) to
save the new cook time.
2. The top display reads P2:__. The control is askĆ
ing for the cook time for stage 2 of this recipe.
Press the TOGGLE/CLEAR KEY (11) to enter a
time of 0:00:00 for P2:.
NOTE: This tells the controller that there are no
more stages for this recipe. Once a
single stage recipe has been estabĆ
lished the control will only allow entries
for one stage on all further parameters for
this product.
3. Press the ENTER KEY (14) again. The top disĆ
play reads P1:. The bottom display shows the
cook time.
4. Press the SCAN KEY (15) to advance the proĆ
gramming mode to cook temperature.
Programming the Cook Temperature:
1. The top display reads Ct-1. The bottom display
gives the current cook temperature. Use the
product keys to enter the desired cook temperaĆ
ture.
2. Press the SCAN KEY (15) to advance the proĆ
gramming mode to fan speed.
Programming the Fan Speed:
1. The top display reads SPd1. The bottom display
gives the current fan speed. Press the TOGGLE/
CLEAR KEY (11). The bottom display toggles beĆ
tween HI and Lo.
2. Press the SCAN KEY (15) to advance the proĆ
gramming mode to the fan cycle time.
Programming the Fan Cycle Time:
There are 3 options for fan cycle time: Pulse, Heat
and Full. Pulse allows the fan to turn on and off as
programmed. Heat allows the fan to operate with
heat only. Full provides continuous fan operation.