Enjoy your product! Our sincerest thanks for your purchase! --The team @ Blizzard Lighting Blizzard Lighting, LLC www.blizzardlighting.
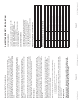
RokPix Manual Rev. A Page 2 A Quick DMX Lesson Keeping Your RokPix™ As Good As New Returns (Gasp!) Shipping Issues Tech Specs 5. Appendix Navigating The Control Panel Control Panel Menu Structure DMX Mode Master/Slave Mode Sound Active Mode Standalone (Program) Mode Manual Color Adjustment DMX Channel Values In-Depth Troubleshooting 4.
RokPix Manual Rev. A Page 18 © 2013 Blizzard Lighting, LLC This page intentionally left blank. 1/4/2013 J. Thomas RokPix Manual Rev. A Date: Author: Page 3 J. Thomas Last Edited: © 2013 Blizzard Lighting, LLC 1/21/2013 Date: Disclaimer: The information and specifications contained in this document are subject to change without notice. Blizzard Lighting™ assumes no responsibility or liability for any errors or omissions that may appear in this user manual.
RokPix Manual Rev. A Page 4 © 2013 Blizzard Lighting, LLC Caution! There are no user serviceable parts inside the unit. Do not open the housing or attempt any repairs yourself. In the unlikely event your unit may require service, please contact Blizzard Lighting at support@blizzardlighting.com. • Avoid direct eye exposure to the light source while it is on. • Never disconnect the power cord by pulling or tugging on the cord. • Make sure the power cord is never crimped or damaged.
RokPix Manual Rev. A Page 16 © 2013 Blizzard Lighting, LLC Damage incurred in shipping is the responsibility of the shipper, and must be reported to the carrier immediately upon receipt of the items. Claims must be made within seven (7) days of receipt. Shipping Issues We will, at our discretion, repair or replace the fixture. Please remember that any shipping damage which occurs in transit to us is the customer’s responsibility, so pack it well! 1.
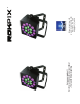
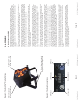
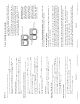
RokPix Manual Rev. A AC Power Out DMX Out © 2013 Blizzard Lighting, LLC AC Power In Menu Buttons Page 6 DMX In Dual Mounting Yokes & Adjustment/Locking Knobs High Power 4-in-1 Quad Color LEDs LED Display Figure 2: The Rear Connections Heavy-Duty Cast Aluminum Enclosure Figure 1: The RokPix™ Pin-Up Picture RokPix Manual Rev. A Page 15 © 2013 Blizzard Lighting, LLC In summary, since its design and evolution in the 1980’s DMX has become the standard for lighting control.
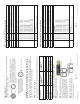
000 <--> 255 000 <--> 255 000 <--> 255 4 5 6 000 <--> 014 015 <--> 255 Check optical system and clean excess dust/grime. Also ensure that the 220V/110V switch is in the correct position, if applicable. Check to ensure fixture is operating under correct mode, IE sound active/auto/DMX/Etc., if applicable. Contact service for more info. Check to ensure proper setup of speed adjustment. Check fuse, AC cord and circuit for malfunction. Check that speed channels are set appropriately.
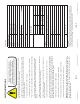
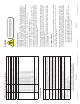
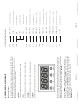
Pin 1 Pin 2 Pin 3 No Connection. No Connection. Ground/Shield DMX Data (-) DMX Data (+) Not Used. Not Used. No Connection. No Connection. Pin 3 Pin 2 Pin 1 5-Pin Male (Input) RokPix Manual Rev. A Page 8 Step 3: Connect other fixtures in the chain from output to input as above. Place a DMX terminator on the output of the final fixture to ensure best communication. Step 2: Connect the female connector of the DMX cable to the first fixture’s male connector (input).
Chnd and press the
RokPix Manual Rev. A Page 10 © 2013 Blizzard Lighting, LLC Press the