
Instruction Manual

Page 12
ToughPar Satellight Manual Rev. A © 2014 Blizzard Lighting, LLC
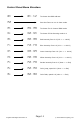
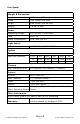
Adjust the Starting DMX Address
1.) To adjust the starting DMX channel, rst push the “A” button once so the
3rd (right) digit is ashing.
2.) Push the “B” button to adjust this digit to a value of 0-9.
3.) Repeating the same process, push the “A” button once so the 2rd (middle)
digit is ashing.
4.) Push the “B” button to adjust this digit to a value of 0-9.
5.) Repeating the same process, push the “A” button once so the 1st (left) digit
is ashing.
6.) Push the “B” button to adjust this digit to a value of 0-5.
7.) Pushing the “A” button once more will nalize your choice of the starting
DMX address with the value being in the range of 001-512.
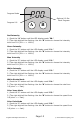
Slave Mode
1.) To set the xture in slave mode, press the “A” button until you reach “PSA”
on the LED display. This xture is now set to slave mode and will automatically
follow the rst unit in the DMX chain, aka the “Master”.
DMX Channel Mode
To set the xture to run in either 5-channel or 9-channel DMX mode:
1.) Push the “A” button until the LED display reads “PA-”.
2.) The right digit will be ashing. Use the “B” button to switch between the
choices of “5” or “9”.
Dimming Mode
The ToughPar Satellight features ultra smooth icker-free 32-bit dimming with 5
user-selectable dimming curves. To manually set the xture to use one of these
5 dimming curve choices, simply do the following:
1.) Push the “A” button until the LED display reads “PD-”
2.) The right digit will be ashing. Use the “B” button to switch between the
choices of dimming curve number 0-4.
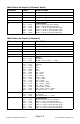
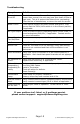
Built-in Programs
In built-in program mode, each of the 3 digits on the LED screen signify sepa-
tate meanings.
Left Digit: Shows “P”, for “Program Mode”
Middle Digit: Represents the built-in program 0-6.
Right Digit: Modies the selected program.