
Manual


Page 12
The Puck™ QFX Manual Rev. A Copyright (c) 2012 Blizzard Lighting, LLC
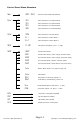
DMX Mode
Allows the unit to be controlled by any universal DMX controller.
1.)
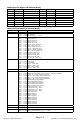
ThedefaultstartingDMXaddressforthextureis
A001
on the LED readout. To select a different starting DMX address, press
the <MENU> button, and then use the <UP/DOWN> buttons to navigate to
Addr
, and press the <ENTER> button. Then use
the <UP/DOWN> buttons to select the starting address you wish to use, and press the <ENTER>buttontoconrmyourchoice.
2.)
To select which Channel Mode you would like to use, press the <MENU> button, and then use the <UP/DOWN> buttons
to navigate to
CHnd
and press the <ENTER> button, and then use the <UP/DOWN> to select your choice of either 3/4/9/ or
16-channel modes. Press the <ENTER>buttontoconrmyourchoice.
Stand-Alone, Master/Slave Modes:
Allows a single or Master/Slaved units to run factory installed programs at user selectable speeds.
Master/Slave Modes
-Tosetthextureasthemasterunitoroneoftwoseparateslavesettings,navigateto
SLNd then <ENTER>. Then use the
<UP/DOWN> to buttons to navigate to either
NASt, SL 1, or SL 2. Press the <ENTER>buttontoconrmyourchoice.
Fixtures set to Slave Mode 1 will function exactly as the master unit does, while those in Slave Mode 2 will mirror it.
Sound Active Modes
-Tosetthexturetooneofit’s4individualsoundactivemodes,usethe<UP/DOWN> buttons to navigate to
SHnd, and press
the <ENTER> button. Then use the <UP/DOWN> buttons to navigate to
SOUN and press <ENTER>. Finally, use the <UP/
DOWN> buttons to navigate to either
SOU1, SOU2, SOU3, or SOU4. Press the <ENTER>buttontoconrmyourchoice
(See page 11, menu structure for descriptions).
Standalone (Program) Mode:
Allows a single unit to display a variety of colors and programs without a DMX controller.
1.)TosetthextureinAuto Mode 1 (full panel effects), use the <UP/DOWN> buttons to navigate to
SHnd, and press the
<ENTER> button. Then select
AUt1, and press the <ENTER> button.
2.) Then to adjust the speed use the <UP/DOWN> buttons to select from
SP 1 to SP 8. Then press the <ENTER> button
toconrmyourchoice.
3.)Toset the xture in Auto Mode 2 (4-pixel effects), use the <UP/DOWN> buttons to navigate to
SHnd, and press the
<ENTER> button. Then select
AUt2 and press the <ENTER> button.
4.) Then to adjust the speed use the <UP/DOWN> buttons to select from
SP 1 to SP 8. Then press the <ENTER> button
toconrmyourchoice.
Color Contol
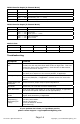
-Tosetthexturetooneofit’s15built-instaticcolors,navigateto
SHnd, and then CoLo and press the <ENTER> button.
Then to choose a color, use the <UP/DOWN> buttons to select from
Co 1 to Co15 (see the static color table on page
14). Press the <ENTER>buttontoconrmyourchoice.
Flash/Strobe
- To adjust the Flash Speed/Strobe, navigate to
SHnd, and then Stro and press the <ENTER> button. Then to adjust the
ashspeedusethe<UP/DOWN> buttons to select from
0 - 255. Press the <ENTER>buttontoconrmyourchoice.
Color Fade
- To adjust the fade settings, navigate to
SHnd, and then FAdE and press the <ENTER> button. Then to adjust the fade speed
use the <UP/DOWN> buttons to select from
SP 1 to SP 8. Press the <ENTER>buttontoconrmyourchoice.