MEZMERIzoR 4FX TM Blizzard Lighting, LLC www.blizzardlighting.
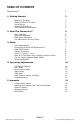
TABLE OF CONTENTS Mezmerizor™ 1 1. Getting Started 3 What’s In The Box? 3 Getting It Out Of The Box 3 Powering Up! 3 Getting A Hold Of Us 3 Laser Safety Requirements 4 2. Meet The Mezmerizor™ 5 Main Features 5 Laser Specifications 5 DMX Quick Reference 5 The Mezmerizor Pin-up Picture 6 3.
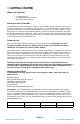
1. GETTING STARTED What’s In The Box? • 1 x Mezmerizor™ • 1 x Mounting bracket w/bolts • This Lovely User Manual Getting It Out Of The Box Congratulations on purchasing one way cool, way original RGB 3D Laser! Now that you’ve got your Mezmerizor™ (or hopefully, Mezmerizors!), you should carefully unpack the box and check the contents to ensure that all parts are present and in good condition.
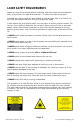
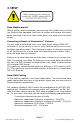
LASER SAFETY REQUIREMENTS Lasers are one of the coolest effects available, and when they are used appropriately, they will be fun, legal and harmless. To make sure that is the case... • Always set up and install all laser effects so that all laser light is at least 3 meters (9.8 feet) above the floor on which people can stand. • After setting up, and before public use, test laser to ensure proper function. Do not use if any defect is detected.
2.
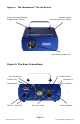
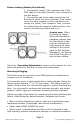
Figure 1: The Mezmerizor™ Pin-Up Picture Secure Mounting Bracket & Adjustment Screws Attractive Blue Colored Aluminum Casing Laser Output (Aperture) Figure 2: The Rear Connections Mic Sensitivity On/Off Switch Cooling Fan Microphone Dipswitches Mic Indicator DMX In DMX Out AC Power Input Mezmerizor™ Manual - Rev.
3. SETUP Fuse Replacement With a philips head screwdriver, unscrew the fuse holder from its housing. Remove the damaged fuse from its holder and replace with exact same type fuse. Insert the fuse holder back in its place and reconnect power. Connecting A Bunch of Mezmerizor™ Fixtures You will need a serial data link to run light shows using a DMX-512 controller or to run shows on two or more fixtures set to sync in master/slave operating mode.
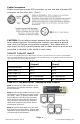
Cable Connectors Cables must have a male XLR connector on one end and a female XLR connector on the other end. (Duh!) CAUTION: Do not allow contact between the common and the fixture’s chassis ground. Grounding the common can cause a ground loop, and your fixture may perform erratically. Test cables with an ohm meter to verify correct polarity and to make sure the pins are not grounded or shorted to the shield or each other.
Fixture Linking (Master/Slave Mode) 1. Connect the (male) 3 pin connector side of the DMX cable to the output (female) 3 pin connector of the first fixture. 2. Connect the end of the cable coming from the first fixture which will have a (female) 3 pin connector to the input connector of the next fixture consisting of a (male) 3 pin connector. Then, proceed to connect from the output as stated above to the input of the following fixture and so on.
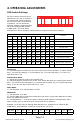
4. OPERATING ADJUSTMENTS DIP Switch Settings All of the various functions of the ON Mezmerizor™ are set up using the 10-position DIP switch located on the rear of the unit. Using this set of switches, you can select the different operating modes and also 1 2 3 4 5 6 7 8 set up the starting DMX channel in DMX mode.
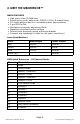
DMX Values In-Depth (15-Channel Mode) Channel Function Value Mode 2 Pattern Mode 4 5 6 Ch. 2 Set from 000-191 Ch.
Channel Function Value Description 000 028 056 084 112 140 168 196 224 252 <-> <-> <-> <-> <-> <-> <-> <-> <-> <-> 027 055 083 111 139 167 195 223 251 256 Single Pattern Mode (Channels 5 & 6 no Func) X Phase Y Phase X/Y Phase Together Zoom Phase Pattern 1 (No Sine), Pattern 2 (Sine Wave) Pattern 1 (No Zoom), Pattern 2 (Zoom) Pattern 1 (No Rotation), Pattern 2 (Rotation) Rotation Phase Pattern 1 (Adjustable X Position), Pattern 2 (Adjustable Y Position) Moving-X 000 128 161 193 225 240 248 <-> <->
No Light Output Check to ensure fixture is operating under correct mode, IE sound active/auto/ DMX/Etc., if applicable. Contact service for more information. No Power Check fuse, AC cord and circuit for malfunction. Blown Fuse Check AC cord and circuit for damage, verify that moving parts are not restricted and that unit’s ventilation is not obstructed No Response to Audio Verify that the fixture is in “Sound Active” mode. Adjust Audio Sensitivity, If Applicable.
Keeping Your Mezmerizor™ As Good As New The fixture you’ve received is a rugged, tough piece of pro lighting equipment, and as long as you take care of it, it will take care of you. That said, like anything, you’ll need to take care of it if you want it to operate as designed. You should absolutely keep the fixture clean, especially if you are using it in an environment with a lot of dust, fog, haze, wild animals, wild teenagers or spilled drinks.
Tech Specs! Weight & Dimensions Length 14.6 inches (37 cm) Width 12.6 inches (32 cm) Height 5.2 inches (13 cm) Weight 9.3 lbs (4.2 kg) Power Operating Voltage 110-250VAC, 50-60 Hertz Fuse 2A 250V Power Consumption 50W Light Source Laser Color Wavelength Power Output Red 650nm 100mW Green 532nm 50mW Blue 470nm 100mW White (all) 250mW Thermal Max. Operating Temp.
Enjoy your product! Our sincerest thanks for your purchase! --The team @ Blizzard Lighting