
User Manual
Page 12
Lil G™ Moving Head Spot - Rev. A (c) 2014 Blizzard Lighting, LLC
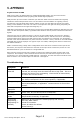
DMX Mode
Allows the unit to be controlled by any universal DMX controller.
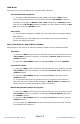
Set The DMX Starting Address
1.) To assign a DMX staring address to the xture, press the <ESC> button
until you reach the top menu level (and then use the <UP/DOWN> buttons if
necessary) to navigate to MENU1: Dmx 11CH, and press the <ENTER> button.
Then use the <UP/DOWN> buttons to display any value within the range of 001-
512, then push the <ENTER> button.
Slave Mode
1.) Connect xtures together via DMX, then set each xture to the same starting
DMX address.
2.) The rst xture in the DMX chain is the master xture, and the following
xtures will follow the master.
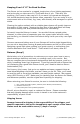
Auto, Stand-Alone, Sound Active Modes:
Allows single or M/S units to run factory installed programs at user selectable speeds.
Auto Mode
1.) Press the <ESC> button until you reach the top menu level (and then use the
<UP/DOWN> buttons if necessary) to navigate to Menu2: Test, and press the
<ENTER> button.
2.) Press the <UP/DOWN> buttons to highlight AUTO, then press <ENTER>.
Sound Active Mode
1.) Press the <ESC> button until you reach the top menu level (and then use the
<UP/DOWN> buttons if necessary) to navigate to Menu2: Test, and press the
<ENTER> button.
2.) Press the <UP/DOWN> buttons to highlight Sound, and then press the
<ENTER> button.
3.) You can then adjust the mic sensitivity level by returning to the top menu
level, and then in the same manner navigate to Menu4: Option > Sound, and
choose a mic level setting between the values of 000-255.
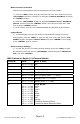
Manual Adjustments & Built-in Programs
1.) Press the <ESC> button until you reach the top menu level (and then use the
<UP/DOWN> buttons if necessary) to navigate to Menu3: Manual, and press
the <ENTER> button.
2.) Press the <UP/DOWN> buttons to highlight CH1-CH11, and then press the
<ENTER> button.
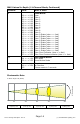
3.) Every option for CH1-CH11 uses the exact same values of 000-255 as listed
on the DMX chart on page 13.