
Owner's manual


Page 13
ICE 60 Manual Rev. B Copyright (c) 2012 Blizzard Lighting, LLC
Additional User Adjustments
To restore all settings to their factory defaults:
1) Use the “Load Data” function in the menu (see page 12).
Operation
Master/Slave Mode (Master Sound, Master Auto):
This mode will allow you to link up to 32 units together without a controller.
1) Use standard DMX cables to daisy chain your units together via the DMX connector on the rear of
theunits.Forlongercablerunswesuggestaterminatoratthelastxture.
2) Choose a unit to function as the Master. Turn dipswitches to the Master position on the unit. The
unitmustbetherstunitinline.ThensimplychaintheunitstogetherusingDMXcable.
Note: The master unit must be in one of the Auto or Sound modes. See the Menu Map for setting the
options in the menu and navigating the Control Board.
3) Adjust the “Operation” to “Slave” on the slave units, and they will react the same as the Master
unit.
Note: if you would like to have the xtures inverted, this can be set in the Control board.
DMX Mode
This mode allows the unit to be controlled by any universal DMX controller. If you are unfamiliar with
DMX, please read the DMX Primer section.
1) Set the menu to “Address.”
2)SetyourDMXstartingaddress,andhit<ENTER>toconrm.
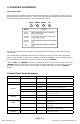
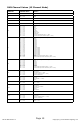
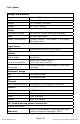
DMX Channel Values
TheICE60™has2DMXchannelproles(operationmodes).ThesecanbeaccessedintheControl
Board.
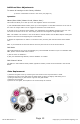
Gobo Replacement
1)Removethegobocoverbyremovingthetwoscrewsonthetopofthexturehead.
2) Remove the slot-n-lock gobo from the gobo wheel by lifting up slightly and sliding it out.
3) Using a small tool, pry the tension ring from the gobo holder.
4) Remove the old gobo.
5) Insert the new gobo, and replace in the reverse steps of removal.