Blizzard Lighting, LLC www.blizzardlighting.
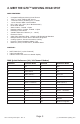
TABLE OF CONTENTS G70™ LED Moving Head Spot 1 1. Getting Started 3 What’s In The Box? 3 Getting It Out Of The Box 3 Powering Up! 3 Getting A Hold Of Us 3 Safety Instructions (Don’t Stick Your Hand In The Toaster!) 4 2. Meet The G70™ Spot 5 Features 5 DMX Quick Reference 5 The G70 Pin-up Picture 6 3.
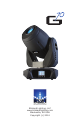
1. GETTING STARTED What’s In The Box? • • • • • 1 x G70™ Moving Head Spot An Ever-So-Handy Power Cord A Sweet Safety Cable & set of Mounting Brackets One really classy DMX cable This Lovely User Manual Getting It Out Of The Box Congratulations on your purchase of the amazing G70™ LED moving spot head.
SAFETY INSTRUCTIONS • Please keep this User Guide for future use. If you sell the unit to someone else, be sure that they also receive this User Guide. • ALWAYS make sure that you are connecting to the proper voltage, and that the line voltage you are connecting to is not higher than that stated on the decal or rear panel of the fixture. • This product is intended for indoor use only. • To prevent risk of fire or shock, do not expose fixture to rain or moisture.
2.
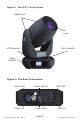
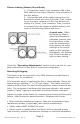
Figure 1: The G70™ Pin-Up Picture Head/Arms Lens Carry Handle LCD Readout Menu Buttons Figure 2: The Rear Connections Power Out Power Switch Power In Fuse Cover G70™ Moving Head Spot - Rev.
3. SETUP Fuse Replacement With a flat head screwdriver, wedge the fuse holder out of its housing. Remove the damaged fuse from its holder and replace with exact same type fuse. Insert the fuse holder back in its place and reconnect power. Connecting A Bunch of G70 Fixtures™ You will need a serial data link to run light shows using a DMX-512 controller or to run shows on two or more fixtures set to sync in master/slave operating mode.
Cable Connectors Cables must have a male XLR connector on one end and a female XLR connector on the other end. (Duh!) CAUTION: Do not allow contact between the common and the fixture’s chassis ground. Grounding the common can cause a ground loop, and your fixture may perform erratically. Test cables with an ohm meter to verify correct polarity and to make sure the pins are not grounded or shorted to the shield or each other.
Fixture Linking (Master/Slave Mode) 1. Connect the (male) 3 pin connector side of the DMX cable to the output (female) 3 pin connector of the first fixture. 2. Connect the end of the cable coming from the first fixture which will have a (female) 3 pin connector to the input connector of the next fixture consisting of a (male) 3 pin connector. Then, proceed to connect from the output as stated above to the input of the following fixture and so on.
Mounting Points Overhead mounting requires extensive experience, which includes calculating working load limits, knowledge of the installation material being used, and periodic safety inspection of all installation material and the fixture. If you lack these qualifications, do not attempt the installation yourself. Improper installation can result in bodily injury. Caution! Please be aware, you should have a qualified electrician performing all of your electrical connection needs.
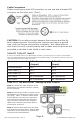
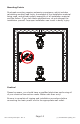
Clamp Mounting This fixture provides a mounting bracket assembly that secures the bottom of the base, the “Omega Brackets,” and the safety cable rigging point together. When mounting this fixture to truss, be sure to secure an appropriately rated clamp to the omega bracket using an M10 screw fitted through the center hole of the “omega bracket”. 1.) Clamp 2.) Omega Bracket 3.
4. OPERATING ADJUSTMENTS The Control Panel All the goodies and different modes possible with the G70™ are accessed by using the control panel on the front of the fixture. There are 4 control buttons below the LCD display which allow you to navigate through the various control panel menus. MENU Button
Control Panel Menu Structure Main Function Sub Function Selection What It Does... Address N/A 001 <-> 512 Sets the DMX address System Channel Mode Standard 14-Channel DMX Mode Reduced 11-Channel DMX Mode Extended Same as standard mode, reserved for future use. English English Language Language Manual Lamp Control Lamp Power Reset Channel Run Mode Option Chinese Language Turn on Reserved for future use, no function. Turn off Reserved for future use, no function.
DMX Channel Values In-Depth Reduced Mode Standard Mode Channel Value What it does 1 1 000 <-> 255 Pan ... 2 000 <-> 255 Pan Fine (16-Bit Pan) Tilt 2 3 000 <-> 255 ... 4 000 <-> 255 Tilt Fine (16-Bit Tilt) ...
DMX Channel Values In-Depth (Continued) Reduced Mode Standard Mode Channel Value 8 11 000 <-> 255 Focus (0% <--> 100%) 9 12 000 <-> 255 Dimmer (0% <--> 100%) 000 011 011 116 166 171 221 231 246 <-> <-> <-> <-> <-> <-> <-> <-> <-> 010 110 115 165 170 220 230 245 255 Strobe Closed Strobe (fast <-> slow) Open Ramp Up (slow <-> fast) Open Ramp Down (slow <-> fast) Open Random strobe effect Open 000 140 150 160 170 180 200 220 <-> <-> <-> <-> <-> <-> <-> <-> 019 149 159 169 179 189 219 255 Buil
Troubleshooting Symptom Solution Fixture AutoShut Off Check the fan in the fixture. If it is stopped or moving slower than normal, the unit may have shut itself off due to high heat. This is to protect the fixture from overheating. Clear the fan of obstructions, or return the unit for service. Beam is Dim Check optical system and clean excess dust/grime. Also ensure that the 220V/110V switch is in the correct position, if applicable.
5. APPENDIX A Quick Lesson On DMX DMX (aka DMX-512) was created in 1986 by the United States Institute for Theatre Technology (USITT) as a standardized method for connecting lighting consoles to lighting dimmer modules. It was revised in 1990 and again in 2000 to allow more flexibility. The Entertainment Services and Technology Association (ESTA) has since assumed control over the DMX512 standard. It has also been approved and recognized for ANSI standard classification.
Keeping Your G70 As Good As New The fixture you’ve received is a rugged, tough piece of pro lighting equipment, and as long as you take care of it, it will take care of you. That said, like anything, you’ll need to take care of it if you want it to operate as designed. You should absolutely keep the fixture clean, especially if you are using it in an environment with a lot of dust, fog, haze, wild animals, wild teenagers or spilled drinks.
Tech Specs! Weight & Dimensions Width 13.3 inches (341 mm) Depth 10.5 inches (265 mm) Height 21.5 inches (546 mm) Weight 33.1 lbs (15 kg) Power Operating Voltage 90-260VAC 50/60Hz (autoranging) Power Consumption 119w, 1.58a, pf:.61 Fuse 3A, 250V Light Source LED 70W (7* 10W) CREE® LED Source Optical Beam Angle 15 degree Luminous Intensity 45,300 Lux @ 1m | 8,300 Lux @ 2m Movement Range Pan 540 degrees Tilt 270 degrees Thermal Max. Operating Temp.
Enjoy your product! Our sincerest thanks for your purchase! --The team @ Blizzard Lighting