
Installation guide


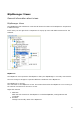

Installing BlipNet
3
7. Connect the BlipNodes to the LAN and connect power.
The BlipNodes will appear in the configuration view tree to the left in the BlipManager
main window. Initially the BlipNodes will pop up in the “Unconfigured” configuration
group folder.
8. Apply a configuration to a BlipNode.
Assuming that the BlipNode shall be used for Bluetooth terminals to access the
Internet, follow the steps:
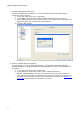
a. Right click on a BlipNode and select “Properties”.
b. The window “BlipNode Properties” will appear. In the “General” tab, find the list
box called “Configuration” and select “Server Node (All Services)”.
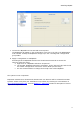
c. It's also recommended to change the friendly name of the BlipNode.
The system is now in operation.
Important: Maintenance releases and releases with new features will be released from BLIP
Systems. Please verify that your installation is up to date, by checking for new software on
http://www.blipsystems.com. Section BlipServer - Advanced contains a description of how to
upgrade the BlipNodes.