
Installation guide


1
Installing BlipNet
Getting Started
Follow these steps to get started:
1. Install BlipNet.
Please refer to the InstallationGuide.html for a description of the installation process.
2. Start the BlipManager.
a. Windows: Go to “Start->Programs->BlipNet->BlipManager”.
b. Linux: Go to ”Main Menu->Programs->BlipNet->BlipManager” or from a x-
terminal execute following file: /opt/blipnet/ blipmanager.bin (default location).
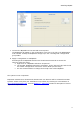
3. Login to the BlipManager.
a. When running the BlipManager locally on the same machine as the BlipServer,
only the password has to be supplied. The default password is “BLIPNET”.
b. When running the BlipManager on another machine than the BlipServer, the IP
address of the machine with the BlipServer must be supplied the first time you
login. Please see the Diagnostics section if you have problems connecting to the
BlipServer remotely.
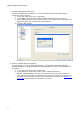
4. Uploading a License file.
If your BlipNet installation does not contain valid License file, you will be prompted to
upload one every time you start a BlipManager.
The BlipServer will not be able to communicate with any BlipNodes, unless a valid
license file is installed.
Select Yes to upload the License file you have received from BLIP Systems.