
Installation guide


HIGH POWER WALL CONNECTOR
12
INSTALLATION
STEP SEVEN - SET OPERATING CURRENT
1. Turn off the power.
WARNING: RISK OF ELECTRIC SHOCK! Before continuing, use a volt meter to
confirm that NO POWER is available at the service wiring or terminals.
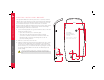
2. Open the front cover and hold it with one hand while completing the
next step.
CAUTION: Do not release the front cover and allow it to hang from the ribbon cable.
Doing so can cause damage to the ribbon cable’s connectors.
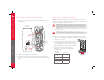
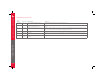
3. Adjust the dip switches to set the operating current based on the type
of breaker being used. Use a pointed non-conductive object such as a
plastic pen.
Test
Mode
40A
Breaker
50A
Breaker
60A
Breaker
70A
Breaker
80A
Breaker
90A
Breaker
100A
Breaker
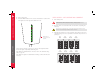
4. Turn on the power.
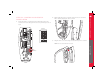
5. Hold the RESET button for five seconds. This button is located on the
lower right side of the High Power Wall Connector.
You should now hear the contacts close and see the High Power Wall
Connector’s lights sequentially illuminate green.
If the RED error light illuminates or flashes, refer to the Troubleshooting
table on page 14.
If the RED error light is not illuminated or flashing, continue with the next
two steps.
RESET button is
located on the lower
right side