
Installation guide
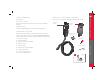


HIGH POWER WALL CONNECTOR
8
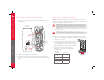
STEP TWO - INSTALL WALL BRACKET
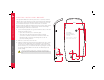
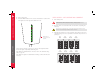
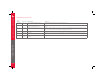
The High Power Wall Connector has provisions for 1” (25 mm) conduit on
either the back or the left side of its main enclosure. Refer to the illustration
on this page for dimensions. Whether brought in from the back or the side,
the conduit should always be located on the left side of a wall stud.
When mounting, the High Power Wall Connector’s 25’ (7.6 m) cable should
easily reach the charging port, located under the driver’s side tail light,
without straining the connections at either end.
1. Use the mounting template as a guide to mark the location on the wall
for the two mounting screws.
• Space the holes exactly 8
⁄” (214 mm) apart.
• The height of the bracket should ensure that the charging
connector is located at a maximum of 48” from floor level.* The
minimum height is 18” (46 cm) if mounting indoors, and 24”
(61cm) if mounting outdoors.
2. Drill two ⅜ ” (10.5 mm) holes in the wall.
3. Attach the wall bracket using fasteners appropriate for the type of wall
material. Use the supplied lag screws and washers only if mounting
to a two by four wooden wall stud. If mounting to another type of wall
(hollow, masonry, etc.), use fasteners that are long enough to securely
anchor the High Power Wall Connector and can withstand up to 80
pounds (36 kg).
*CAUTION: If installing in a public location, consider laws and regulations that
accommodate persons with disabilities (such as the ADA - American Disabilities
Act).
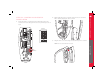
INSTALLATION
8.43”
214 mm
.87”
22 mm
2.24”
57 mm
6.18”
HIGH POWER
WALL CONNECTOR
MOUNTING TEMPLATE
(not to scale)
NOTE: Provision for 1" conduit on
either the back or the left side.
37 mm
1.44”
57 mm
2.23”
157 mm