
Installation guide


HIGH POWER WALL CONNECTOR
7
INSTALLATION
TOOLS REQUIRED
T20 torx driver
Hole saw (1 ¼ ” / 32 mm)
Ratchet wrench with 8 mm and 17 mm sockets, and a 2” (minimum)
extension
Sharp knife or razor
Voltmeter or Digital Multimeter (to measure AC power at the site)
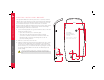
OVERVIEW OF STEPS
After running service wiring to the desired location using 1” (25 mm)
conduit as described on the previous pages, TURN OFF THE POWER
SUPPLY. Then follow these steps to install the High Power Wall Connector:
1. Check box contents.
2. Install wall bracket.
3. Prepare connector for installation.
4. Mount connector.
5. Connect wiring.
6. Confirm a successful installation.
7. Set operating current.
8. Secure cover and power up.
These steps are detailed next.
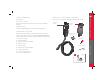
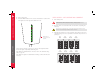
Wall Connector
assembly
Mounting
Bracket
M6 flange screws (2)
M10 lag screws and
washers (2)
INSTALLATION
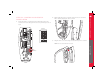
STEP ONE - CHECK BOX CONTENTS
If any of these components are damaged or missing, contact Tesla.
Ground wire
HIGH POWER
WALL CONNECTOR
Installation Guide