HIGH POWER WALL CONNECTOR INSTALLATION GUIDE
INFORMATION ABOUT YOUR TESLA VEHICLE IS AVAILABLE AT: www.teslamotors.com/mytesla To contact Tesla call 1-877-79TESLA (1-877-798-3752) For Roadside Assistance call 1-866-99TESLA (1-866-998-3752) © 2012 TESLA MOTORS, INC. All rights reserved. All information in this document and all MODEL S® software is subject to copyright and other intellectual property rights of Tesla Motors, Inc. and its licensors.
SAVE THESE IMPORTANT SAFETY INSTRUCTIONS This document contains important instructions and warnings that must be followed when installing and maintaining the High Power Wall Connector. WARNINGS: The High Power Wall Connector must be grounded through a permanent wiring system or an equipment grounding conductor. Do not install or use the High Power Wall Connector near flammable, explosive, harsh, or combustible materials, chemicals, or vapors.
PRODUCT SPECIFICATIONS All specifications and descriptions contained in this document are verified to be accurate at the time of printing. However, because continuous improvement is a goal at Tesla, we reserve the right to make product modifications at any time. FCC DECLARATION OF CONFORMITY This device complies with Part 15 of the FCC rules.
SPECIFICATIONS ............................................................................... 2 FEATURES ............................................................................................ 3 SERVICE WIRING - NORTH AMERICA ......................................4 SERVICE WIRING - EUROPE .........................................................6 INSTALLATION....................................................................................
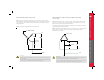
HIGH POWER WALL CONNECTOR SPECIFICATIONS The maximum rating for the High Power Wall Connector is 20 kW or 80 amps at 240 volts. Your vehicle will charge from 200 to 240 volts. Voltage and Wiring 120V ABOVE GROUND (common in North America) 230V ABOVE GROUND (common in Europe, Asia, and Australia) 240V AC single-phase: L1, L2, and safety ground 230V AC single-phase: LINE, NEUTRAL, and EARTH. 208V AC 3-phase, wye-connected: Any 2 phases, and safety ground.
For the fastest charging, using a circuit breaker rated for 100 amps is recommended. In certain home or office locations, this level of power isn’t readily available. Therefore, you can adjust the current setting on the High Power Wall Connector for 40 to 100 amp breakers (see page 12). SELF-MONITORING AND RECOVERY The High Power Wall Connector has a ground monitoring circuit that continuously checks for the presence of a safe ground connection and automatically recovers from faults.
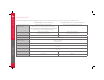
HIGH POWER WALL CONNECTOR SERVICE WIRING - NORTH AMERICA 4 120V ABOVE GROUND Ground connection For most branch circuits of 100A, use 3 AWG (26.7 mm2), 167°F (75°C) copper wire. Ground wiring can be a maximum of 4 AWG. If your ground wiring does not fit into the bus, use a wire nut or other suitable connection method. For installations less than 100A, use conductors that are sized according to local electrical codes. Always connect the Neutral at the service to Earth ground.
240V 3-Phase, delta-connected, with center tap on one leg With a wye-connected secondary, any two of the legs can be used to provide 208V to the High Power Wall Connector. For example, L1 and L2, or L1 and L3, or L2 and L3. The two used phases must each measure 120V to Neutral. With the delta connection, one leg must be center tapped, and only the two phases on either side of the center tap can be used. The two used phases must each measure 120V to Neutral.
HIGH POWER WALL CONNECTOR SERVICE WIRING - EUROPE 6 230V ABOVE GROUND Ground (Earth) connection For most branch circuits of 100A, use 3 AWG (26.7 mm2), 75°C (167°F) copper wire. For installations less than 100A, use conductors that are sized according to local electrical codes. Ground wiring can be a maximum of 4 AWG. If your ground wiring does not fit into the bus, use a wire nut or other suitable connection method. Always connect the Neutral line at the service panel to Earth.
INSTALLATION STEP ONE - CHECK BOX CONTENTS T20 torx driver If any of these components are damaged or missing, contact Tesla.
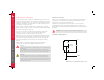
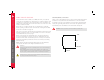
HIGH POWER WALL CONNECTOR STEP TWO - INSTALL WALL BRACKET The High Power Wall Connector has provisions for 1” (25 mm) conduit on either the back or the left side of its main enclosure. Refer to the illustration on this page for dimensions. Whether brought in from the back or the side, the conduit should always be located on the left side of a wall stud. 6.18” 157 mm When mounting, the High Power Wall Connector’s 25’ (7.
1. Using a T20 Torx driver, remove the two security screws from the bottom of the High Power Wall Connector. 3. Disconnect the ground wire from the terminal block and push it out of the way to avoid damaging it when completing the next step. 2. Release the front cover by pulling it towards you far enough to disconnect the ribbon cable. Disconnect the ribbon cable from inside the main enclosure to fully release the front cover.
HIGH POWER WALL CONNECTOR STEP FOUR - MOUNT CONNECTOR STEP FIVE - CONNECT WIRING 1. NOTE: For most branch circuits of 100A, use 3 AWG (26.7 mm2), 75°C (167°F) copper wire. For installations less than 100A, use conductors that are sized according to local electrical codes. Position the connector over the bolts on the mounting bracket as shown below. WARNING: Do not connect service wiring until you have read and fully understand the pages in this document titled “Service Wiring.
1. 2. While holding the front cover near the wall connector, re-connect the ribbon cable by aligning the cable, as shown. Set the dip switches, located in the lower right-hand portion of the connector, to the test setting shown here. Use a pointed object such as a pen. Test Mode HIGH POWER WALL CONNECTOR STEP SIX - CONFIRM A SUCCESSFUL INSTALLATION 3. Hang the front cover over the hinge located at the top of the connector. NOTE: Do not secure the front cover yet.
HIGH POWER WALL CONNECTOR INSTALLATION 12 4. Turn on the power. STEP SEVEN - SET OPERATING CURRENT 5. Hold the RESET button for five seconds. This button is located on the lower right side of the High Power Wall Connector. 1. Turn off the power. WARNING: RISK OF ELECTRIC SHOCK! Before continuing, use a volt meter to confirm that NO POWER is available at the service wiring or terminals. 2. Open the front cover and hold it with one hand while completing the next step.
1. Reposition the front cover over the unit, aligning the five tabs on the back of the front cover with their corresponding slots. Starting at the bottom and working upwards, press firmly on both sides of the front cover until it clicks into place. 2. Using a T20 torx driver, re-attach the two security screws that you removed in STEP THREE. 3. Turn on the power. YOU HAVE NOW FINISHED INSTALLING THE HIGH POWER WALL CONNECTOR. YOU ARE READY TO INSTALL THE CABLE DECK.
HIGH POWER WALL CONNECTOR TROUBLESHOOTING 14 TROUBLESHOOTING Green Lights Red Light What it means What to do Top light on Off Power on. High Power Wall Connector is powered, but not charging. Make sure the High Power Wall Connector is plugged into the car. Off 1 flash Ground fault. Electrical current is leaking through a potentially unsafe path. This should automatically reset in 15 minutes. If not, make sure nobody is touching the car, then press the RESET button.
MAINTENANCE & SUPPORT QUESTIONS? Always ensure that after charging, the charging cable is returned to the cable hanger and the charging connector is clear of the floor. Contact Tesla at 1-877-79-TESLA. Regularly inspect the High Power Wall Connector and charging cable for signs of damage. If damage is found, contact Tesla. The High Power Wall Connector contains no user-serviceable components. If the unit is not operating correctly, contact Tesla.
CONNECTOR LIMITED WARRANTY Subject to the exclusions and limitations described below, the Connector Limited Warranty covers the repair or replacement necessary to correct any manufacturing defects in the factory-supplied High Power Wall Connector that occurs under normal use for a period of 12 months from the date of invoice to the customer.
Tesla hereby disclaims any and all indirect, incidental, special and consequential damages arising out of or relating to the High Power Wall Connector, including, but not limited to, transportation to and from a Tesla Authorized Service Center, loss of High Power Wall Connector or vehicle value, loss of time, loss of income, loss of use, loss of personal or commercial property, inconvenience or aggravation, emotional distress or harm, commercial loss (including but not limited to lost profits or earnings),
notification sent to Tesla and/or all information required in such notification specified above, your desired resolution, and all receipts if requesting reimbursement. Upon receipt of your request, NCDS will contact you regarding the status of your case and provide you with additional details about the program. When NCDS receives your request, it will be forwarded to Tesla for response. After analyzing all information pertaining to your case, NCDS will schedule a technical evaluation if applicable.
3500 Deer Creek Road Palo Alto, CA 94304