
Operations Manual

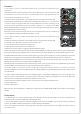
Table Of Contents

Functions:
1.Line input for CH A: Use combination XLR and 1/4” jack connector input balanced or
unbalanced.
2.MIC/LINE switch for CH A:Use the MIC position when a microphone is connected.Use the LINE
position when a line level source such as an audio mixing console,audio playback device,or
electronic musical instrument is connected.
3.Volume for CH A: Channel Volume control adjusts the gain on the particular channel CH A.
4.Bluetooth pairing button:Start to Bluetooth pairing if press this button for 2 - 3 seconds, in the
connection state, pressing this button will cancel the Bluetooth connection, and then you can
replace the device you want to pair. Press this button again for 2 - 3 seconds to turn off the
Bluetooth.LED indicates the status:litting said connected already,slow flash indicates the music is
playing,quick flash is means matching.
Bluetooth can be found automatically and be conn
ected automatically from second time.if no
connection,Bluetooth will be off automatically after 2 seconds.
5.Line input for CH B: Use combination XLR and 1/4” jack connector input balanced or
unbalanced.
6.Volume for CH B: Channel Volume control adjusts the gain on the particular channel CH B.
7.AUX IN:Use a 1/8” TRS cable to connect a line-level audio source.
8.Line in: Use RCA connector balanced or unbalanced.
9.Output: Use XLR connector balanced or unbalanced.
10.DSP Presets:Use this button to toggle through the 5 different settings.
FLAT:Recommended mode for general enterainment setup:wedding,party,clubbing etc,the perfect choice for CD player,MP3
player general music playback.Its flat frequency response allows you to freely adjust bass and high depending of your room.
ROCK:Recommended mode for live music,bands,guitar songs etc.The perfect setup for rock music,pushing to the front the
sound of the electric guitar,the strong and punch of the drums,taking off all superfluous frequencies such as low basses.
EXT SUB:The EXT MODE features same frequency specifications than the FL
AT mode but with a strong low cut filter
@80Hz.Select this mode if you are using an external SUBWOOFER.
ELECTRO:A balanced setup between bass,mid and high,in order to get a good balanced curve adjustment for your favorite
pop music.With a grain of medium and a grain of bass,your music will sound great.
VOICE:This mode is specially processed to bring high intelligibility and clear sound to a speaker voice using a
microphone.With a boost curve for medium frequencies and DSP adjusted selected frequencies,this mode also reduces risks of
Larsen feedback.
11.Limiter indicator: Illuminated just before the amplifer begins to clip and distort. Adjust the level control and signal level
from your source so this illuminates only briefly on peaks in the music. Using the system with this on all or much of the time
will result in poor sound quality and damage the speakers and electronics.
12.Power indicator: Illuminates when the unit is connection to the main supplys and switched on.
13.Power supply inlet.
14.Power supply switch.
Make sure ALL of your equipment is completely OFF and lower ALL VOLUME, LEVEL & GAIN controls before connecting the
speaker.
Connections:
1. For this unit you can connect a mixer,microphone or CD pLayer directly into your speaker. To connect a microphone use
XLR connector to connect to the INPUT1(1) and INPUT2 (5) input
.
2. You can LINK additional speakers using the OUTPUT(9) connection. The amplifier on your speaker will only power this
speaker. If you LINK to additional speakers those speakers must be self amplified.
3. Turn on your mixer/microphones or other signal source, then turn on your unit. Now you can adjust your volume controls to
a reasonable level.
1
2
3
4
5
6
10
7
8
9
11
12
14
13
K-pro12