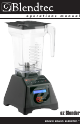
operat ions m a nua l ez Blender BRAWN. BRAINS. BLENDTEC.
Table Of Contents Section Page Section 1.....Important Safeguards 2 Section 2.....Component Overview 4 Section 3.....Unpacking 6 Section 4.....Installation 7 Section 5.....Operating Instructions 8 Section 6.....
SECTION 1 – IMPORTANT SAFEGUARDS Read all instructions carefully before using your Blendtec machine. 1.1 SAFETY CERTIFICATION The ez Blender and accessories are certified by ETL to UL standard 763 and by CE Standards. 1.2 HEALTH CERTIFICATION The ez Blender and accessories are certified by NSF International. R 1.3 AVOID CONTACT WITH MOVING PARTS ● Keep fingers, hands, hair and clothing away from all moving parts. ● Keep all utensils away from the drive socket and blender blades during operation.
1.7 THE 110/120 VOLT RECEPTACLE FOR EACH POWER UNIT MUST BE PROTECTED BY A SEPARATE 15 AMP CIRCUIT BREAKER OR FUSE. Do not use any other electrical equipment on the same circuit as the blender or you risk overloading the circuit and either damaging the blender electronics or blowing the circuit protection. 1.8 NEVER OPERATE IF THE UNIT APPEARS DAMAGED If the blender malfunctions call the service agent first.
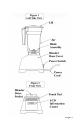
SECTION 2: COMPONENT OVERVIEW 2.1 BLENDER MOTOR The blender motor consists of the blender base, touch pad control, and Liquid Crystal Display (LCD) information center. (See Figures 1 and 2.) ● Motor housing: Houses the power unit in a plastic casing. Never remove the motor cover. Removal of the motor cover will void the warranty. ● Touch Pad: Consists of six buttons which contain pre-programmed settings as well as a pulse for selective blender control.
Page 5
SECTION 3: UNPACKING Save the two foam inserts and all packaging for future storage or shipping. Save these instructions for future reference. 3.1 UNPACKING YOUR BLENDER 1. You should have received the following items: ● Model ES3 Blender Base ● One or more blender jar with lids 2. Remove blender motor,blender jars and lids from carton. 3. Unwind the power cord. 4. Check for and remove any packing material which may have blocked ventilation holes in either the power unit or the black motor stand. 5.
SECTION 4: INSTALLATION 4.1 ez Blender Installation 1. Place blender base on a flat, clean, dry surface. 2. Make sure plug outlet is available within four feet of the motor base. 3. Plug the unit into a 120 volt receptacle with 15 amp protection. Make sure switch is turned off befor plugging in. Failure to use a dedicated line may result in damage to the blender. Lack of adequate power causes the motor to overheat (which shortens the life of the blender electronics.
SECTION 5: OPERATING INSTRUCTIONS 5.1 OPERATIONAL OVERVIEW 1. Turn on the main power switch located on the back of the blender. 2. Place the properly filled blender jar on the motor, making sure the jar is seated all the way down and jar lid is secured tightly on the jar. 3. Press the button on the touchpad of your desired blender cycle. 5.2 AUTOMATIC CYCLE OPERATION If not otherwise specified, Blendtec blenders are programmed to the default Multipurpose blender program.
A reading of “OVERLOAD” indicates an overload on the motor. Turn the motor off for 10 seconds (using the switch) then turn the motor on again to clear the overload condition. Check the blender jar for blockage. A reading of “LOW VOLTAGE” indicates not enough voltage coming to the motor. Turn the motor off. Correct the cause of low voltage. (Normally caused by more than one appliance drawing power on the same circuit, or by low power from a power source {brown out}.
● Increase cycle time. If the drink is mixing well but has not had enough time for complete blending, try a longer cycle (usually by using a higher button number to start the blender) or touch and hold the “Pulse” button for required extra blending time. ● Make sure the drive shaft on the jar is fully engaged into the drive socket or that the blade is firmly affixed to the drive shaft. TRIED EVERYTHING? If none of the preceding suggestions work, contact your Blendtec service agent for further assistance. 5.
5.7 DAILY CLEANING OF MOTOR 1. Make sure the main power switch is off and motor is unplugged before cleaning. 2. When necessary, wipe the metal top and sides of the blender motor clean with a damp rag. Mild cleaners like WINDEX® may be used. 5.8 WEEKLY CLEANING OF MOTOR (Done in addition to daily cleaning while motor is unplugged and removed from enclosure) 1. Fill the blender drive socket (see figure 1.2) with a strong cleaning solution such as 409® or Simple Green®. DO NOT OVERFILL.
SECTION 6: WARRANTY AND SERVICE PROCEDURE 6.1 WARRANTY DESCRIPTION Blendtec warrants the ez Blender base for 1 year or 5,000 cycles, whichever comes first. JAR: The polycarbonate jar and internal bearing assembly are warrantied against failure as follows: Jar Model 40-501 40-505 Warranty 180 days from purchase date 1 year from purchase date The jar model number can be found under the NSF logo on the jar. BLADES: The stainless steel blade are warrantied against breakage for the life of the jar.
6.2 SERVICE PROCEDURE Should you experience any difficulty in using your Blendtec blender, please do the following: UNDER WARRANTY 1. Contact your authorized Blendtec service agent immediately to diagnose the difficulty. Please have your serial number ready as well as a description of the problem. Do not attempt to do your own repairs. Repairs made by persons other than Blendtec authorized service representatives will void the warranty. Many issues can be resolved simply and quickly over the phone. 2.
1206 South 1680 West Orem, UT 84058 801-222-0888 www.blendtec.