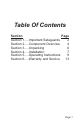
Table Of Contents Section Page Section 1.....Important Safeguards 2 Section 2.....Component Overview 4 Section 3.....Unpacking 6 Section 4.....Installation 7 Section 5.....Operating Instructions 8 Section 6.....
SECTION 1 – IMPORTANT SAFEGUARDS Read all instructions carefully before using your Blendtec machine. 1.1 SAFETY CERTIFICATION The Xpress and accessories are certified by ETL to UL standard 763 and by CE Standards. 1.2 HEALTH CERTIFICATION The Xpress and accessories are certified by NSF International. R 1.3 AVOID CONTACT WITH MOVING PARTS ● Keep fingers, hands, hair and clothing away from all moving parts. ● Keep all utensils away from the drive socket and blender blades during operation.
1.7 THE 220/240 VOLT RECEPTACLE FOR EACH POWER UNIT MUST BE PROTECTED BY A SEPARATE 7.5 AMP OR GREATER CIRCUIT BREAKER OR FUSE. Do not use any other electrical equipment on the same circuit as the blender or you risk overloading the circuit and either damaging the blender electronics or blowing the circuit protection. 1.8 NEVER OPERATE IF THE UNIT APPEARS DAMAGED If the blender malfunctions call the service agent first.
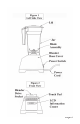
SECTION 2: COMPONENT OVERVIEW 2.1 BLENDER MOTOR The blender motor consists of the motor, touch pad control, and Liquid Crystal Display (LCD) information center. (See Figures 1 and 2.) ● Motor housing: Houses the power unit in a plastic casing. Never remove the motor cover. Removal of the motor cover will void the warranty.
Page
SECTION 3: UNPACKING Save the two foam inserts and all packaging for future storage or shipping. Save these instructions for future reference. 3.1 UNPACKING YOUR BLENDER 1. You should have received the following items: ● Model ES3 Blender Base ● One or more blender jar with lids 2. Remove blender motor,blender jars and lids from carton. 3. Unwind the power cord. 4. Check for and remove any packing material which may have blocked ventilation holes in either the power unit or the black motor stand. 5.
SECTION 4: INSTALLATION 4.1 Xpress Installation 1. Place blender on a flat, clean, dry surface. 2. Make sure plug outlet is available within four feet of the motor base. 3. Plug the unit into a 220/240 volt receptacle with 7.5 amp protection. Make sure switch is turned off before plugging in. Failure to use a dedicated line may result in damage to the blender. Lack of adequate power causes the motor to overheat (which shortens the life of the blender electronics.
SECTION 5: OPERATING INSTRUCTIONS 5.1 OPERATIONAL OVERVIEW 1. Turn on the main power switch located on the back of the blender. 2. Place the properly filled blender jar on the motor, making sure the jar is seated all the way down and jar lid is secured tightly on the jar. 3. Press the button on the touchpad of your desired blender cycle. 5.2 AUTOMATIC CYCLE OPERATION Buttons 1-5 are programmed cycles designed for various drink combinations.
the on position. ● Unplug, then re-plug in the power cord. ● Determine if the numbers on the Liquid Crystal Display (LCD) indicator are lighted. An absence of lighted LCD indicates a lack of power to the microprocessor. ● Check the LCD: A reading of “OVERTEMP” indicates an overheated condition has been detected and the motor has been disabled until the unit cools to operating temperatures. Unplug motor and allow motor to cool for at least 20 minutes.
BLENDED TEXTURE UNSATISFACTORY: If the blended texture of product is lumpy or uneven, do the following: ● Make sure the mixture is not cavitating during the cycle. Cavitation is a condition in which the blender blade spins freely in an air pocket within the drink mix because the mix is too cold or too solid.
5.6 LONG-TERM SANITATION OF JAR 1. For long-term sanitation, periodically fill the blender jar with hot tap water. 2. Add non-chlorine sanitizer according to manufacturer’s specifications. 3. Empty water/sanitizer mixture. Store jar as described in section 5.5. 5.7 DAILY CLEANING OF MOTOR 1. Make sure the main power switch is off and motor is unplugged before cleaning. 2. When necessary, wipe the top and sides of the blender clean with a damp rag. Mild cleaners like WINDEX® may be used. 5.
● For long term storage of jar, apply a small amount of food-grade oil (such as vegetable oil) to the seals around the blade assembly both inside and outside of the blender jar.
SECTION 6: WARRANTY AND SERVICE PROCEDURE 6.1 WARRANTY DESCRIPTION Blendtec warrants the Xpress for 1 year. JAR: The polycarbonate jar and internal bearing assembly are warrantied against failure as follows: Jar Model 40-501 40-505 Warranty 180 days from purchase date 1 year from purchase date The jar model number can be found under the NSF logo on the jar. BLADES: The stainless steel blade is warranted against breakage for the life of the jar.
6.2 SERVICE PROCEDURE Should you experience any difficulty in using your Blendtec blender, please do the following: UNDER WARRANTY 1. Contact your authorized Blendtec service agent immediately to diagnose the difficulty. Please have your serial number ready as well as a description of the problem. Do not attempt to do your own repairs. Repairs made by persons other than Blendtec authorized service representatives will void the warranty. Many issues can be resolved simply and quickly over the phone. 2.
Page 15
1206 South 1680 West Orem, UT 84058 801-222-0888 www.blendtec.com OWN-CE-002 Manual for Xpress Blender Rev.