
Owner's Manual

PART# BRX-2021
Blend
fflount-
®
Erad:snso=
Innovative
Mounting
Solutions
S
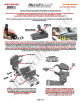
TEP
3 -
Wh
en the mount
is
positioned as far forr-
ward
as
it
will go, tighten the clamp screw untill the
Top
and
Mid
Seaions are sllghtly snug around the mirror
stem.
You
should
still be able
to
rotate the mount.
STEP
4 - Rotate the mount
so
it
is
parallel with the
bottom
of
the mirror. lighten the clamp screw untill the
mount
is
securely
attached
to
the
mirror stem.
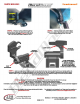
ROTATING
ADJUSTMENT
CLAMP SCREW MUST
BE SUGH11.Y LOOSENED
BEFORE
MAKJNO
ROTATING
ADJUSTMENT
BE SURE TO RETIGKTEN
AFTER ADJUSTMENT
IS
MADE
STEP
5 - Install your radar detec:klr onto the mount. Use the
adJuatmenta
shawn above
ID
adjust the
RD
ID
your
deal
red
poattlon.
We
recommend
adjusting the
RD
aa close to the bottom
of
your mirror
aa
you can.
Be
sure
to
tighten all adjustment screws
after
the adjust-
menta are made. For the Pivot adjustment, grab the long arm
of
the
allen wrench for
maximum
leverage.
You
wlll not strip the threaded
holes
In
the aln:raft grade alumlnum.
CAUTION
DO NOT use this mount If It Interferes with the adjuatablllty or the
oparaUon
of
your rear view mirror
In
any
way.
DO NOT use this maunt
If
the radar detector
c:reatea
an
unsafe viewing obstruction.
DO
NOT ATTEMPT
TO
MODIFY THIS
PRODUCT.
Consult
the
manufacturer
for
assistance.
All BlendMount products are accompanied with detalled lnatallatlon Instructions and adjustment
Ups.
You
are encouraged to contact cuatomeraer flce@blend-
mount.com or call J28 Design at 1-888-497-«iBB for further assistance.
Check the BlendMount
Forum
for Installation
Ups
and acme vehicle spectnc Installs. Your feedback
Is
very Important
ID
us. Please email any questions or
www.blendmount.com comments you have
to
cuatome1'98rvlce@blendmounlcom
Innovative De
sig
n
And
Precision Manufacturing
PAGE20F2
BlendMount- US PATENT# D625,580 S, 0656,811 S, 0653,980 S
and other patanta pending