
User Guide
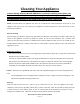
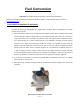
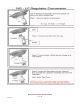

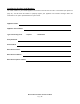
Table Of Contents
- USE & CARE GUIDE
- ATTENTION:
- I. Safety and Installation Warnings 4-7
- II. Location of Appliance 8-9
- i. Electrical Safety and Installation Warnings 10-11
- III. Gas Safety and Installation Warnings 11-12
- IV. Gas Leaks 13
- i. Checking for Gas Leaks 13-15
- ii. Unpacking Unit 15-16
- V. Gas Connections 16
- i. Natural Gas Requirements 16
- ii. Liquid Propane Gas and Tank Requirements 16-18
- iii. Transporting and Storing LP Gas 17-18
- VI. Installing the Appliance in an Island 19-22
- i. Outdoor Kitchen Ventilation 20-21
- ii. Building Specifications + Instruction 21-23
- iii. Installation Diagrams 23-24
- VII. First Time Operation 25
- i. Lighting the Appliance 25-26
- ii. Manually Lighting the Appliance 26-27
- iii. Flame Adjustment 27
- VIII. Cleaning your Appliance 28-29
- IX. Fuel Conversion 30-32
- Do not attempt to heat unopened containers on the griddle as pressure may build up and cause the container to explode.
- Never use charcoal or any other solid fuel in the griddle.
- Never cook without the drip pan in place.
- Never operate this griddle while under the influence of alcohol or drugs.
- Never place your fingers inside the observation openings in the griddle plate during removal or replacement of the griddle plate as they could be pinched. Never place your fingers inside the observation openings in the griddle at any time as injury co...
- Location of Appliance
- Gas Safety and Installation Warnings
- IMPORTANT: Never connect the appliance to an unregulated gas supply.
- Installation must conform with local codes or in the absence of local codes, to the National Fuel Gas Code, ANSI Z223.1/NFPA 54 and Natural Gas Installation Code, CSA B149.1. All Natural Gas installations must conform to local codes or in the absence ...
- Leak Testing
- NEVER USE AN OPEN FLAME TO CHECK FOR LEAKS.
- Never place your fingers inside the observation openings in the griddle plate during removal or replacement of the griddle plate as they could be pinched. Never place your fingers inside the observation openings in the griddle at any time as injury co...
- Never place your fingers inside the observation openings in the griddle plate during removal or replacement of the griddle plate as they could be pinched. Never place your fingers inside the observation openings in the griddle at any time as injury co...
- Natural Gas Requirements
- Liquid Propane (LP) Gas and Tank Requirements
- Installing the Appliance in a BBQ Island
- FIRST-TIME OPERATION
- Cleaning Your Appliance
- Fuel Conversion
- Warranty Registration
- Improper Maintenance, high cooking temperatures, excessive humidity, chlorine, fertilizers, lawn pesticides, chemicals, and salt can affect the Stainless Steel components and for these reasons, the warranties DO NOT COVER DISCOLORATION, SURFACE RUST, ...
- Locating the Product Serial Number:
- Blaze Product Registration
- Blaze Outdoor Products, Warranty Registration, 6620 Greenwell Springs Rd.
- Baton Rouge, LA 70805

Blaze Outdoor Products Instructional Book
Page | 33
Fuel (Gas) Conversion Instructions for BLAZE Gas Griddles
CAUTION: This should only by performed by a licensed gas professional.
Main Burners:
1.
Remove the griddle plate to expose the main
burners in the appliance. There is a single screw holding
the griddle plate to the housing located below the rear exhaust/flue cover in the middle of the griddle
plate.
2.
On the bottom rear of each burner is a cotter pin. Remove cotter pin. (unless they were removed prior to
installation into an outdoor kitchen)
3.
To remove burner, pull rod upwards and slide burner toward the rear of the appliance. Repeat for each
burner.
4.
Where the burner was previously located, connecting to the main valve through the hole in the basin should
now be empty space.
5.
Inside the space you will find the end of the valve (toward the front of appliance), with an orifice (brass
fitting), screwed into the end of the valve stem.
6.
Carefully remove the orifice with a 6mm socket set and extension. (These are extremely fragile! When
unscrewing, be extremely gentle, for you could easily break the brass fitting and have to replace the valve).
7.
Once the old orifice is removed, replace it with the new orifice, (repeat for all burners). When re-installing
the orifice, do not over tighten or you will strip the brass fitting. Very little pressure is needed!!!
8.
Inspect burners for proper flame appearance. The ideal flame appearance is one that is mostly blue and not
lifting off of the burner surface. There is an air shutter found at the end of the burner (close to the valve)
which can be either opened or closed to make adjustments to the flame's appearance. To adjust, remove
the burner from the appliance and loosen the Philips head screw holding the air shutter to the burner. If the
flame is yellow, open the air shutter to make the flame bluer. If the flame is lifting off of the burner surface,
slightly close the air shutter. Re-tighten the Philips head screw and re-install the burner to recheck the flame
appearance. Repeat if necessary.