
Manual


23
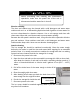
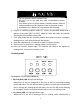
temperature probe on the evaporator. When the green LED flashes, the unit is
working in the ice making mode controlled by a fixed timer.
3. Harvest (Yellow) LED: Ice harvest indicator light
When this is lit, the unit is working in the ice harvest mode controlled by the
ice-full probe.
4. Mode button: Mainly for service. When this is pressed, the ice making mode
changes to the ice harvest mode or vice versa. The mode can be judged from
the status of the green and yellow LEDs.
5. Adjust button: Mainly for service. When it is pressed over 3 seconds, the unit
will enter the Ice Size Adjustment mode. The mode can be judged from the
status of the yellow LED.
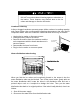
Ice Size Adjustment Guide:
1. Press and hold the “Adjust” button for at least 3 seconds. The unit will enter the
Ice Size Adjustment mode. The “HARVEST” LED (yellow) will be blinking
continuously during the ice size adjustment. Release the button when the
“HARVEST” LED blinks continuously to adjust the ice size.
2. While in the Ice Size Adjustment mode, press the “Clean” (-) button or the
“Mode” (+) button for the desired ice size.
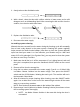
Smaller ice setting:
By pressing the “Clean” (-) button, you can decrease the size of the ice cubes. The
“ICE” LED (green) will flash as you lower the ice size and will finally be blinking at
the setting of smallest ice size.
Larger ice setting:
By pressing the “Mode” (+) button, you can increase the size of the ice cubes. The
“BIN FULL” LED (red) will flash as the larger size is set and will blink when the
setting of largest ice size has been reached.
After 10 seconds without any operation, the unit will return to the previous mode.
NOTE:
• If during the ice size adjustment mode the “BIN FULL”, “ICE” and “HARVEST”
LEDS blink all at once, this indicates that the unit is in the regular (middle)
setting of the ice size.
• When the machine is in the cleaning stage or ice full stage, the ice size
adjustment mode cannot be accessed.