
Manual


13
the use of a condensate pump is recommended.
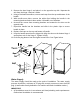
4. Pour 1 gallon of water into the ice storage bin to check for leaks in the drainage
system. Tighten any connections that leak.
NOTE: The above installation refers to a standard “gravity drain” scenario
where gravity will allow the water draining from the unit to flow naturally into
the onsite drain. Should the installation require draining which is unable to
be satisfied by this method, any aftermarket condensate pump could be
used in conjunction with this ice maker to drain the water.
IMPORTANT: This ice maker is not a freezer. Insufficient
drainage will cause a high rate of melting in the ice storage bin.
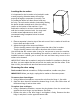
Installation Types
This ice maker has been designed for Mobile (free-standing) installation. However,
it can also be Enclosed (as under a cabinet) or Built-in (sealed to the floor). In all
cases, there must be adequate air space around the unit for ventilation.
Mobile installation:
A mobile installation will allow you to install the ice maker free-standing in any
place you desire provided you have access to a water supply. You must follow the
stated instructions for
a. Electrical requirements
b. Water supply
c. Leveling the ice maker
Enclosed Installation:
An enclosed installation will allow you to install the ice maker under a cabinet or in
a kitchen cabinet provided the required clearance space around the ice maker is
respected. This installation has the same requirements as a mobile installation.
Built-in installation:
If this method of installation is chosen, it will still be necessary to allow adequate
ventilation space around the unit. The following additional items must be observed.
1. Place ice maker in front of installation location. Place the unit flat on the floor or
on a platform depending on your installation requirements.
2. The water supply line must be plumbed before connecting to the ice maker.
3. Turn on main water supply and tap. Check for water supply connection leaks.
Tighten every connection (including connection at the water inlet).
4. If the electrical outlet for the ice maker is behind the cabinet, plug in the ice
maker.
5. Push the ice maker into position.