
Manual


11
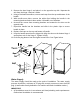
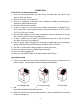
3. Remove the door hinge 2 and place it on the opposite top side. Separate the
axis from the hinge 2 and set it aside.
4. Using a flat head screwdriver, remove end caps from the top and bottom of the
handle.
5. With needle nose pliers, remove the white clips holding the handle in the
mounting brackets and set them aside. Lift handle out of brackets.
6. Unscrew the screws from mounting brackets and reattach to the door on the
opposite side.
7. Reposition handle into the brackets and slide in the plastic clips to secure
handle in place.
8. Replace end caps on the top and bottom of handle.
9. Keep the handle apart from the hinge side. Align the door on the bottom hinge 1
and replace axis on the hinge 2. Tighten it firmly.
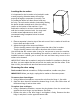
10. Push the plug buttons into the original screw holes. See Figure below.
Water Supply
The water supply should be ready at the point of installation. The water supply
pressure should be a minimum of 15 psig with a static pressure not more than 80
psig. (A wall outlet directly behind the ice machine will make installation easier.)
IMPORTANT:
1. All installations must be in accordance with local plumbing code requirements.
Professional installation is recommended.