Your DAB+ Radios Contents Contents ....................................................................................................... 2 Introduction................................................................................................... 2 Safety Instructions............................................................................................3 Your DAB+ ..................................................................................................... 4 What Is DAB+..................
Safety Instructions Please ensure that you read all of the safety instructions before using this unit. Safety Considerations Position the power cable and other connected cables so that they are not likely to be walked on, pinched or where items can be placed on or against them. Do not use the unit in humid or damp conditions. Do not allow the unit to get wet. Never allow children to insert foreign objects into holes or slots on the unit.
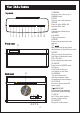
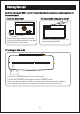
Your DAB+ Radios 1.STANDBY Press to start,press to go to STANDBY mode. 2.SCAN Press to scan radio channels. 3.MODE Press to select DAB or FM radio and AUX input. Top view 1 2 3 4 5 6 7 8 9 10 11 12 4.MENU Press to view channel/time/ date/RDS. 5.ALARMS Press to setup alarm . 6.PRESET Press to store and preset radio stations . Front view 13 7/9. / Back /Press to store and preset radio stations ,or Next/Previous music 8.ENTER Press to confirm the selection. Play/ Pause in Bluetooth mode 10/11.
What Is DAB+ Digital DAB+ was developed in Europe by a consortium of broadcasters and manufactures. DAB+ uses digital compression techniques to transform the source material, i.e. music and speech,into better quality audio. Interference free reception Analogue systems suffer from an effect called "multipath distortion". This is caused because waves do not behave in a orderly fashion, but bounce and reflect off buildings etc.
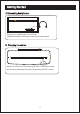
Getting Started Carefully remove your DAB+ receiver form the box.(we recommend you keep the package for future reference.) 1.Connect the power 2.Exetend the telescopic aerial Connect the power adaptor provided to the unit and then connect to you wall outlet and turn on the power. Extend the telescopic aerial for the best reception possible 3.Turning on the radio 1.Press the STANDBY button to turn on the radio. 2.Press the STANDBY button again to enter STANDBY mode.
Getting Started 4.Connecting headphones Connect your headphones to the 3.5mm headphone socket on the back of the unit as shown above. 5. Changing the volume Adjust the volume level by pressing the VOL+ button to increase the volume or decrease the volume by pressing the VOL- button.
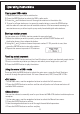
Operating Instructions Playing your DAB+ radio 1.Please make sure your unit is switched on. 2.Press the MODE button to select the DAB+ radio mode. 3.Press the << and << buttons to scroll through the stations in the station list. 4.To scan for all new stations or to rescan for weak stations, press the SCAN button and the radio will scan and store all available stations. We recommend scanning for new stations every so often to pick up any newly launched digital radio stations.
Operating Instructions Dynamic range control(DRC) adds or removes a degree of compensation for the differences in the dynamic range between radio stations. 1.Press the MENU button to access the main menu. 2.Press the << and << button until DRC is displayed. 3.Press the ENTER button to confirm. 4.Using the << and << buttons to select off ,low or high to prune and then press the ENTER button to confirm.
Operating Instructions Playing your FM radio To switch f r om DAB+ to FM , press the MODE button to select the FM mode. Auto tune 1.Press the SCAN button to automatically search for the next available frequency. 2.If you find the reception is poor, use the Manual tuning option to fine tune station or make sure your aerial is adjusted accordingly. Alarm setting Setting ALARM1 or ALARM2 is simple, when you follow the below steps: 1.
Operating Instructions Snooze function The alarm will stop sounding and will sound again after a 9 minutes period. Brightness function Press the SNOOZE button to cycle through the 10 light setting. AUX connection The radio has an auxiliary input. This can be used to connect an external source such as MP3 players and other audio sources by using the included 3.5mm cable. 1. Press the MODE button to select the AUX mode. 2. Connect the 3.5mm cable to your radio and to your external device. 3.
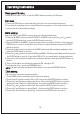
Warning/Troubleshooting/Technical Specifications If a fault occurs, first check the points listed below before taking the set for repair. If you are unable to remedy a problem by following these hints ,consult you retailer or service centre. WARNING: Under no circumstances should you try to repair the set yourself ,as this would void your guarantee. Troubleshooting All electrical and electronic products must not be disposed of with household waste.
Warranty Please keep your receipt as proof of purchase. This products is warranted for any defect in materials or workmanship for 1year after the original date of purchase. This product is for normal domestic & office use only. This warranty does not cover damage from misuse or neglect, accidental damage, vermin infestation,excessive voltages such us lightning or power surges or any alternation that affects the performance or reliability of the product.