Español English
1
TABLE OF CONTENTS Overhead DVD System . . . . . . . . . . . . . 3 Infrared remote control overview . . . . . . . 5 English Notes for the user . . . . . . . . . . . . . . . . . 7 Precautionary measures . . . . . . . . . . . . . 7 Safety Notices . . . . . . . . . . . . . . . . . 7 Supplied parts . . . . . . . . . . . . . . . . . . . . 8 Installing the unit . . . . . . . . . . . . . . . . . . . 9 Connections . . . . . . . . . . . . . . . . . . . . . 11 General Information . . . . . . . . . . . . . . .
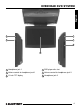
OVERHEAD DVD SYSTEM 10 11 14 8 1 9 5 13 4 7 6 12 2 3 1 Switch for interior lighting 2 Reset button (located on base) 3 Monitor auto power ON/OFF (located on base) 4 DVD: next chapter; VCD/CD/MP3: next track menu: move cursor upwards 5 EJECT Eject disc 6 DISC IN A disc is inserted 7 3 DVD: previous chapter; VCD/CD/MP3: previous track menu: move cursor downward 8 PLAY/PAUSE Play the disc, pause (freeze frame) 9 Source Select A/V source (DVD, AV1, AV2) 10 AV2 11 AV1 AV 1 input se
English OVERHEAD DVD SYSTEM 5 2 6 1 4 3 1 Headphone jack 1 4 DVD player disc slot 2 Volume control for headphone jack 1 5 Volume control for headphone jack 2 3 10 inch TFT display 6 Headphone jack 2 4
INFRARED REMOTE CONTROL OVERVIEW 1 12 2 9 13 3 4 14 5 15 16 6 17 7 8 18 19 11 10 5 20
INFRARED REMOTE CONTROL OVERVIEW POWER Turn system power on / off 13 REPEAT Selects repeat mode 2 0 - 9 Numeric key buttons 14 3 PLAY/PAUSE SLOW Slow motion play (only for DVD) 4 STOP 15 Fast forward / fast reverse 16 OK Confirms selection 17 DISP Display time information (during playback) 18 SETUP Display the SETUP menu of MONITOR Settings (e.g. brightness, contrast, etc.
NOTES FOR THE USER Thank you for choosing a Blaupunkt product. We hope you enjoy using this new piece of equipment. Please read these operating instructions before using the equipment for the first time. • Avoid using the monitor in environments where it is subjected to dust, dirt or moisture. Precautionary measures Blaupunkt recommends having all your video products installed by an authorized dealer.
SUPPLIED PARTS 1 Overhead DVD System 1 Mounting Plate English 1 Trim Ring 1 Remote Control 1 Power supply cable (5 m) with fuses 5 Rubber Caps 1 User Manual Mounting Hardware Technical data, design and supplied parts may vary slightly due to product updating 8
INSTALLING THE UNIT Select a suitable location for secure installation of the unit. • The unit must not distract the driver or restrict the driver’s view. • The ability to enter and get out of the vehicle must not be impeded. • The unit must not be installed in such a way that could prevent the other vehicle components from functioning properly (e.g. sliding sunroof). • Make sure that the unit is installed in a safe and secure position and that it cannot become detached in the event of an emergency stop.
INSTALLATION English Mounting Plate SelfTapping Screws Trim Ring Dome Light Trigger Switch Rubber Caps 10
INSTALLATION Marking the installation area. Power supply connections 1. Carefully pry the two transparent covers of the interior lights off the unit from the outside using a screwdriver. This allows access to the two front mounting screw holes.
INSTALLATION Initial operation The IVOD1002 has two built-in lamps that can be connected to the interior lighting system of the vehicle. Connect the white lead to the interior lighting circuit. Set the dome light trigger switch to the correct position for your application (see installation diagram). 1. Reconnect the vehicle battery. Audio/video inputs “AV 1 IN” and “AV 2 IN” 4. Fold down the display screen of the multimedia unit.
GENERAL INFORMATION Confidential unpublished works. 1992-1997 Dolby Laboratories. All rights reserved. Disc formats CAUTION: Any inappropriate use of the device may expose the user to visible/invisible laser rays which exceed the limits for Class 1 laser products. Do not open the unit and do not attempt to repair it yourself. Refer servicing to qualified personnel. Copyright protection This product incorporates copyright protection technology that is protected by method claims of certain U.S.
GENERAL INFORMATION Disc cleaning Use a dry soft cloth to wipe the surface of a disc. If the disc is especially dirty, use a soft cloth slightly moistened with isopropyl (rubbing) alcohol. Never use solvents such as benzine, or conventional record cleaners as they may mar the surface of the disc. Preparing new discs with rough spots Avoid leaving fingerprints on the disc when handling it. Always store discs in their protective cases. Always ensure that discs are clean and dry before inserting.
BASIC OPERATION Switching on/off TFT display To switch on the system: Opening the display - Switch on the ignition. - Press the POWER button on the system or the remote control. - Press the unlocking button for the display and pull the screen carefully downward. To switch off the system: - Press the POWER button on the system or the remote control. Do not touch the display screen itself! This can damage the LCD panel. Or: - Switch off the ignition.
BASIC OPERATION - Press the Monitor Setup button once or several times to call up the display settings. - Press the or buttons to change the value of the setting. Press OK button to exit the display mode. Brightness - Set the brightness to between 0 and 32 Color saturation- (AV1/AV2 only) - Set the color saturation to between 0 and 32. Contrast - Set the contrast to between 0 and 32. Color balance- TINT (AV1/AV2 only) - Set the color balance to between 0 and 32.
BASIC OPERATION Video CDs with PBC (playback control) Video CDs with PBC can be played with or without a menu: - Press the MENU button to select between playback with or without PBC. Pause (still picture) - Press the button during playback. - Press the button once again to resume normal playback. Fast forward/reverse - Press the playback.
BASIC OPERATION Press the DISP button during playback to display different time information on the screen of the disc that is playing. Press DISP for the fourth time: TITLE 02 / 05 01 : 14 : 39 CHAPTER 001 / 027 English Time displays Example: DVD: - Press DISP once: The following information is shown on the screen: Press DISP for the fifth time: The message on the screen will be cleared.
BASIC OPERATION TITLE button If the DVD has multiple titles recorded, you can select the preferred title from the title menu to start playback. - Press the TITLE button during playback. - The title menu is displayed. - Move the cursor to the desired title with the cursor buttons or . - Confirm your selection by pressing the ENTER button. Selecting audio language DVD: - Press the AUDIO button once or more than once during playback to select the desired audio soundtrack language.
Make sure that the MP3 files have a file format designation of .mp3. Note: The folder cannot be selected in this mode. Two different modes of MP3 playback are available: - WITH MENU - NO MENU Repeat file/directory - REPEAT The playback mode can be set in the SETUP menu under “PREFERENCES” WITH MENU WITH MENU In this mode the display shows all the MP3 folders of the disc on the left and the file names of the folder currently opened on the right.
ADVANCED OPERATION - In order to start the slide show with a particular image from the folder currently selected, enter the number which appears after the image in the navigation menu using the numeric key buttons and press the ENTER button. JPEG image CDs The DVD player supports the display of JPEG images. Ensure that the JPEG images have a file format designation .jpg. JPEG image CD playback Notes: JPEG images can be recognized by the camera symbol to the left of the file name.
ADVANCED OPERATION Image overview (digest mode) - Press MENU. English - Up to nine thumbnail JPEG images are displayed on the screen. - The images are assigned to the numeric key buttons on the remote control as follows: 1 2 3 4 5 6 7 8 9 - You can select the next/previous nine thumbnail images in the current directory using the and buttons. - Press one of the numeric key buttons (1 to 9), in order to see the image in full screen image mode.
SETTINGS Setup Menu Main page In STOP mode: - Press the SETUP button. - The initial SETUP menu is displayed. - Select the preferred item by using the / buttons. - Press the ENTER button to confirm your selection. The following options are available: • GENERAL SET-UP This includes TV display & audio output. For details please refer to the General setup menu. • SPEAKER SET-UP This changes the audio output from DOLBY AC3 5.1 DOWNMIX to 2 channel mode. Please refer to Speaker set-up menu.
SETTINGS DOWNMIX This is to select the Dolby AC3 5.1 Downmix mode for the analog output. Audio set-up menu OP MODE The operating mode for the Dolby Digital decoder cannot be changed. The mode is always set to LINE MODE. DUAL MONO - Select the desired Dual mono mode for 1+1 coded Dolby Digital programs. - STEREO: Stereo-reproduction 1+1 program. CH1 for left channel, CH2 for right channel. - CH1 MONO: CH1 Mono-reproduction. CH1 in both Left/Right output. - CH2 MONO: CH2 Mono-reproduction.
Replacing the remote control batteries. Open the battery compartment on the back of the remote control. Remove the discharged batteries. Insert two AAA Alkaline batteries. Note the correct polarity (marked inside the battery compartment). Close the battery compartment. Changing bulbs Carefully pry the transparent cover of the interior lights off the unit using a small screwdriver. Replace the bulbs with the same type (12 V/2 - 3 W). Snap the cover closed.
TROUBLESHOOTING Symptoms Possible cause / remedy Player does not work when switching on ignition and pressing the POWER button. Check fuses (unit and vehicle) and connections (see mounting instructions). • Press the RESET button (see page 16). The remote control does not work. Change the batteries in the remote control. • Replace the batteries with two AAA Alkaline batteries. The infrared lens on the remote or the unit is covered by objects or dirty. • Clean the infrared lenses with a damp cloth.
GLOSSARY Dolby Digital JPEG (Joint Photographic Expert Group) Dolby Laboratories audio compression technology that allows up to 6 channels (Right, Left, Center, Surround Right, Surround Left and Subwoofer) in one audio stream (AC3). Most DVDs contain Dolby Digital audio. JPEG images are bitmapped images that use a compression method in order to save memory space.
• PG-13 (Parental Guidance 13): allowed for viewing by children over 13 with parental supervision VFD (Vacuum Fluorescent Display) • R (Restricted): parental supervision or the accompaniment by an adult is mandatory TFT (Thin Film Transistor) • NC-17: contents unsuitable for children under 17 This DVD player is equipped with a multicolor display with adjustable brightness. A technology for manufacturing large, high resolution LCD flat-screen displays (e.g. computer monitors, LCD TVs, etc.).
SPECIFICATIONS Model IVMR-1002 Screen size (Diagonal): 10" Monitor Screen resolution: 800 (H) x 3 (RGB) x 480(V) Active area: 216.0 (H) x 129.6 (V) Signal system: Dual system NTSC/PAL Brightness: 300 cd/m2 Contrast ratio: 400:1(Typ.) Viewing angle: Left/right: 55/55 degrees Up/down: 35/50 degrees Video input level: 1.0 Vpp ± 10 % Audio input level: 0.3 Vrms Humidity for normal operation: 10%~75% Carrier frequency for IR sensor: L-CH: 2.3 MHz R-CH: 2.
For twelve (12) months after delivery to you, the original consumer purchaser, we will repair or at our option replace at no charge to you any car audio product which, under normal conditions of use and service, proves to be defective in materials or workmanship. However, this warranty does not cover expenses incurred in the removal or reinstallation of any car audio product, whether or not proven defective, and does not cover products not purchased from an authorized Blaupunkt dealer.