In Car Video IVMS-5802 IVMS-6502 Operating and installation instructions http://www.blaupunkt.
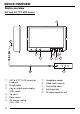
DEVICE OVERVIEW Device overview 5.8" and 6.5" TFT-LCD screen 1 9 V I DEO CH 8 6 10 2 3 4 5 6 14 5.8"/ 6.5" TFT LCD screen for headrests On/off switch Key for screen menu display (OSD menu) Up menu Down menu AV channel setting (AV1 - AV2 - ...
General information ............... 16 Operation ...................................... 22 Important notes ............................. 16 Safety notices ............................... 16 IR remote control ................... 23 Accessories ............................ 17 Specifications ........................ 24 NEDERLANDS ITALIANO Connection diagram ............ 109 SVENSKA Monitor installation ......................... 17 Prepare the working area .............. 17 Mark out the dimensions ...
NOTES General information Thank you for choosing a Blaupunkt product. We hope you enjoy using this new piece of equipment. Please read these operating instructions before using the equipment for the first time. The Blaupunkt editors are constantly working on making the operating instructions clearer and easier to understand. However, if you still have any questions on how to operate the device, please contact your dealer or the telephone hotline for your country.
Accessories supplied Monitor installation - Note: It is recommended that the fitting is carried out at a specialist workshop. NEDERLANDS SVENSKA Note regarding VIDEO IN/AUX: Only use original Blaupunkt accessory 7 607 001 510. Or else use a mono plug. Note: Take appropriate action to ensure that the headrest is not damaged while fitting the monitor.
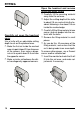
FITTING Open the headrest and remove filling and other items ➮ Carefully lift the covering material away from the cut area. ➮ Adjust the cutting depth of the knife Carefully cut open the headrest cover Use a knife with an adjustable cutting depth to cut out the planned area. ➮ Make the first cut inside the marked area at a point about 0.5 cm from one of the corners, then make a diagonal cut to a point about 0.5 cm from the opposite corner.
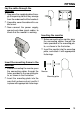
FITTING DEUTSCH Lay the cable through the headrest ➮ Now pass the supplied cables throu- ESPAÑOL Monitor PORTUGUÊS Mounting plate DANSK the connecting cables through the holes provided in the mounting plate, as shown in the illustration. ➮ Insert the mounting plate into the area that has been cut out, and fix it in place with appropriate fastenings.
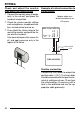
FITTING Adapter cable for a direct connection to an AV source ○ ○ ○ Video out ○ ○ ○ ○ Digital AV out in ○ DVD - Player (IVDP-01) ○ ○ ○ ○ rarily in the cut-out, and place the headrest into position. ➮ Check the various monitor settings such as brightness, headphone function, volume control and so on. ➮ Then attach the Velcro strips to the rear of the monitor, and push the frame onto the headrest. Take care not to press the screen itself, and apply pressure only in the region of the frame.
Negative (ground) connection Removal Attach the negative cable (earth/GND) directly to the vehicle body using a screw. Scratch the surface down to the bare metal at the point at which the ground is made. • If the installation requires holes to be drilled or any other changes to be made to the vehicle, please contact a specialist workshop in your area. ➮ To remove the screen, insert the ex- FRANÇAIS traction tool between the screen and the mounting plate.
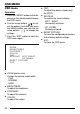
OSD MENU OSD menu Operation ➮ Press the “MENU” button on the display or on the remote control to open the OSD menu. ● Use the arrow buttons / to select the options and after you press the MENU button you can use the / to change the arrow buttons settings. ➮ Press the “EXIT” option to close the OSD menu again.
IR REMOTE CONTROL DEUTSCH IR remote control 3 MUTE 4 VOL CH 5 NEDERLANDS 6 FRANÇAIS POWER TV/VIDEO ITALIANO 2 SVENSKA MENÜ ESPAÑOL IVRC-06 PORTUGUÊS 1 POWER On/off button for the monitor. 2 TV/VIDEO No function. 3 VOL • arrow button Increase the volume for the selected monitor. VOL • arrow button Decrease the volume for the selected monitor. 4 MUTE Mute the volume of the loudspeakers inside the monitor.
SPECIFICATIONS Specifications 5.8" screen System: NTSC/PAL auto switch Power supply / consumption: 12 V direct current, ± 10%, <900 mA Standby: < 1 mA Video input level: 1 Vpp, 75 ohms Audio input level: 0 - 0.3 Vrms, 20 Hz - 20 kHz Operating temperature: -20° C to +60° C Storage temperature: -30° C to +80° C Screen size (diagonal): 5.8" (14.
SPECIFICATIONS DEUTSCH 6.5" screen NTSC/PAL auto switch Power supply / consumption: 12 V direct current, ± 10%, <900 mA Standby: < 1 mA Video input level: 1 Vpp, 75 ohms Audio input level: 0 - 0.3 Vrms, 20 Hz - 20 kHz Operating temperature: -20° C to +60° C Storage temperature: -30° C to +80° C Screen size (diagonal): 6.5" (16.
1 out CDC CDC-A08 IDC-A09 DANSK 4 PORTUGUÊS RCA-Y-Cable C1-4x Cinch AUX 2-in 2 3 RCA-Cable 1 4 1 1 ESPAÑOL SVENSKA 7 607 885 093 (1,3m) 7 607 886 093 (5m) 7 607 001 507 7 607 893 093 (0,35m) 7 607 001 508 Anschlusskabel/Additional Cables: Speakers 3 Preamp CDC AUX 2 in out in 2x Aux-in AV in NEDERLANDS Video 3 Audio L 3 Audio R 3 Video 2 Audio L 2 Audio R 2 Video 1 Audio L 1 Audio R 1 Digital out DVD - Player (IVDP-01) ITALIANO FRANÇAIS ENGLISH Front Monitor D1 Right Monito
Service-Nummern / Service numbers / Numéros du service aprèsvente / Numeri del servizio di assistenza / Servicenummers / Telefonnummer för service / Números de servicio / Número de serviço / Servicenumre Country: Phone: Fax: WWW: http://www.blaupunkt.