
Operation Manual

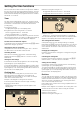
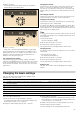
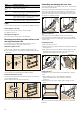
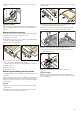
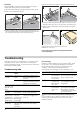
Table Of Contents
- [de] Gebrauchsanleitung 2
- Ø Inhaltsverzeichnis[de] Gebrauchsanleitung
- : Wichtige Sicherheitshinweise
- Diese Anleitung sorgfältig lesen. Nur dann können Sie Ihr Gerät sicher und richtig bedienen. Die Gebrauchs- und Montageanleitung für einen späteren Gebrauch oder für Nachbesitzer aufbewahren.
- Dieses Gerät ist nur für den Einbau bestimmt. Spezielle Montageanleitung beachten.
- Das Gerät nach dem Auspacken prüfen. Bei einem Transportschaden nicht anschließen.
- Nur ein konzessionierter Fachmann darf Geräte ohne Stecker anschließen. Bei Schäden durch falschen Anschluss besteht kein Anspruch auf Garantie.
- Dieses Gerät ist nur für den privaten Haushalt und das häusliche Umfeld bestimmt. Das Gerät nur zum Zubereiten von Speisen und Getränken benutzen. Das Gerät während des Betriebes beaufsichtigen. Das Gerät nur in geschlossenen Räumen verwenden.
- Dieses Gerät kann von Kindern ab 8 Jahren und Personen mit reduzierten physischen, sensorischen oder mentalen Fähigkeiten oder Mangel an Erfahrung oder Wissen benutzt werden, wenn sie von einer Person, die für ihre Sicherheit verantwortlich ist, b...
- Kinder dürfen nicht mit dem Gerät spielen. Reinigung und Benutzer-Wartung dürfen nicht durch Kinder durchgeführt werden, es sei denn, sie sind 8 Jahre und älter und werden beaufsichtigt.
- Kinder jünger als 8 Jahre vom Gerät und der Anschlussleitung fernhalten.
- Zubehör immer richtig herum in den Garraum schieben. Siehe Beschreibung Zubehör in der Gebrauchsanleitung.
- Brandgefahr!
- ■ Im Garraum gelagerte, brennbare Gegenstände können sich entzünden. Nie brennbare Gegenstände im Garraum aufbewahren. Nie die Gerätetür öffnen, wenn Rauch im Gerät auftritt. Das Gerät ausschalten und Netzstecker ziehen oder Sicherung im S...
- ■ Beim Öffnen der Gerätetür entsteht ein Luftzug. Backpapier kann die Heizelemente berühren und sich entzünden. Nie Backpapier beim Vorheizen unbefestigt auf das Zubehör legen. Backpapier immer mit einem Geschirr oder einer Backform beschwere...
- Verbrennungsgefahr!
- ■ Das Gerät wird sehr heiß. Nie die heißen Garraum-Innenflächen oder Heizelemente berühren. Das Gerät immer abkühlen lassen. Kinder fernhalten.
- ■ Zubehör oder Geschirr wird sehr heiß. Heißes Zubehör oder Geschirr immer mit Topflappen aus dem Garraum nehmen.
- ■ Alkoholdämpfe können sich im heißen Garraum entzünden. Nie Speisen mit großen Mengen an hochprozentigen alkoholischen Getränken zubereiten. Nur kleine Mengen hochprozentiger Getränke verwenden. Gerätetür vorsichtig öffnen.
- Verbrühungsgefahr!
- ■ Die zugänglichen Teile werden im Betrieb heiß. Nie die heißen Teile berühren. Kinder fernhalten.
- ■ Beim Öffnen der Gerätetür kann heißer Dampf entweichen. Gerätetür vorsichtig öffnen. Kinder fernhalten.
- ■ Durch Wasser im heißen Garraum kann heißer Wasserdampf entstehen. Nie Wasser in den heißen Garraum gießen.
- Brandgefahr!
- Verletzungsgefahr!
- Zerkratztes Glas der Gerätetür kann springen. Keinen Glasschaber, scharfe oder scheuernde Reinigungsmittel benutzen.
- Stromschlaggefahr!
- ■ Unsachgemäße Reparaturen sind gefährlich. Nur ein von uns geschulter Kundendienst-Techniker darf Reparaturen durchführen. Ist das Gerät defekt, Netzstecker ziehen oder Sicherung im Sicherungskasten ausschalten. Kundendienst rufen.
- ■ An heißen Geräteteilen kann die Kabelisolierung von Elektrogeräten schmelzen. Nie Anschlusskabel von Elektrogeräten mit heißen Geräteteilen in Kontakt bringen.
- ■ Eindringende Feuchtigkeit kann einen Stromschlag verursachen. Keinen Hochdruckreiniger oder Dampfreiniger verwenden.
- ■ Beim Auswechseln der Garraumlampe stehen die Kontakte der Lampenfassung unter Strom. Vor dem Auswechseln den Netzstecker ziehen oder Sicherung im Sicherungskasten ausschalten.
- ■ Ein defektes Gerät kann einen Stromschlag verursachen. Nie ein defektes Gerät einschalten. Netzstecker ziehen oder Sicherung im Sicherungskasten ausschalten. Kundendienst rufen.
- Brandgefahr!
- ■ Lose Speisereste, Fett und Bratensaft können sich während der Selbstreinigung entzünden. Vor jeder Selbstreinigung grobe Verschmutzungen aus dem Garraum und vom Zubehör entfernen.
- ■ Das Gerät wird während der Selbstreinigung außen sehr heiß. Nie brennbare Gegenstände, wie z. B. Geschirrtücher, an den Türgriff hängen. Vorderseite des Gerätes freihalten. Kinder fernhalten.
- Verbrennungsgefahr!
- ■ Der Garraum wird während der Selbstreinigung sehr heiß. Nie die Gerätetür öffnen oder den Verriegelungshaken mit der Hand verschieben. Das Gerät abkühlen lassen. Kinder fernhalten.
- ■ ; Das Gerät wird während der Selbstreinigung außen sehr heiß. Nie die Gerätetür berühren. Das Gerät abkühlen lassen. Kinder fernhalten.
- Gefahr schwerer Gesundheitsschäden!
- Das Gerät wird während der Selbstreinigung sehr heiß. Die Antihaftbeschichtung von Blechen und Formen wird zerstört und es entstehen giftige Gase. Nie antihaftbeschichtete Bleche und Formen bei der Selbstreinigung mitreinigen. Nur emailiertes Zub...
- Ursachen für Schäden
- Funktionswähler
- Tasten und Anzeigefeld
- Tasten zum Ändern der eingestellten Stufen
- Garraum
- Sonderzubehör
- Den Backofen erhitzen
- Zubehör
- Schnellaufheizung
- 1. Mit dem Funktionswähler die Schnellaufheizung J auswählen.
- 2. Die gewünschte Temperatur mit den Tasten @ und A auswählen.
- Ende der Schnellaufheizung
- Schnellaufheizung abbrechen
- Hinweis
- Die an der Zeitschaltuhr eingestellte Zeit ist abgelaufen
- Zeiteinstellung an der Zeitschaltuhr ändern
- Zeiteinstellung an der Zeitschaltuhr löschen
- Die Zeiteinstellungen abfragen
- Garzeit
- Endezeit
- 1. Funktionswähler einstellen.
- 2. Zweimal den Sensor 0 antippen.
- 3. Die Garzeit mit @ oder A einstellen.
- 4. Den Sensor 0 antippen.
- 5. Die Endezeit mit @ oder A auf später verschieben.
- 6. Den Sensor ºC antippen.
- Die Garzeit ist abgelaufen
- Die Ausschaltzeit ändern
- Ausschaltzeit löschen
- Die Zeiteinstellungen abfragen
- Uhrzeit
- 1. Taste 0 drücken.
- 2. Die Uhrzeit mit den Tasten @ oder A ändern.
- 3. Uhrzeit mit der Taste 0 bestätigen.
- Die Uhrzeit ändern
- Die Uhrzeit ausblenden
- Vor der Selbstreinigung
- Einstellung
- Nach der Selbstreinigung
- Beleuchtungsfunktion
- Gestelle aus- und einhängen
- Backofentür aus- und einhängen
- Türabdeckung ausbauen
- Türscheiben aus- und einbauen
- Ausbauen
- 1. Backofentür aushängen und mit dem Griff nach unten auf ein Tuch legen.
- 2. Abdeckung oben an der Backofentür abschrauben. Dazu die Schrauben links und rechts aufdrehen (Bild A).
- 3. Oberste Scheibe anheben und herausziehen und die beiden kleinen Dichtungen abnehmen (Bild B).
- 4. Halteklammern rechts und links aufschrauben. Scheibe anheben und Klammern von der Scheibe abnehmen (Bild C).
- 5. Dichtung unten an der Scheibe abnehmen (Bild D). Dabei die Dichtung ziehen und nach oben herausnehmen. Scheibe herausziehen.
- 6. Untere Scheibe schräg nach oben herausziehen.
- 7. Die Schrauben links und rechts auf dem Blechteil NICHT abschrauben (Bild E).
- Einbauen
- 1. Untere Scheibe schräg nach hinten einschieben (Bild A).
- 2. Mittlere Scheibe einschieben (Bild B).
- 3. Halteklammern rechts und links auf die Scheibe stecken, ausrichten, dass die Federn über dem Schraubloch sind und festschrauben (Bild C).
- 4. Dichtung unten an der Scheibe wieder einhaken (Bild D).
- 5. Oberste Scheibe schräg nach hinten in die beiden Halterungen einschieben. Achten Sie darauf, dass Sie dabei die Dichtung nicht nach hinten schieben (Bild E).
- 6. Die beiden kleinen Dichtungen links und rechts wieder auf die Scheibe stecken (Bild F).
- 7. Abdeckung aufsetzen und anschrauben.
- Fehlermeldungen
- Ausbauen
- Backofenlampe auswechseln
- Glasabdeckung
- Energie sparen
- ■ Verwenden Sie dunkle, schwarz lackierte oder emaillierte Backformen. Sie nehmen die Hitze besser auf.
- ■ Halten Sie die Backofentür während Sie Garen, Backen und Braten geschlossen.
- ■ Mehrere Kuchen backen Sie am besten nacheinander. Der Backofen ist noch warm. Dadurch verkürzt sich die Backzeit für den zweiten Kuchen. Sie können auch 2 Kastenformen nebeneinander einschieben.
- ■ Bei längeren Garzeiten können Sie den Backofen 10 Minuten vor Ende der Garzeit ausschalten und die Restwärme zum Fertiggaren nutzen.
- Heißluft eco
- Ratschläge und praktische Hinweise zum Backen
- Fleisch, Geflügel, Fisch
- Tipps zum Braten und Grillen
- Aufläufe, Soufflés, Toast
- Fertigprodukte
- Spezialgerichte
- Auftauen
- Dörren
- Einkochen von Marmelade
- Achtung!
- Zubereitung
- Programmierung
- Einkochen von Marmelade
- Die Einweckgläser aus dem Backofen nehmen
- Grillen
- Ú Table of contents[en] Instruction manual
- : Important safety information
- Read these instructions carefully. Only then will you be able to operate your appliance safely and correctly. Retain the instruction manual and installation instructions for future use or for subsequent owners.
- This appliance is only intended to be fully fitted in a kitchen. Observe the special installation instructions.
- Check the appliance for damage after unpacking it. Do not connect the appliance if it has been damaged in transport.
- Only a licensed professional may connect appliances without plugs. Damage caused by incorrect connection is not covered under warranty.
- This appliance is intended for domestic use only. The appliance must only be used for the preparation of food and drink. The appliance must be supervised during operation. Only use this appliance indoors.
- This appliance may be used by children over the age of 8 years old and by persons with reduced physical, sensory or mental capabilities or by persons with a lack of experience or knowledge if they are supervised or are instructed by a person responsi...
- Children must not play with, on, or around the appliance. Children must not clean the appliance or carry out general maintenance unless they are at least 8 years old and are being supervised.
- Keep children below the age of 8 years old at a safe distance from the appliance and power cable.
- Always slide accessories into the cooking compartment correctly. See "Description of accessories in the instruction manual.
- Risk of fire!
- ■ Combustible items stored in the cooking compartment may catch fire. Never store combustible items in the cooking compartment. Never open the appliance door if there is smoke inside. Switch off the appliance and unplug it from the mains or switch ...
- ■ A draught is created when the appliance door is opened. Greaseproof paper may come into contact with the heating element and catch fire. Do not place greaseproof paper loosely over accessories during preheating. Always weight down the greaseproof...
- Risk of burns!
- ■ The appliance becomes very hot. Never touch the interior surfaces of the cooking compartment or the heating elements. Always allow the appliance to cool down. Keep children at a safe distance.
- ■ Accessories and ovenware become very hot. Always use oven gloves to remove accessories or ovenware from the cooking compartment.
- ■ Alcoholic vapours may catch fire in the hot cooking compartment. Never prepare food containing large quantities of drinks with a high alcohol content. Only use small quantities of drinks with a high alcohol content. Open the appliance door with care
- Risk of scalding!
- ■ The accessible parts become hot during operation. Never touch the hot parts. Keep children at a safe distance.
- ■ When you open the appliance door, hot steam may escape. Open the appliance door with care. Keep children at a safe distance.
- ■ Water in a hot cooking compartment may create hot steam. Never pour water into the hot cooking compartment.
- Risk of fire!
- Risk of injury!
- Scratched glass in the appliance door may develop into a crack. Do not use a glass scraper, sharp or abrasive cleaning aids or detergents.
- Risk of electric shock!
- ■ Incorrect repairs are dangerous. Repairs may only be carried out by one of our trained after-sales engineers. If the appliance is faulty, unplug the mains plug or switch off the fuse in the fuse box. Contact the after-sales service.
- ■ The cable insulation on electrical appliances may melt when touching hot parts of the appliance. Never bring electrical appliance cables into contact with hot parts of the appliance.
- ■ Do not use any high-pressure cleaners or steam cleaners, which can result in an electric shock.
- ■ When replacing the cooking compartment bulb, the bulb socket contacts are live. Before replacing the bulb, unplug the appliance from the mains or switch off the circuit breaker in the fuse box.
- ■ A defective appliance may cause electric shock. Never switch on a defective appliance. Unplug the appliance from the mains or switch off the circuit breaker in the fuse box. Contact the after-sales service.
- Risk of fire!
- ■ Loose food residues, grease and meat juices may catch fire during the Self- cleaning cycle. Remove coarse dirt from the cooking compartment and from the accessories before every Self-cleaning cycle.
- ■ The appliance will become very hot on the outside during the Self-cleaning cycle. Never hang combustible objects, e.g. tea towels, on the door handle. Do not place anything against the front of the oven. Keep children at a safe distance.
- Risk of burns!
- ■ The cooking compartment will become very hot during the Self-cleaning cycle. Never open the appliance door or move the locking latch by hand. Allow the appliance to cool down. Keep children at a safe distance.
- ■ ; The appliance will become very hot on the outside during the Self-cleaning cycle. Never touch the appliance door. Allow the appliance to cool down. Keep children at a safe distance.
- Risk of serious damage to health!
- The appliance will become very hot during the Self-cleaning cycle. The non-stick coating on baking trays and tins is destroyed and noxious gases are released. Never let non-stick baking trays and tins go through the Self-cleaning cycle. Only enamelle...
- Causes of damage
- Function selector
- Sensors and display panel
- Sensors to change the set values
- Inside the oven
- Optional accessories
- Heating the oven
- Cleaning the accessories
- Rapid heating
- Cooking time
- End time
- Time
- Before using the self-clean function
- Setting
- After using the self-clean function
- Light
- Removing and refitting the wire shelves or left and right hand side rails
- Unhooking and hanging the oven door
- Removing the door covering
- Removing and installing the door panels
- Removal
- 1. Detach the oven door and lay it on a cloth with the handle facing down.
- 2. Unscrew the cover at the top of the oven door. To do this, unscrew the left and right screws (fig. A).
- 3. Lift the top panel up and pull it out and remove the two small seals (fig. B).
- 4. Unscrew the retaining clips on the right and left. Lift the panel and remove the clips from the panel (fig. C).
- 5. Remove the seal from the bottom of the panel (fig. D). Pull the seal and remove it up and out. Pull out the panel.
- 6. Pull the lower panel at an angle, upwards and out.
- 7. Do NOT unscrew the left and right-hand screws from the sheet metal part (fig. E).
- Installation
- 1. Insert the lower panel at an angle towards the back (fig. A).
- 2. Slide in the middle panel (fig. B).
- 3. Stick the retaining clips onto the right and left-hand side of the panel, aligning them so that the retaining carriers are over the screw holes, and then screw into place (fig. C).
- 4. Hook the seal in to the bottom of the panel again (fig. D).
- 5. Insert the uppermost panel at an angle to the back into the brackets. Take care not to push the seal to the back (fig. E).
- 6. Insert the two small seals on the left and right of the panel again (fig. F).
- 7. Put the cover back in place and screw it on.
- Error messages
- Removal
- Changing the oven bulb
- Protective glass panels
- Saving energy
- ■ Use dark, lacquered or black enamel baking tins. These are more efficient at absorbing heat.
- ■ Keep the oven door closed during cooking, baking and roasting cycles.
- ■ When baking several cakes, these should be preferably baked one after the other. The oven will still be hot, thereby reducing the cooking time for the second cake. Two rectangular baking tins can be placed side-by-side.
- ■ For long cooking times, the oven may be turned off 10 minutes prior to the specified time, allowing the item to continue to cook but taking advantage of the oven's residual heat.
- Hot air eco
- Suggestions and practical advice for baking
- Meat, poultry, fish
- Tips for roasting and grilling
- Au gratin dishes, soufflés, toast
- Convenience products
- Special dishes
- Defrosting
- Drying
- Jam making
- Grilling
- Þ Table des matières[fr] Notice d’utilisation
- : Précautions de sécurité importantes
- Lire attentivement ce manuel. Ce n'est qu'alors que vous pourrez utiliser votre appareil correctement et en toute sécurité. Conserver la notice d'utilisation et de montage pour un usage ultérieur ou pour le propriétaire suivant.
- Cet appareil est conçu pour être encastré uniquement. Respecter la notice spéciale de montage.
- Contrôler l'état de l'appareil après l'avoir déballé. Ne pas le raccorder s'il présente des avaries de transport.
- Seul un expert agréé peut raccorder l'appareil sans fiche. La garantie ne couvre pas les dommages résultant d'un mauvais raccordement.
- Cet appareil est conçu uniquement pour un usage ménager privé et un environnement domestique. Utiliser l'appareil uniquement pour préparer des aliments et des boissons. Surveiller l'appareil lorsqu'il fonctionne. Utiliser l'appareil uniquement da...
- Cet appareil peut être utilisé par des enfants de 8 ans ou plus et par des personnes dotées de capacités physiques, sensorielles ou mentales réduites ou disposant de connaissances ou d’expérience insuffisantes, sous la surveillance d'un tiers...
- Les enfants ne doivent pas jouer avec l'appareil. Le nettoyage et l'entretien effectué par l'utilisateur ne doivent pas être accomplis par des enfants, sauf s'ils sont âgés de 8 ans et plus et qu'un adulte les surveille.
- Les enfants de moins de 8 ans doivent être tenus à distance de l'appareil et du cordon d'alimentation.
- Toujours insérer les accessoires à l'endroit dans le four. Voir la description des accessoires dans la notice d'utilisation.
- Risque d'incendie !
- ■ Tout objet inflammable entreposé dans le compartiment de cuisson peut s'enflammer. Ne jamais entreposer d'objets inflammables dans le compartiment de cuisson. Ne jamais ouvrir la porte de l'appareil lorsqu'il s'en dégage de la fumée. Éteindre...
- ■ Il se produit un courant d'air lors de l'ouverture de la porte de l'appareil. Le papier sulfurisé peut toucher les résistances chauffantes et s'enflammer. Ne jamais poser de papier sulfurisé non attaché sur un accessoire lors du préchauffage...
- Risque de brûlure !
- ■ L'appareil devient très chaud. Ne jamais toucher les surfaces intérieures chaudes du compartiment de cuisson ni les résistances chauffantes. Toujours laisser l'appareil refroidir. Tenir les enfants éloignés
- ■ Les récipients ou les accessoires deviennent très chaud. Toujours utiliser des maniques pour retirer le récipient ou les accessoires du compartiment de cuisson.
- ■ Les vapeurs d'alcool peuvent s'enflammer dans un compartiment de cuisson chaud. Ne jamais préparer de plats contenant de grandes quantités de boissons fortement alcoolisées. Utiliser uniquement de petites quantités de boissons fortement alcoo...
- Risque de brûlures !
- ■ Les éléments accessibles deviennent chauds pendant le fonctionnement. Ne jamais toucher les éléments chauds. Eloigner les enfants.
- ■ De la vapeur chaude peut s'échapper lors de l'ouverture de la porte de l'appareil. Ouvrir la porte de l'appareil avec précaution. Tenir les enfants éloignés
- ■ La présence d'eau dans un compartiment de cuisson chaud peut générer de la vapeur d'eau chaude. Ne jamais verser d'eau dans le compartiment de cuisson chaud.
- Risque d'incendie !
- Risque de blessure !
- Un verre de porte d'appareil rayé peut se fendre. Ne pas utiliser de racloir à verre, ni de produit de nettoyage agressif ou abrasif.
- Risque de choc électrique !
- ■ Les réparations inexpertes sont dangereuses.Seul un technicien du service après-vente formé par nos soins est habilité à effectuer des réparations.Si l'appareil est défectueux, retirer la fiche secteur ou enlever le fusible dans le boîtie...
- ■ L'isolation des câbles des appareils électroménagers peut fondre au contact des pièces chaudes de l'appareil. Ne jamais mettre le câble de raccordement des appareils électroménagers en contact avec des pièces chaudes de l'appareil.
- ■ De l'humidité qui pénètre peut occasionner un choc électrique. Ne pas utiliser de nettoyeur haute pression ou de nettoyer à vapeur.
- ■ Lors du remplacement de l'ampoule du compartiment de cuisson, les contacts du culot de l'ampoule sont sous tension. Retirer la fiche secteur ou couper le fusible dans le boîtier à fusibles avant de procéder au remplacement.
- ■ Un appareil défectueux peut provoquer un choc électrique. Ne jamais mettre en service un appareil défectueux. Débrancher la fiche secteur ou enlever le fusible dans le boîtier à fusibles. Appeler le service après-vente.
- Risque d'incendie !
- ■ Les restes de nourriture épars, la graisse et le jus de cuisson peuvent s'enflammer au cours de l'autonettoyage. Enlever les salissures les plus grossières du compartiment de cuisson et des accessoires avant chaque cycle d'autonettoyage.
- ■ L'extérieur de l'appareil devient très chaud lors de l'autonettoyage. Ne jamais accrocher jamais d'objet inflammable, tel qu'un torchon à vaisselle, à la poignée de la porte.Ne pas entraver la façade de l'appareil. Tenir les enfants éloignés
- Risque de brûlure !
- ■ Le compartiment de cuisson devient très chaud lors de l'autonettoyage. Ne jamais ouvrir la porte de l'appareil ni déplacer à la main les crochets de verrouillage. Laisser l'appareil refroidir. Tenir les enfants éloignés
- ■ ; L'extérieur de l'appareil devient très chaud lors de l'autonettoyage. Ne jamais toucher la porte de l'appareil. Laisser l'appareil refroidir. Tenir les enfants éloignés
- Risque de préjudice sérieux pour la santé !
- L'appareil devient très chaud lors de l'autonettoyage. Le revêtement anti- adhérent des plaques et des moules est détruit et il se dégage des gaz toxiques. Ne jamais nettoyer des plaques et des moules à revêtement anti-adhérents avec le cycle...
- Causes de dommages
- Sélecteur des fonctions
- Touches et panneau indicateur
- Touches pour modifier les positions réglées
- Compartiment intérieur du four
- Accessoires en option
- Chauffer le four
- Nettoyage des accessoires
- Chauffage rapide
- 1. Sélectionnez le chauffage rapide J à l'aide du bouton de fonctions.
- 2. Sélectionnez la température souhaitée à l'aide des touches @ et A.
- Fin du chauffage rapide
- Annuler le chauffage rapide
- Remarque
- Le temps du minuteur est terminé
- Modifier le temps du minuteur
- Annuler le temps du minuteur
- Consulter les réglages de temps
- Temps de cuisson
- Heure de la fin
- 1. Régler le sélecteur des fonctions.
- 2. Effleurer deux fois le capteur 0.
- 3. Régler le temps de cuisson avec @ ou A.
- 4. Effleurer le capteur 0.
- 5. Différer l'heure de la fin avec @ ou A.
- 6. Effleurer le capteur °C.
- Le temps de cuisson est terminé
- Modifier l'heure de fin de cuisson
- Annuler l'heure de fin de cuisson
- Consulter les réglages de temps
- Heure
- 1. Appuyez sur la touche 0.
- 2. Réglez l'heure à l'aide des touches @ ou A.
- 3. Confirmez l'heure à l'aide de la touche 0.
- Changer l'heure
- Masquer l'heure
- Avant le nettoyage
- Réglage
- Après l'autonettoyage
- Fonction éclairage
- Décrocher et raccrocher les clayettes ou les rails de gauche et de droite
- Démonter et remonter la porte du four
- : Risque de blessures !
- Démonter la porte
- Remonter la porte
- Démonter le cache de la porte
- Dépose et pose des vitres de la porte
- Dépose
- 1. Décrocher la porte du four et la placer sur un chiffon, la poignée vers le bas.
- 2. Dévisser le recouvrement en haut à la porte du four. A cet effet, dévisser les vis à gauche et à droite (fig. A).
- 3. Lever la vitre supérieure et la retirer, enlever les deux petits joints (fig. B).
- 4. Dévisser les crochets à droite et à gauche. Lever la vitre et enlever les crochets de la vitre (fig. C).
- 5. Enlever le joint en bas à la vitre (fig. D). Ce faisant, tirer le joint et l'enlever par le haut. Retirer la vitre.
- 6. Retirer la vitre inférieure vers le haut en l'inclinant.
- 7. Ne PAS dévisser les vis à gauche et à droite sur la pièce en tôle (fig. E).
- Pose
- 1. Engager la vitre inférieure vers l'arrière en l'inclinant (fig. A).
- 2. Introduire la vitre centrale (fig. B).
- 3. Fixer les crochets sur la vitre à droite et à gauche, aligner de sorte que les ressorts se trouvent au-dessus du trou de vissage et visser (fig. C).
- 4. Raccrocher le joint en bas à la vitre (fig. D).
- 5. Glisser la vitre supérieure en arrière dans les deux fixations en l'inclinant. Ce faisant, veillez à ne pas pousser le joint vers l'arrière (fig. E).
- 6. Refixer les deux petits joints à gauche et à droite sur la vitre (fig. F).
- 7. Poser le recouvrement et le visser.
- Messages d'erreur
- Dépose
- Changer l'ampoule du four
- Vitre protectrice
- Économiser l'énergie
- ■ Utilisez des moules foncés, vernis ou émaillés en noir car ils absorbent mieux la chaleur.
- ■ Laissez la porte du four fermée pendant les cycles de cuisson au four ou de rôtissage.
- ■ Si vous vous voulez cuire plusieurs gâteaux, faites-le de préférence l'un après l'autre. Le four sera encore chaud et vous réduirez ainsi le temps de cuisson du deuxième gâteau. Il est également possible d'introduire deux moules rectangul...
- ■ Pour les temps de cuisson longs, vous pouvez éteindre le four 10 minutes avant la fin pour tirer profit de la chaleur résiduelle.
- Chaleur tournante eco
- Conseils pratiques de cuisson
- Viandes, volailles, poissons
- Conseils pour les rôtis et grillades
- Gratins, soufflés, toasts
- Plats cuisinés
- Plats spéciaux
- 1. Faire bouillir 1 litre de lait (3,5 % de matière grasse) et laisser refroidir le liquide jusqu'à ce qu'il redescende à 40 ºC.
- 2. Mélanger 150 g de yaourt (à température du réfrigérateur).
- 3. Le verser dans des tasses ou des pots et recouvrir les récipients à l'aide d'un film transparent.
- 4. Préchauffer le compartiment intérieur du four comme indiqué ci-dessous.
- 2. Préchauffer le compartiment intérieur du four comme indiqué ci-dessous.
- Décongélation
- Séchage
- Cuisson des confitures
- Attention !
- Préparation
- Programmation
- Cuisson des confitures
- Retirer les bocaux du four
- Grillades
- é Inhoudsopgave[nl] Gebruiksaanwijzing
- : Belangrijke veiligheidsvoorschriften
- Lees deze gebruiksaanwijzing zorgvuldig door. Alleen dan kunt u uw apparaat goed en veilig bedienen. Bewaar de gebruiksaanwijzing voor later gebruik of om door te geven aan een volgende eigenaar.
- Dit apparaat is alleen bestemd voor inbouw. Neem het speciale installatievoorschrift in acht.
- Controleer het apparaat na het uitpakken. Niet aansluiten in geval van transportschade.
- Alleen een daartoe bevoegd vakman mag apparaten zonder stekker aansluiten. Bij schade door een verkeerde aansluiting maakt u geen aanspraak op garantie.
- Dit apparaat is alleen bestemd voor huishoudelijk gebruik en de huiselijke omgeving. Gebruik het uitsluitend voor het bereiden van gerechten en drank. Zorg ervoor dat het apparaat onder toezicht gebruikt wordt. Het toestel alleen gebruiken in geslote...
- Dit toestel kan worden gebruikt door kinderen vanaf 8 jaar en door personen met beperkte fysieke, sensorische of geestelijke vermogens of personen die gebrek aan kennis of ervaring hebben, wanneer zij onder toezicht staan van een persoon die verantwo...
- Kinderen mogen niet met het apparaat spelen. Reiniging en onderhoud van het toestel mogen niet worden uitgevoerd door kinderen, tenzij zij 8 jaar of ouder zijn en onder toezicht staan.
- Zorg ervoor dat kinderen die jonger zijn dan 8 jaar uit de buurt blijven van het toestel of de aansluitkabel.
- Toebehoren altijd op de juiste manier in de binnenruimte plaatsen. Zie beschrijving toebehoren in de gebruiksaanwijzing.
- Risico van brand!
- ■ Brandbare voorwerpen die in de binnenruimte worden bewaard kunnen vlam vatten. Bewaar geen brandbare voorwerpen in de binnenruimte. Open nooit de deur wanneer er sprake is van rookontwikkeling in het apparaat. Het toestel uitschakelen en de stekk...
- ■ Wanneer de apparaatdeur geopend wordt, ontstaat er een luchtstroom. Het bakpapier kan dan de verwarmingselementen raken en vlam vatten. Tijdens het voorverwarmen mag er nooit bakpapier los op de toebehoren liggen. Verzwaar het bakpapier altijd me...
- Risico van verbranding!
- ■ Het toestel wordt zeer heet. Nooit de hete vlakken in de binnenruimte of verwarmingselementen aanraken. Het apparaat altijd laten afkoelen. Zorg ervoor dat er geen kinderen in de buurt zijn.
- ■ Toebehoren of vormen worden zeer heet. Neem hete toebehoren en vormen altijd met behulp van een pannenlap uit de binnenruimte.
- ■ Alcoholdampen kunnen in de binnenruimte vlam vatten. Nooit gerechten klaarmaken die een hoog percentage alcohol bevatten. Alleen kleine hoeveelheden drank met een hoog alcoholpercentage gebruiken. De deur van het toestel voorzichtig openen.
- Kans op verbranding!
- ■ Tijdens het gebruik worden de toegankelijke onderdelen heet. De hete onderdelen nooit aanraken. Zorg ervoor dat er geen kinderen in de buurt zijn.
- ■ Bij het openen van de apparaatdeur kan hete stoom vrijkomen. De deur van het toestel voorzichtig openen. Zorg ervoor dat er geen kinderen in de buurt zijn.
- ■ Door water in de hete binnnruimte kan hete waterdamp ontstaan. Nooit water in de hete binnenruimte gieten.
- Risico van brand!
- Risico van letsel!
- Wanneer er krassen op het glas van de apparaatdeur zitten, kan dit springen. Geen schraper, scherpe of schurende schoonmaakmiddelen gebruiken.
- Kans op een elektrische schok!
- ■ Ondeskundige reparaties zijn gevaarlijk.Reparaties mogen uitsluitend worden uitgevoerd door technici die zijn geïnstrueerd door de klantenservice.Is het apparaat defect, haal dan de stekker uit het stopcontact of schakel de zekering in de meterk...
- ■ De kabelisolatie van hete toestelonderdelen kan smelten. Zorg ervoor dat er nooit aansluitkabels van elektrische toestellen in contact komen met hete onderdelen van het apparaat.
- ■ Binnendringend vocht kan een schok veroorzaken. Geen hogedrukreiniger of stoomreiniger gebruiken.
- ■ Bij vervanging van de lamp in de binnenruimte staan de contacten van de lampfitting onder stroom. Trek voordat u tot vervanging overgaat de netstekker uit het stopcontact trekken of schakel de zekering in de meterkast uit.
- ■ Een defect toestel kan een schok veroorzaken. Een defect toestel nooit inschakelen. De netstekker uit het stopcontact halen of de zekering in de meterkast uitschakelen. Contact opnemen met de klantenservice.
- Risico van brand!
- ■ Losse voedselresten, vet en braadjus kunnen tijdens de zelfreiniging vlam vatten. Verwijder voor de zelfreiniging altijd de grove verontreiniging uit de binnenruimte en van de toebehoren.
- ■ De buitenkant van het apparaat wordt tijdens de zelfreiniging zeer heet. Nooit brandbare voorwerpen, zoals bijv. droogdoeken, aan de deurgreep hangen. Zorg ervoor dat de voorkant van het toestel vrij blijft. Zorg ervoor dat er geen kinderen in de...
- Risico van verbranding!
- ■ De binnenruimte wordt tijdens de zelfreiniging zeer heet. Nooit de apparaatdeur openen of de vergrendelingshaak met de hand verschuiven. Het toestel laten afkoelen. Zorg ervoor dat er geen kinderen in de buurt zijn.
- ■ ; De buitenkant van het apparaat wordt tijdens de zelfreiniging zeer heet. De apparaatdeur nooit aanraken. Het apparaat laten afkoelen. Zorg ervoor dat er geen kinderen in de buurt zijn.
- Ernstig gezondheidsrisico!
- Het toestel wordt zeer heet tijdens de zelfreiniging. De antiaanbaklaag van bakplaten en vormen wordt aangetast en er ontstaan giftige gassen. Nooit platen en vormen met een antiaanbaklaag meereinigen bij de zelfreiniging. Alleen geëmailleerde toebe...
- Oorzaken van schade
- Functiekeuzeknop
- Sensors en indicatiepaneel
- Toetsen voor het wijzigen van de ingestelde standen
- Binnenzijde van de oven
- Extra toebehoren
- De oven verwarmen
- Reiniging van de accessoires
- Snel verwarmen
- 1. Selecteer snel verwarmen J met de functieknop.
- 2. Selecteer de gewenste temperatuur met de sensors @ en A.
- Einde van het snel verwarmen
- Snel verwarmen annuleren
- Aanwijzing
- De tijd van de kookwekker is verstreken
- Wijzigen van de tijd van de kookwekker
- Annuleren van de tijd van de kookwekker
- De tijdinstellingen opvragen
- Bereidingstijd
- Eindtijd
- 1. Functiekeuzeknop instellen.
- 2. Twee keer de sensor 0 aantippen.
- 3. De bereidingstijd met @ of A instellen.
- 4. De sensor 0 aantippen.
- 5. De eindtijd met @ of A op een later tijdstip zetten.
- 6. De sensor ºC aantippen.
- De baktijd is verstreken
- Wijzigen van de eindtijd
- Annuleren van de eindtijd
- De tijdinstellingen opvragen
- Tijd
- 1. Druk op de sensor 0.
- 2. Stel de tijd in met de sensors @ of A.
- 3. Bevestig de tijd met de sensor 0.
- De tijd wijzigen
- De tijd onzichtbaar maken
- Vóór de zelfreiniging
- Instelling
- Na de zelfreiniging
- Lichtfunctie
- De roosters of rails links en rechts los- en vasthaken
- De ovendeur afnemen en ophangen
- : Gevaar voor verwonding!
- De deur afnemen
- De deur ophangen
- Uitbouwen van de afdekking van de deur
- Deurruiten verwijderen en inbrengen
- Verwijderen
- 1. Ovendeur verwijderen en met de handgreep naar beneden op een doek leggen.
- 2. De afscherming bovenaan de ovendeur eraf schroeven. Hiervoor de schroeven aan de linker- en rechterkant losdraaien (Afbeelding A).
- 3. Bovenste ruit optillen en naar buiten trekken, en de beide kleine afdichtingen afnemen (Afbeelding B).
- 4. De grote klemmen rechts en links losschroeven. De ruit optillen en de klemmen van de ruit afnemen (Afbeelding C).
- 5. Afdichting onder aan de ruit afnemen (Afbeelding D). Hierbij aan de afdichting trekken en naar boven uitnemen. Ruit eruit trekken.
- 6. Onderste ruit er schuin naar boven uittrekken.
- 7. De schroeven links en rechts op het plaatdeel NIET afschroeven (Afbeelding E).
- Inbrengen
- 1. Onderste ruit schuin naar achteren inschuiven (Afbeelding A).
- 2. Middelste ruit inschuiven (Afbeelding B).
- 3. Borgveren rechts en links op de ruit plaatsen, zo uitlijnen dat de veren zich boven het schroefgat bevinden en vastschroeven (Afbeelding C).
- 4. Afdichting onder aan de ruit weer inhaken (Afbeelding D).
- 5. Bovenste ruit schuin naar achteren in de beide houders schuiven. Let erop dat u hierbij de afdichting niet naar achteren schuift (Afbeelding E).
- 6. De beide kleine afdichtingen links en rechts weer aan de ruit bevestigen (Afbeelding F).
- 7. De afscherming plaatsen en vastschroeven.
- Foutberichten
- Verwijderen
- Vervangen van de ovenlamp
- Beschermglas
- Energie besparen
- ■ Gebruik donkere, zwart gelakte of geëmailleerde bakvormen. Deze nemen de warmte beter op.
- ■ Houd de ovendeur gesloten tijdens de cycli van bakken of braden.
- ■ Bij het bereiden van verschillende taarten is het beter om ze meteen na elkaar te bakken. De oven is dan nog warm. Op die manier wordt de bereidingstijd van de tweede taart verkort. Er kunnen ook twee rechthoekige bakvormen ingevoerd worden, naas...
- ■ Bij lange kooktijden kan de oven 10 minuten voor het verstrijken van de tijd uitgeschakeld worden en wordt de restwarmte gebruikt voor het beëindigen.
- Hetelucht eco
- Suggesties en praktische tips voor het bakken
- Vlees, gevogelte, vis
- Tips voor het braden en grillen
- Ovenschotels. soufflés, toast
- Kant-en-klaar producten
- Bijzondere gerechten
- Ontdooien
- Drogen
- Jam koken
- Braden op de grill
34
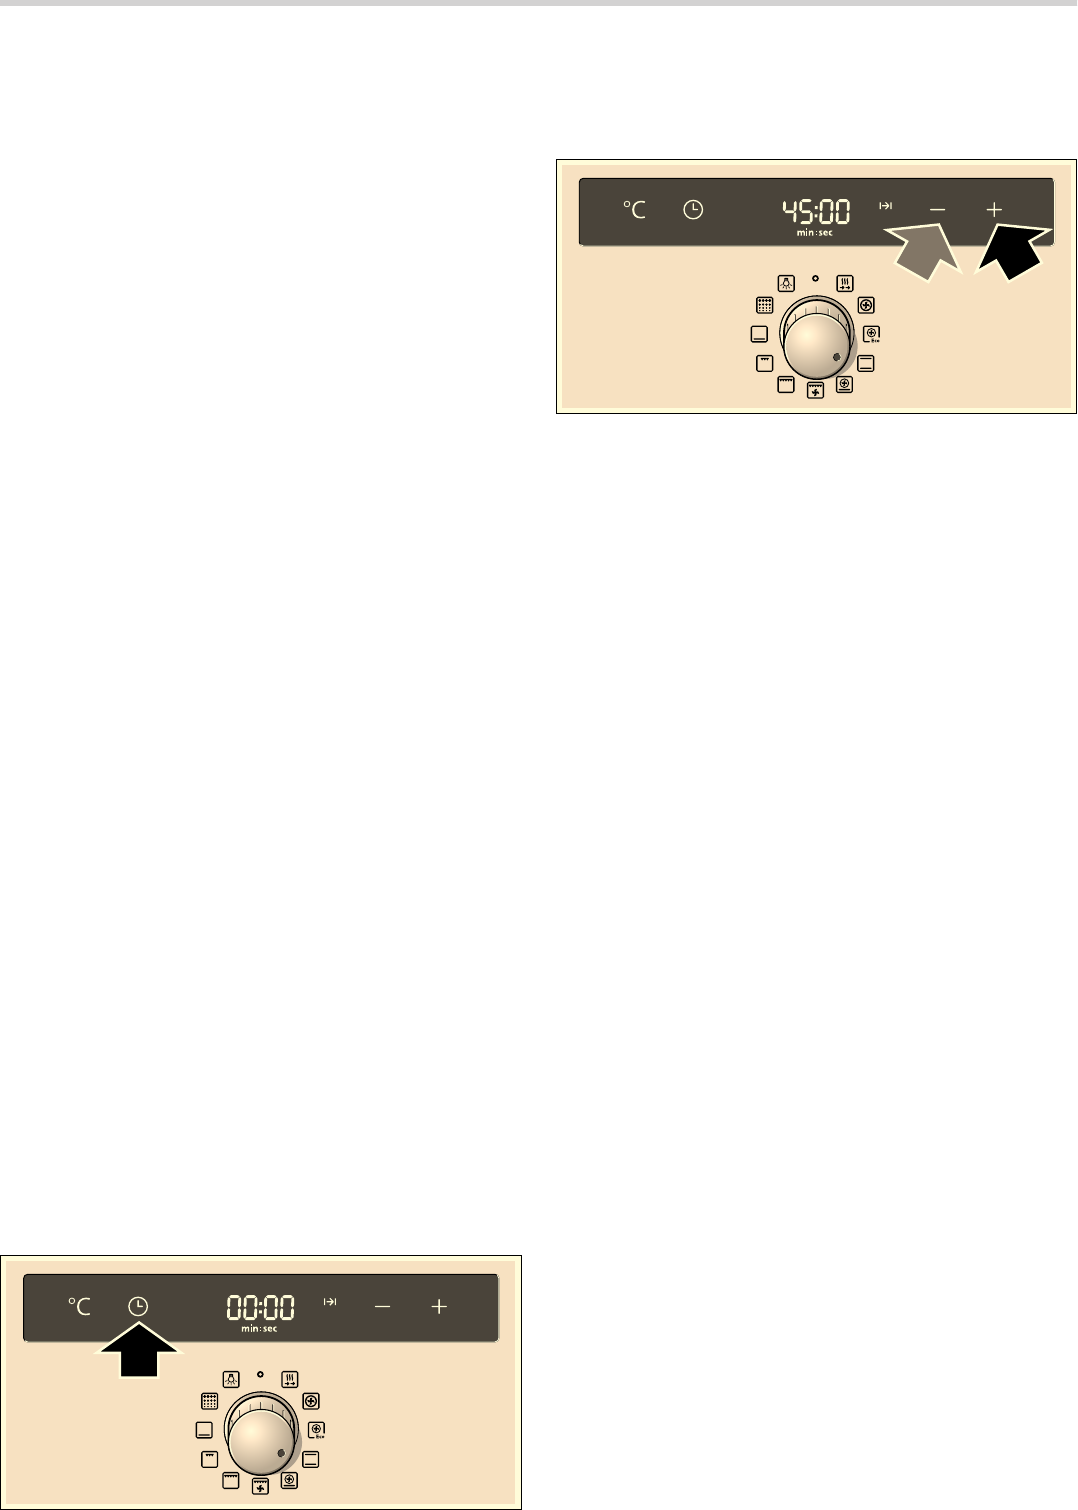
Setting the time functions
This oven has various time functions. The 0 sensor activates
the menu and moves through the different functions. The time
symbols remain lit up while settings are programmed. A time
function that has already been programmed can be modified
with the
@ or A sensors.
Timer
The timer works independently of the oven. The timer has its
own signal. You can therefore distinguish whether the time set
for the timer or the automatic oven shut-off have finished
(cooking time).
1. Press the 0 sensor.
The
V symbol lights up on the display panel.
2. Programme the timer using the @ or A sensors.
Sensor suggested value
@ = 10 minutes.
Sensor suggested value
A = 5 minutes.
The programmed time is shown after a few seconds. The time
set for the timer starts to count down. The
V symbol lights up
on the display panel and the time elapsed is displayed.
The time set for the timer has elapsed
A signal will sound. The display panel will show
‹‹:‹‹. Switch
off the timer using the
0 sensor.
Changing the time set on the timer.
Change the time set for the timer using the
@ or A sensors.
The altered time is shown after a few seconds.
Cancelling the timer
When the oven switches off, the timer continues working.
Resetting the timer to
‹‹:‹‹ with the A sensor. The timer
switches off.
Viewing the time settings
If several time functions are programmed, the corresponding
symbols light up on the display panel.
To view the timer
V, the cooking time x, the end time y or
the time
0, press the 0 sensor repeatedly until the required
symbol lights up. The corresponding value will be shown for a
few seconds on the display panel.
Cooking time
You can select the cooking time for your dish on the oven.
When the set time has elapsed, the oven switches off
automatically. This means that you do not have to interrupt
other work to switch off the oven.
Example in the diagram: Cooking time 45 minutes.
1. Use the function selector to select the type of heating.
2. Tap the 0 sensor twice.
‹‹:‹‹ and the x cooking time symbol appear in the
display panel.
3. Set the cooking time using @ or A.
@ suggested value from the sensor = 30 minutes
A suggested value from the sensor = 10 minutes
4. Tap the ºC sensor.
Using
@ or A, set the required temperature or grill setting.
The oven will start up after a few seconds. The set temperature
appears in the display panel and the
x symbol lights up.
The cooking time has finished
A beep will sound. The oven will stop heating. The display
panel will show
‹‹:‹‹. Press the 0 sensor twice. You can set
a new cooking time with the
@ or A sensors, or press the 0
sensor and turn the function control knob to zero. The oven is
switched off.
Changing the cooking time
Press the
0 sensor twice. Change the cooking time using the
@ or A sensors.
Cancelling the cooking time
Press the
0 sensor twice. Reset the cooking time to ‹‹:‹‹
with the sensor
A. The time has been cancelled.
Viewing the time settings
If several time functions are programmed, the corresponding
symbols light up on the display panel.
To view the timer
V, the cooking time x, the end time y or
the time
0, press the 0 sensor repeatedly until the required
symbol lights up. The corresponding value will be shown for a
few seconds on the display panel.
End time
You can delay the time at which you wish your dish to be ready
to a later end time. The appliance then starts automatically and
switches off at the desired time. You can, for example, put your
dish in the cooking compartment in the morning and set the
oven so that it is ready at lunch time.
Ensure that food is not left in the cooking compartment for too
long as it may spoil.
Example in the diagram: It is 10:30 am, the cooking time is 45
minutes and the oven is set to finish cooking at 12:30 pm.
1. Set the function selector.
2. Tap the 0 sensor twice.
3. Set the cooking time using @ or A.