
Operation Manual


37
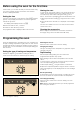
Changing the basic settings
This oven has different basic settings. The settings can be
adapted to the user's own needs.
The oven must be switched off.
1. Press the 0 sensor for approximately 4 seconds.
The display panel will show the current basic setting for the
duration of the signal, e.g.,
™‚ Option ƒ.
2. Change the basic setting using the @ or A sensors.
3. Confirm with the sensor0.
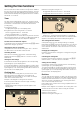
The display panel shows the following basic setting. The
0
sensor allows you to run through all the settings and the
@ or A sensors allow you to modify them.
4. Finally, press the 0 sensor for approximately 4 seconds.
All basic settings have been applied.
The basic settings can be changed again at any time.
Automatic shut off
If the settings of the appliance are not changed for several
hours it is automatically shut off. The oven will stop heating.
This depends on the temperature or grill power selected.
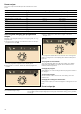
Automatic shut off is activated
A signal will sound. The display shows
”‰. The oven will stop
heating.
Turn the function control knob to the zero setting. The oven
switches off.
Cancelling the automatic shut off function
To avoid triggering the automatic shut off, a cooking time must
be set. The oven will heat until this time is up.
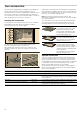
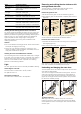
Care and cleaning
If cleaned and properly cared for, your oven will keep its bright
appearance and operating performance for many years to
come. Advice on how to care for and clean your oven is
provided below.
Notes
■ Different colours may be seen in your front panel due to the
various materials used in its manufacture, such as glass,
plastic and metal.
■ Dark patches in the door's glass panel may seem to be dirt
but they are in fact reflections from the oven light.
■ Enamel burns at very high temperatures. This may cause
slight discolouration. This is normal and does not affect the
oven's operation. The edges of thin baking trays may not be
completely enamelled. They may therefore feel slightly rough,
although their corrosive protection will be unaffected.
Cleaning products
Follow the indications provided in the table to avoid damaging
the various oven surfaces by using unsuitable cleaning
products. Do not use
■ abrasive or acidic cleaning products
■ strong products containing alcohol
■ scourers or hard sponges
■ high-pressure or steam cleaners
Wash new dishcloths thoroughly before use.
Basic setting Option 0 Option 1 Option 2 Option 3
™‚
Duration of signal after the cooking time or the time set on
the timer has elapsed
- approx. 10 sec approx. 2 min* approx. 5 min
™ƒ
Time indicator no yes* - -
™„
Time until a setting is applied - approx. 2 sec approx. 4 sec* approx. 10 sec
™†
The shelf support rails have been refitted. no yes - -
™‡
Select default settings for all values. no* yes - -
* Default setting
Zone Cleaning products
Front panel Hot water and a little soap:
Clean with a dishcloth and dry with a soft
cloth. Do not use a glass cleaning product
or a glass scraper.
Stainless steel Hot water and a little soap:
Clean with a dishcloth and dry with a soft
cloth. Immediately remove any water
marks, grease, cornflower or egg white
stains since corrosion could occur under-
neath these marks or stains.
Special products for the care of stainless
steel and which are suitable for hot sur-
faces may be obtained from Technical
Assistance Service centres and specialist
retail outlets. Use a very fine soft cloth to
apply the cleaning product.
Glass panel Glass cleaning products:
Clean using a soft cloth. Do not use a
glass scraper.
Display Glass cleaning products:
Clean using a soft cloth. Do not use alco-
hol, vinegar or other abrasive or acidic
cleaning products.