
Operation Manual


35
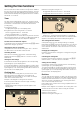
4. Tap the 0 sensor.
The time at which the dish will be ready and the
y End
symbol appear in the display panel.
5. Set a later end time using @ or A.
6. Tap the ºC sensor.
Using
@ or A, set the required temperature or grill setting.
The set temperature and the
y symbol are displayed in the
display panel; the oven is in standby. As soon as the oven is
switched on, the set temperature and the
x symbol are
displayed. The
y symbol goes out.
The cooking time has finished
A beep will sound. The oven will stop heating. The display
panel will show
‹‹:‹‹. Press the 0 sensor twice. You can set
a new cooking time with the
@ or A sensors, or press the 0
sensor and turn the function control knob to zero. The oven is
switched off.
Changing the end time
Press the sensor
0 three times. Change the end time using
the
@ or A sensors. The altered time is shown after a few
seconds. Do not change the end time if the cooking time has
already started to count down. The final result may not be the
same.
Cancelling the end time
Press the 0 sensor three times and reset the end time to the
current time with the
A sensor. The oven switches on.
Viewing the time settings
If several time functions are programmed, the corresponding
symbols light up on the display panel.
To view the timer
V, the cooking time x, the end time y or
the time
0, press the 0 sensor repeatedly until the required
symbol lights up. The corresponding value will be shown for a
few seconds on the display panel.
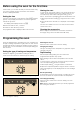
Time
Once the oven has been connected or after a power cut, the 0
and
‹: ‹‹ symbols light up on the display panel.Set the clock
to the right time.
1. Press the 0 sensor.
The time is displayed
‚ƒ:‹‹.
2. Set the time with the @ or A sensors.
3. Confirm the time with the 0 sensor.
The programmed time is displayed after a few seconds.
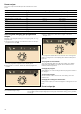
Changing the time
No other time function must be programmed, the oven must be
switched off.
1. Press the 0 sensor twice.
The display panel displays
0.
2. Set the time with the @ or A sensors.
3. Confirm the time with the 0 sensor.
The programmed time is displayed after a few seconds.
Hiding the time
The time can be hidden. See the Modifying basic settings
chapter.
Preset recipes
The preset recipes are perfect for easily cooking special
recipes and juicy roasts. There is no need to turn and add
water to meat and this also keeps the oven clean.
The cooking result depends on the quality of the ingredients
and size of the cookware.
Use oven gloves to remove the dish from the oven when it is
ready. The cookware will be very hot.
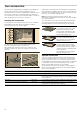
Cookware
Read the indications for using the right cookware for a
particular recipe described in the recipe booklet included. Read
also the manufacturer's indications for the cookware. All other
program indications are detailed below.
Suitable cookware
We recommend that you use heat-resistant (up to 300 °C),
glass or glass ceramic cookware.
Stainless steel pans are suitable, but have their limitations. The
shiny surfaces reflect heat radiation too much, the dish browns
less and the meat is cooked less too. If you use a stainless
steel pan, remove the lid after the program has finished. Brown
the meat on grill power 3 for 8-10 minutes. The dish browns
less when an enamelled steel, cast iron or die-cast aluminium
pan is used. Add a little less liquid.
Unsuitable pans
Clay, aluminium and plastic cookware or cookware with plastic
handles.
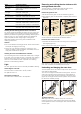
Preparing the dish
Prepare the recipes following the indications in the recipe
booklet.
Use a suitable pan.
Weigh the rice, meat, poultry or fish. The specific indications
are shown in the corresponding tables. Select the weight for the
program.
Always place the cookware inside a cold oven.
Do not open the oven door during cooking.