Deutsch ACHTUNG NETZSTECKER ZIEHEN BEIM VERLASSEN DER MASCHINE, BEI WARTUNGSARBEITEN ODER BEIM WECHSELN VON MECHANISCHEN TEILEN ODER ZUBEHÖRTEILEN Deutsch WICHTIGE SICHERHEITSANWEISUNGEN Bei der Verwendung eines elektrischen Gerätes sollen immer für die Sicherheit grundsätzliche Vorsichtsmaßnahmen getroffen werden, einschließlich: Lesen Sie vor der Verwendung (dieses Gerätes) alle Gebrauchshinweise.
Deutsch D WARNHINWEISE 1. 2. 3. 4. 5. 6. 7. 8. Halten Sie Ihre Finger weg von allen sich bewegenden Teilen. Besondere Vorsicht ist rund um die Nadel der Nähmaschine geboten. Verwenden Sie die Original Stichplatte. Verwenden Sie keine verbogene bzw. stumpfe Nadel. Der Stoff soll während des Nähens weder gezogen noch geschoben werden. Falsches Bedienen kann zu Nadelbruch führen. Schalten Sie die Nähmaschine immer aus ("O"), wenn Sie die Nadel oder den Nähfuß wechseln, wenn der Unterfaden leer ist usw.
INHALTSVERZEICHNIS Teil 1 Hauptteile der Maschine…………. 5 Teil2 Nähvorbereitung…………………... 7 Fußanlasser………………………... 7 Nählicht……………………………... 7 Anschiebetisch…………………….. 8 Nähfußbefestigung……………….. 8 Nadelwechsel……………………… 9 Einstellen Garnrollenstift……….... 10 Einfädeln des Oberfadens……….. 10 Aufspulen des Unterfadens……... 10 Einsetzen der Unterspule………... 11 Einfädeln des Oberfadens……….. 11 Einstellen von Stretch Stichen…...…. 14 "Rückwärts" Zurück Nähen………….
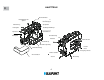
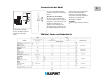
HAUPTTEILE D Garnrollenhalter Fadenführung zum Spulen Spulen Überlaufstopper Fadenführung Spulspindel Fadengeber Fadengeber Stichlängenwahlknopf Rücklauftaste Kopfdeckel Nadelplatte Armabdeckung Handrad Füßchenheber Ausloserad Stichwahlknopf Oberfadenspannung Freiarm Greiferabdeckung NadelBefestigungsschraube An/Aus-Schalter Anschiebetisch Stecker 6 Abdeckung Abdeckung
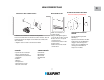
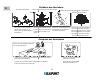
NÄHVORBEREITUNG ANSCHLUSS DES FUßANLASSERS ANSCHLUSS DES FUSSANLASSERS DER FUßANLASSER D AUSWECHSELN DER GLÜHLAMPE Nur bei Ausführung mit Glühlampe (A Verbinden Sie Fußanlasser und Kabel wie abgebildet. Bevor Sie die Maschine anschließen, beachten Sie bitte, dass die Netzspannung mit der Angabe auf der Rückseite der Maschine übereinstimmt. * Angaben sind von Land zu Land unterschiedlich.
Der Anschiebetisch (Zubehörbox) D Für einfache Näharbeiten sollte der Anschiebetisch verwendet werden. Dadurch wird die Arbeitsfläche vergrößert und somit das Nähen erleichtert. ENTFERNEN DES ANSCHIEBETISCHES Ziehen Sie den Anschiebetisch in Pfeilrichtung nach vorne weg und Sie können nun den Freiarm benutzen. Schwer zugängliche Stellen wie Manschetten, Ärmel, Hosenbeine usw. können mit dem Freiarm mühelos genäht werden. Taschen aufnähen, Steppnähte an Kleidern, Mäntel ...., alles kein Problem mehr.
Auswechseln der Nadel Lösen Sie die Nadelbefestigungsschraube und nehmen Sie die Nadel heraus. Einsetzen der neuen Nadel: Die flache Seite des Nadelkolbens muss nach hinten zeigen (von Ihnen weg) und so setzen Sie nun die neue Nadel in die Nadelstange ein. Schieben Sie die Nadel bis zum Anschlag nach oben und ziehen Sie die Nadelbefestigungsschraube fest. Handrad in Ihre Richtung drehen, die Nadel in höchster Stellung, den Lifterhebel heben.
Einfädeln des Oberfadens D Einstellen Garnrollenstift Einstellen Garnrollenstift Herausnehmen und Einsetzen der Spulenkapsel Schalten Sie die Maschine während dieser Arbeit aus! Einsetzen der Spulenkapsel Ziehen Sie den Garnrollenstift. Ziehen Sie den Garnrollenstift aus derdie Maschine. Stecken Sie die Legen Sie kürzere Seite kürzere Seite des Garnrollenstift in des Garnrollenstift in die hine. die Maschine. Öffnen Sie die Greiferabdeckung.
Einsetzen der Spule Setzen Sie die Spule in die Spulenkapsel wie abgebildet. Faden in Pfeilrichtung. Faden in den Schlitz der Spulenkapsel gleiten lassen. D Faden nach links, unter die Spannungsfeder hindurch bis zur Öffnung ziehen. Einfädeln des Oberfadens Schalten Sie die Maschine während dieser Arbeit aus! Nähfußheber nach oben und Gelenkfadenhebel in höchste Stellung bringen, indem Sie das Handrad auf sich zu drehen.
Einfädeln des Unterfadens D Fadenende des Oberfadens mit der linken Hand wie auf der Abbildung halten. Drehen Sie nun das Handrad langsam in Ihre Richtung, bis der Gelenkfadenhebel sich wieder in der höchsten Stellung befindet. Ziehen Sie den Oberfaden leicht an, und der Unterfaden wird in Form einer kleinen Schlinge heraufgeholt. Beide Fäden bis etwa 15cm herausziehen und nach links unter den Nähfuß legen.
Stichprogramm Musterwählknopf (Programm-Selector) Dieser Knopf wird entsprechend dem gewünschten Muster gedreht, entweder nach links oder nach rechts. Einstellmarke 5 7 9 6 8 10 11 12 13 15 17 19 21 14 16 18 20 22 * Bitte beachten Sie, dass beim Drehen des Musterknopfes die Nadel immer in höchster Position steht. Musterwahlknopf Stichlängenregulierung Mit dem Stichlängeneinstellknopf regeln Sie die Stichlänge. 0 1 2 3 Je höher die eingestellte Zahl, desto länger der Stich.
Einstellung der Stretchstiche D MITTE Um die Stretchstiche einzustellen, drehen Sie den Stichlängeneinstellknopf in den Bereich – SS +. Einstellmarkierung + .SS. Die Stretchstiche befinden sich im inneren Kreis des Stichmusterwählers, diese sollten in der Mitte des + SS Bereiches eingestellt werden. Um die Stichdichte zu verändern drehen Sie entweder in Richtung + oder -.
Geradstich D Maschineneinstellung 5 Stichwahlknopf Stich (5) Fadenspannung 2-6 5 4 3 Zick-Zack-Fuß Stichlänge 1.5 ~- 44 1.5 Legen Sie das Nähgut so unter den Nähfuß, dass sich dieser ca. 1 cm innerhalb des Stoffes befindet (siehe Abbildung). Legen Sie den Stoff parallel zum Führungslineal und senken Sie den Nähfuß. Betätigen Sie den Fußanlasser und die Maschine beginnt zu nähen. Ziehen Sie nicht am Stoff. Nährichtung ändern Nähen Sie bis zur Stoffkante um die Naht zu verstärken.
Federstich (offener Overlockstich) D Maschineneinstellung Maschineneinstellung Stichwahlknopf Stich (9) Stich (17) 18 Stichwahlknopf Fadenspannung von 1 - 4 Fadenspannung von 1 - 4 Stichlänge SS Stichlänge 1-2 3 2 3 2 Maschine wie auf Abbildung einstellen. Nähen Sie sorgfältig, so dass alle Stiche auf der rechten Seite genau mit dem Rand abschließen. 1 Zick-Zack-Fuß 1 Zick-Zack-Fuß Legen Sie zwei Stoffe mit den rechten Seiten aufeinander.
Reißverschluss Einnähen Rollsaum D Maschineneinstellung Stichwahlknopf Stich (5) 5 Maschineneinstellung Stichwahlknopf Stich (5) Fadenspannung 3-6 Fadenspannung 2-6 5 Stichlänge 2-4 1.5-4 4 3 Zipp-Fuß 5 Stellen Sie die Maschine wie auf der Abb. ein. Befestigen Sie die Nähfußsohle so an dem Füßchenhalter, dass sie rechts von der Nadel liegt.
Knopf annähen D Maschineneinstellung Stichwahlknopf Stich (9) Zick-Zack-Fuß Fadenspannung Stichlänge muss nicht von 1 - 4 Stopfplatte eingestellt werden 3 2 1 Verwenden Sie zum Knopf annähen die Stopfplatte. 1 2 3 Maschine wie auf Abb. einstellen. Knopf und Stoff befinden sich unter dem Füßchen. Senken Sie das Füßchen, wenn die Nadel links über dem Loch des Knopfes steht. Nadel nach oben und Zickzackbreite so einstellen, dass die Nadel genau in das rechte Loch des Knopfes trifft. Abb.
Knopfloch nähen D Maschineneinstellung Stichwahlknopf Stich (1) 4 1 - 2 4 - 3 - 2 Stichlänge Fadenspannung von 1 auf 5 4 3 1 3 2 Knopflochfuß 2 Stellen Sie den Musterwahlknopf auf . Senken Sie den Nähfuß. Stechen Sie nun mit der Nadel in den Stoff, dort wo Sie mit dem Knopfloch beginnen wollen. 1 Nähen Sie als Test ein Knopfloch auf einem Stück Reststoff. Dies hilft, Fehler zu vermeiden. 4 Nähen Sie nun die linke Seite. Dies hilft, Fehler zu vermeiden.
Muschelsaum D Der Muschelsaum ist eine Ziernaht, der an Kanten Bogen bildet. Legen Sie die Stoffkante unter den Nähfuß und nähen Sie nun an der Kante entlang. Maschineneinstellung Stichwahlknopf Stich (17) 17 Fadenspannung von 3 - 9 6 Stichlänge 1-2 5 4 Zick-Zack-Fuß Stichprogramm Maschineneinstellung Sticheinstellung bei Fadenspannung Elastikstichen 3 2 Stiche 1 ElastikStiche Zick-Zack-Fuß Stiche 5-21 sind Nutzstiche.
Bei allen Wartungsarbeiten wie z. B. Nadel wechseln, Reinigen und Ölen muss die Stromzufuhr unterbrochen werden! Entfernen der Spulenkapsel Reinigen der Maschine Geben Sie einen Tropfen Öl auf den Greifer. Nadel in höchste Position bringen. Öffnen Sie die Klappe der Spulenkapsel und nehmen Sie diese nun heraus. Öffnen Sie die Greiferbahnhalter wie Abb. (Pfeile beachten) und entfernen Sie die Greiferbahn. Greifer herausnehmen und mit einer Bürste den Staub entfernen.
Funktionsstörungen D STÖRUNG Lautes Geräusch bei der Maschine Oberfaden reißt URSACHE 1. Greifer verschmutzt 18 2. Transporteur verschmutzt 18 1. Faden falsch eingefädelt 6 2. Schlechte Qualität des Garnes Unterfaden reißt BESEITIGUNGS-SEITE Gutes Nähgarn verwenden 3. Fadenspannung falsch eingestellt 17 4. Nadel verbogen oder stumpf 5 1. Faden falsch eingefädelt 8 2. Verbogene, kaputte oder falsche Spule Originalspulen verwenden 3. Verschmutzte Spulenkapsel Nadelbruch 18 1.
D DO NOT THROW AWAY! NE PAS JETER! BITTE NICHT WEGWERFEN! ¡NO DESECHAR! NON SPRECHIAMO NULLA! GOOI DIT NIET WEG WIEDERVERWERTUNG Wir sind zum Umweltschutz verpflichtet. Unser Bestreben ist, den Umwelteinfluss unserer Produkte zu minimieren, indem wir ständig unsere Herstellungsmethoden verbessern. Bitte beachten Sie bei der Entsorgung des Produktes, dass dies nach den folgenden umweltfreundlichen Richtlinien geschieht.
English UK ONLY IMPORTANT PLEASE READ CAREFULLY The wires in this mains lead are colored in accordance with the following code: BLUE-NEUTRAL BROWN-LIVE (OR ACRTIVE) As the colors of the mains lead of this appliance may not correspond with the colored markings identifying the terminals in your plug -- PROCEED AS FOLLOWS: The earth plug pin is unnecessary. As the Machine is designed under double insulation structure, the earth wire is removed from the machine.
English WARNING EN 1. 2. 3. 4. 5. 6. 7. Keep fingers away from all moving parts. Special care is required around the sewing machine needle. Always use proper needle plate. The wrong plate can cause the needle to break. Do not use bent needles. Do not pull or push fabric while stitching. It may deflect the needle causing it to break.
TABLE OF CONTENTS SECTION I ESSENTIAL PARTS Name of parts……………………………………... 28 SECTION II GETTING READY TO SEW Connecting the Machine to the Power Supply… 29 Foot Control……………………………………….. 29 Sewing Light………………………………………. 29 Extension Table (Accessory storage Box)……... 30 To Snap On and Snap Off the Presser Foot…… 30 Changing Needles………………………………… 31 Thread and Needle Chart………………………... 31 Setting spool pin…………………………………... 32 Removing or Inserting the Bobbin Case……….. 32 Winding the Bobbin………………………………..
PARTS DIAGRAM Names of Parts EN Spool Pin Bobbin winder thread guide Bobbin winder stopper Bobbin winder Spindle Thread guide Take up lever Fadengeber Stitch length control knob Face Plate Reverse stitch Lever Needle Plate Arm cover Balance wheel Stitch selector Presser foot lever Screw Ausloserad Upper thread tension dial Free arm Hook cover Needle clamp screw Extension table (Accessory storage box) ON/OFF switch Cord socket 28 Back cover Abdeckung
GETTING READY TO SEW Connecting the Machine to the Power Supply Foot Control Sewing Light (For E14 bilb only) (A) Before connecting the machine to the power supply, make sure that the voltage and frequency of your electricity matches that of the machine. Fit the non-reversible plug into the cord socket and plug the machine into the power supply. Sewing speed can be varied by the foot control. The sewing light is located behind the face plate.
Extension Table (Accessory Storage Box) Extension Table The extension table provides added sewing surface and can be easily removed for free arm sewing. For free arm sewing EN Pull the end of the extension table away from the machine, as illustrated. For attaching the table Push the extension table toward the machine making sure that the locating pins are aligned. To Snap On and Snap Off the Presser Foot To snap off Turn the balance wheel toward you to raise the needle to its highest position.
Changing Needles Switch off the machine and disconnect the machine from the power point. Loosen the needle clamp screw by turning it counter-clockwise. Undo the needle clamp screw just enough to release the needle. Remove the needle from the clamp. Insert the new needle into the needle clamp with the flat side away from you. When inserting the needle into the clam, push it up as far as it will go and tighten the clamp screw firmly with the screwdriver.
Setting spool pin Einstellen Garnrollenstift Removing or Inserting the Bobbin Case Switch off the machine while doing this! Inserting the Bobbin Case EN Ziehen Sie Pullden outGarnrollenstift. the spool pin. Insert the Open the hook cover. shorter side of spool pin into the Legen Sie die kürzere Seite machine. des Garnrollenstift in die hine. When inserting the bobbin case, place the horn into the recess of the Take out the bobbin case by holding hook race. Switch on the machine. the latch.
Threading Bobbin Case EN 1 Place bobbin into bobbin case. Make sure the thread unwinds in the direction of arrow. 2 Pull the thread into the bobbin case slot. 3 Draw the thread under the tension spring and into the delivery eye. * Leave about 10cm (4 inches) of free thread. Threading the Machine Always thread your machine with the power off! 1 Raise the take-up lever to its highest position by turning the balance wheel toward you. Raise the presser foot.
Drawing up Bobbin Thread EN 1 Raise the presser foot and hold the needle thread lightly with your left hand. 2 Turn the balance wheel slowly towards you with your right hand until the needle goes down and continue turning balance wheel until the take-up lever is at its highest position. Lightly draw up the needle thread forming a loop of the bobbin thread. 3 Pull 15cm (6") of both threads back and under the presser foot.
Stitch Selector Dial The stitch selector not only determines the stitch you select, but also regulates the stitch width for regular zigzag and rick rack stretch stitches. Setting mark 5 7 9 11 13 15 17 19 21 NOTE: To avoid needle or fabric damage, be sure your needle is up and out of the fabric when adjusting this control.
Adjusting Stretch Stitch Balance Stitch length Setting mark To select Stretch Stitches, set this control at SS position. In stretch stitch sewing, Stitch Length Control should be in the Center position between - and + (SS position) for most materials. Depending upon the type of fabric used. You may need to adjust this control to match forward stitches of stretch sewing with reverse motion stitches.
Straight Stitch Sewing BASIC SEWING Make sure the take-up lever is at the highest position before starting Machine Setting 5 Stitch (5) Stitch selector EN Upper thread Stitch length tension dial 2 to 6 1.5 ~- 44 1.5 5 4 3 Raise the presser foot and position the fabric under the presser foot. For fastening the ends of seams, press the reverse stitch control and sew several reverse stitches. Lower the presser foot and smooth the threads toward the back. Depress the foot control.
UTILITY STITCHING Overcasting Machine Setting Machine Setting EN Stitch (18) Stitch selector Stitch (9) 18 Stitch length SS Stitch length 1 to 4 2 3 2 This type of stitch is used on the seam to prevent fabrics from fraying at raw edges. 1 Overedge stitches are most effective when the right side stitches of Zigzag fall slightly off the edge of the fabric.
Zipper Application Machine Setting Stitch (5) 5 Rolled Hem Machine Setting Stitch (5) 5 Stitch selector Stitch selector EN Upper thread tension dial 3 to 6 5 Stitch length 2 1.5-4 4 3 Zipper foot Upper thread tension dial 2 to 6 Pin or baste zipper tape to fabric and place it under the foot. Smooth the threads toward the back and lower the foot. To sew the left side of the zipper, guide the edge of the zipper along the zipper teeth and stitch through the garment and zipper tape. Stitch length 1.
Sewing Buttons Machine Setting Stitch (9) Stitch selector EN Zigzag foot Upper thread Stitch length control any number (not tension dial 1 to 4 necessary to adjust) Darning plate 3 2 1 Use the darning plate for button sewing (see page 10). 1 2 3 A pin can be placed on top of the button to form a shank. Set the stitch selector at " ". Align both holes of the button with the slot of the foot and place the left hole of the button just below the needle point.
Buttonhole Stitching Machine Setting Stitch selector Stitch (1) 4 1 - 2 4 - 3 - 2 EN Stitch length Upper thread tension dial 1 to 5 4 1 2 3 2 3 Buttonhole foot Set the stitch selector at " Make a sample button hole using a piece of the sample material as the garment. Place the button on the fabric sample and mark the top and bottom to determine the buttonhole length. 4 1 ". Sew down the left side stopping at the bottom mark. Raise the needle. Slide both threads to the left.
DECORATIVE STITCHING Shell Tuck Machine Setting Stitch (17) 17 EN Upper thread tension dial 3 to 9 6 Place the folded edge along the slot of the foot. The needle should fall off the edge of the fabric on the right forming a tuck.
When caring for your machine, cleaning, removing the thread or any other function please make sure that the power is switched off and the machine is unplugged! Dismantling and Assembling hook race Cleaning the machine Disconnect your machine from the power source EN Oil with one drop of oil To dismantle hook race: Raise the needle to its highest position and open the hook cover. Open the hinged latch of the bobbin case and remove it from its position Disconnect your machine from the power source.
Trouble Shooting EN 44
Environment Meaning of crossed out wheeled dustbin: Do not dispose of electrical appliances as unsorted municipal waste, use separate collection facilities. Contact your local government for information regarding the collection systems available. If electrical appliances are disposed of in landfills or dumps, hazardous substances can leak into the groundwater and get into the food chain, damaging your health and well-being.
Français Important : PRESCRIPTION DE SECURITE Lors de l’utilisation d’un appareil électrique, des mesures élémentaires de sécurité doivent toujours être respectées. Lire toutes les prescriptions avant utilisation (de cet appareil) DANGER – Afin de réduire le risque d’électrocution : Il ne faut jamais laisser un appareil sans surveillance lorsqu’il est branché. Toujours déconnecter cet appareil de la pris électrique immédiatement après l’avoir utilisé et avant de la nettoyer.
Français ATTENTION FR Eloigner les doigts de toutes les parties en mouvement. Il faut faire particulièrement attention au niveau de l’aguille de la machine à coudre. Toujours utiliser la plaque aiguille appropriée. Si vous n’utilisez pas la plaque appropriée, l’aguille peut casser. Ne pas utiliser d’aguilles tordues. Ne pas pousser ni tirer le tissu pendant que vous cousez. Cette manœuvre peut faire dévier l’aguille et la casser.
TABLE DES MATIERES PARTIE I PARTIES ESSENTIELLES Nom des pièces…………………………...…………. 50 PARTIE II AVANT DE COMMENCER A COUDRE 51 Branchement de la machine à la prise électrique… 51 Rhéostat………………...……………………............. 51 Ampoule………………...……………………............. 51 Table d’extension (boîte accessoires) …………..... 52 Changement du pied de biche………………...……. 52 Changement des aiguilles………………...………… 53 Choix du fil et utilisation des aiguilles……………… 53 Installation de la tige porte bobine………………….
NOM DES PIECES Nomenclature Porte bobine Guide fil pour le bobinage de la canette FR Stoppeur bobinage canette Guide fil Bobineur canette Réglage longueur de point Tendeur de fil Fadengeber Bouton de marche arrière Capot Plaque aiguille Couverture de bras Volant Sélecteur de point Volant de débrayage Releveur de pied presseur Réglage de tension de fil supérieur Bras libre Coursière Porte aiguille Table d’extension (boite a accessoires) Bouton de marche prise 50 Couverture arrière Abdeckung
AVANT DE COMMENCER A COUDRE Branchement de la pédale et du cordon d’alimentation électrique Le rhéostat Remplacement de l’ampoule (A FR Avant de brancher votre machine sur le secteur assurez-vous que la tension est la même. La vitesse de couture peut varier selon la pression exercée sur le rhéostat. Plus vous appuyez sur la pédale plus la machine fonctionne rapidement. L’ampoule est situé dans le coté latéral de la machine. Dévissez et enlevez la coquille.
Table d’extension (Boîte accessoires) Table d’extension Permet d’optimiser votre surface de couture et permet d’utiliser la machine en bras libre Pour la couture en bras libre Enlever la tablette de la machine comme illustré. FR Pour la remettre en place la pousser dans son logement. Problem mehr. Pour changer le pied de biche Enlever le pied de biche Tournez le volant vers vous afin d’amener l’aiguille dans sa position la plus haute. Levez le pied presseur.
Changement d’aiguille Desserrez la vis suffisamment afin de libérer l’aiguille. Eteindre la machine et la débrancher. Retirer l’aiguille. Insérez un nouvelle aiguille dans son logement avec le coté plat vers l’arrière. Insérer l’aiguille dans son logement aussi loin qu’elle puisse aller et serrer fermement la vis de maintien à l’aide du tournevis. FR Enfiler l’aiguille. Relevez l’aiguille en tournant le volant vers vous et abaissez le pied presseur. Rebrancher la machine sur le secteur.
Enfiler le fil supérieur Installation de la tige porte bobine Einstellen Garnrollenstift Fil supérieur Trous Bourrage Mise en place du boitier canette corne FR Ziehen Sieladen Tirer tigeGarnrollenstift. porte bobine. Insérez la Ouvrir le cache coursière partie la plus petite dans la machine Legen Sie die kürzere Seite des Garnrollenstift in die hine. Amener l’aiguille à sa position la plus haute en tournant le volant vers vous.
Mise en place la canette 1 Placer la canette dans le boitier. Assurer vous que le fil se déplacera dans la direction de la flèche. Tirer le fil dans l’encoche du boitier. 2 3 Passez le fil sous le ressort de tension et dans l’encoche, laissez à peu près 10 cm de fil libre. Enfilage supérieur de la machine Toujours réaliser cette opération la mise débranchée! Amenez le releveur de fil à sa position la plus haute en tournant le volant vers vous. Levez le pied presseur.
Enfiler le fil de la canette FR Levez le pied presseur, maintenir le fil avec la main. Tournez le volant vers vous jusqu’à ce que l’aiguille descende puis remonte à sa position la plus haute. Tirez doucement le fil qui doit former une boucle avec le fil de la canette. Tirez un longueur de 15cm de chaque fil vers l’arrière et abaissez le pied presseur.
Sélecteur de point Le sélecteur de point n’indique pas seulement le point que vous avez sélectionné mais règle également la longueur du point des points zig-zag et stretch.
Réglage du point stretch longueur de point maque Pour sélectionner le point stretch, amener le bouton sur la position SS. Pour la couture du point stretch, le réglage de la longueur du point doit être sur la position médiane, entre le - et le + (position SS) pour la plupart de tissus. Selon le tissu utilisé, vous devrez jouer sur ces réglages. Pour allonger un point stretch, amenez le bouton vers le et pour l’allonger vers le + + .SS.
Assurez-vous toujours que le releveur de fil est position haute avant de commencer BASES DE COUTURE Couture point droit Réglage de la machine Point (5) sélecteur de point contrôle de la tension supérieure de fil 2 à 6 5 sélecteur de longueur de point 1.5 ~ 4 4 3 pied-de-biche zig-zag baissez le pied de la biche sur le tissu à coté d’un des repères de la plaque aiguille. Appuyez sur le rhéostat et guidez légèrement le tissu ver l’arrière.
Points utilitaires Surfilage Réglage de la machine point (17) sélecteur de point Réglage de la machine point (9) sélecteur de point contrôle de la tension supérieure sélecteur de longueur de fil 1 à 4 contrôle de la tension supérieure de fil 1 à 4 3 sélecteur de longueur de point 1à 2 2 FR Point de recourvrement 3 2 Ce point est utilisé pour éviter que le tissu ne s’effiloche.
Fermeture à glissière Coudre un ourlet Réglage de la machine point (5) sélecteur de point 5 Réglage de la machine sélecteur de point point (5) 5 contrôle de la tension supérieure sélecteur de de fil 3 à 6 contrôle de la tension supérieure sélecteur de longueur de fil 2 à 6 de point 1.5 à 4 5 longueur de point 2 1.5-4 4 3 pied-de-biche glissieve Placer la fermeture sous le tissu et le pied. Placer les fils vers l’arrière, abaisser le pied.
Couture des boutons Réglage de la machine point (9) sélecteur de point pied-de-biche zig-zag contrôle de la tension supérieure contrôle longueur de de fil 1 à 4 point 3 2 FR 1 Utiliser la plaque de reprisage pour la couture des boutons 1 2 3 “, aligner les trous du bouton Placer le sélecteur sur la position “ avec l’encoche du pied. Et placer le trou de gauche du bouton juste au dessous de la position de l’aiguille.
Point boutonnière Réglage de la machine point (1) sélecteur de point 4 1 - 2 4 - 3 - 2 sélecteur de longueur de point contrôle de la tension supérieure de fil 1 à 5 4 3 pied-de-biche boutonnière 1 Placer le sélecteur sur la position , les deux fils placés vers la gauche. 2 1 Faire une boutonnière test sur un échantillon de même tissu. Placer le bouton dessus, afin de déterminer la longueur.
POINTS DECORATIFS Placer le tissu et procéder comme indiqué (l’aiguille doit piquer au bord du tissu). Réglage de la machine sélecteur de point point (17) 17 Réglage de la machine.
Lots de l’entretien ou du nettoyage de votre machine, retirez le fil, débranchez le rhéostat (même lors d’un changement d’aiguille)! Démontage et remontage de la coursière Extraction de votre machine Débranchez votre machine huiler avec une goutte d’huile Pour démonter la coursière amenez l’aiguille à sa position la plus haute. Tirez l’ergot du boîtier canette et sortez-le. Enlevez l’étrier de la coursière de en poussant les ergots de maintien.
FR 66
NE PAS JETER ! Recyclage Nous sommes concernés par la protection de l’environnement. Nous nous efforçons de réduire l’impact négatif de nos produits sur l’environnement en améliorant continuellement nos produits, nos méthodes de production. Lorsque le moment est venu de vous débarrasser de votre ancien appareil, nous vous demandons de le faire dans les conditions les plus respectueuses possibles de l’environnement.