
Manual


5
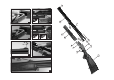
2. Disassembly
of the rifle
4
1. Assembly
of the Rifle
Securing barrel set
(Only possible with forearm removed)
• Pull out extractor all the way to the stop.
• Seat the front barrel hook onto the hinge
bolt. Due to the tight fit, this requires care.
• Grip around barrel hook part and action
with one hand, press barrel hook into its
seat, thus closing the rifle.
NOTE:
Securing the barrel set requires a certain
amount of skill. Do not use force!
We suggest having this procedure demon-
strated by an expert and practise several
times in his presence.
Installing forearm
• Engage forearm on hinge bolt, flush with
the receiver, and tilt it onto the barrel,
until it reaches the stop.
• The best manner to do this is to lift the
forearm flap with your index finger and
hold it in this position.
• Press in forearm.
• The forearm flap engages.
• Close the forearm flap completely.
The forearm is now locked.
1.2.
1.1.
CAUTION:
Unload your rifle before disassembly
(refer to page 7).
Removing forearm
• Support the rifle at the buttstock
on your thigh.
• Pull forearm flap out with a finger of one
hand, and disengage forearm from the
barrel by pressing with the fingers of your
other hand.
• Tilt forearm away from barrel at a slight
angle and pull it up, out of the hinge.
Unhinging barrel set
(Only possible with forearm removed)
• Press locking lever all the way to
the right and hold it in this position.
• Tilt barrel all the way down.
Doing so, the barrel hook is disengaged.
2.2.
2.1.
3. Opening and
Closing the Rifle
4. Safety
Opening the rifle
• Press locking lever all the way to
the right and hold it in this position.
• The barrel hook is disengaged.
• The barrel set can now be tilted
downwards (“opened”).
Closing the rifle
• Hold the barrel pointing in a safe
position and tilt the buttstock upward.
• To check whether the locking lever is closed,
apply light pressure to the left. Otherwise,
disengaging from safe position (cocking)
of the rifle will not be possible, for safety
reasons.
• Mainly in new rifles, some force has to be
exerted in order to close the locking lever.
This is due to the tight, precise fits. The
wedge "pulls”.
3.2.
3.1.
Disengaging from safe position
(cocking)
Push the safety slide (cocking slide)
all the way to the front, until it locks.
Safety slide (cocking slide)
in front position:
The rifle is disengaged from safe position,
the hammer is cocked.
Returning to the safe position
(locking/uncocking)
Press rear end of safety slide (cocking slide)
down with your thumb and let it slide bak-
kwards. With some practise, this can be do-
ne without making a sound.
When the safety slide (cocking slide)
is in its rear position:
The rifle is locked, the hammer is uncocked.
CAUTION:
Under no circumstances should you put
your fingers into the triggers when disenga-
ging (cocking) or locking (uncocking) your
rifle (you may be used to do this from rifles
with exposed hammers). This would trigger
a shot if the rifle is loaded.
NOTE:
When opening the rifle - pressing the
locking lever to the right - the safety slide
(cocking slide) jumps back into the "safe”
(uncocked) position automatically.
4.2.
4.1.