
Blade Theory Type W Manual - US


8
EN
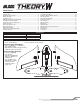
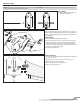
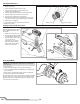
Balance the Airframe
Flight Modes Explained
NOTICE: DO NOT omit this step. Failure to balance the airframe
properly will make the aircraft uncontrolable and will cause a crash.
Crash damage is not covered under warranty.
The recommended center of gravity is indicated on the bottom of the
airframe by two molded-in marks just behind the wing lock access holes.
1. Using two fi ngers, balance the airframe on the molded-in marks.
2. Adjust the position of the battery forward or backward to achieve
proper balance. If you are not using an optional HD camera, place the
battery at the front of the battery box. If you are using an optional HD
camera, place the battery at the rear of the battery box.
3. Check the lateral balance. If necessary, add weight to the light wingtip
in very small increments.
The Theory
™
Type W fl ying wing has three fl ight modes pre-programmed into the receiver:
Launch Mode (switch position 0)
In Launch Mode the aircraft will self level and has bank and pitch limiting. At full
throttle, the aircraft will have a gradual climbing attitude. Pull back on the elevator
stick if a faster rate of climb is needed or desired.
Launch mode can also be used as an attitude recovery mode. If the aircraft is in
an unknown or unexpected attitude while in Intermediate or Experienced mode,
change to Launch mode and release the sticks to return the aircraft to upright and
level fl ight.
NOTICE: The aircraft must have suffi cient altitude and enough distance away
from any obstacles to return to upright level fl ight.
Intermediate Mode (switch position 1)
In Intermediate Mode the aircraft has bank and pitch limiting to help prevent the pi-
lot from over-controlling. The aircraft dampens any outside forces to give a smooth
fl ight performance, even in moderate wind and turbulence. This mode does not
have self leveling. Use this mode to help get the feel of the aircraft before moving
on to more advanced aerobatic fl ight.
Experienced Mode (switch position 2)
Experienced Mode has no bank or pitch limiting, giving an unlimited fl ight envelope.
The aircraft dampens any outside forces to give a smooth fl ight performance, even
in moderate wind and turbulence.
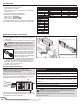
Consult local laws and ordinances before choosing a fl ying location.
When powering on, keep the aircraft out of the wind, steady and level until the
receiver completes initialization.
Range Check your Radio System
Before you fl y, range check the radio system. Refer to your specifi c transmitter
instruction manual for range test information.
Oscillation
Once the AS3X system is active (after advancing the throttle for the fi rst time), you
will normally see the control surfaces react to aircraft movement. In some fl ight
conditions you may see oscillation (the aircraft rocks back and forth on one axis
due to overcontrol). If oscillation occurs, refer to the Troubleshooting Guide for
more information.
Flying
We recommend fl ying the aircraft using line of sight for the fi rst few fl ights, until
you are familiar with characteristics of the aircraft. Once you are comfortable, you
may proceed to fl ying the aircraft using FPV.
Always choose a wide-open space for fl ying. Due to the higher speeds of this
aircraft, it does require more room to fl y than average foam models. It is ideal
for you to fl y at a sanctioned fl ying fi eld. If you are not fl ying at an approved site,
always avoid fl ying near houses, trees, wires and buildings. You should also be
careful to avoid fl ying in areas where there are many people, such as busy parks,
schoolyards, or soccer fi elds.
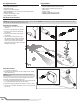
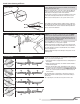
Hand Launching
For the fi rst few fl ights, we recommend you use the help of a friend to hand
launch the model. Hold the aircraft with the fi nger grips on the underside of the
center section. Set the fl ight mode to Launch Mode. With the throttle off, give the
aircraft a fi rm throw directly into the wind at a slight upward angle (10 degrees
above the horizon). As you let go of the aircraft, advance the throttle and climb out.
CAUTION: DO NOT advance the throttle before tossing the aircraft. Serious
injury may result from the spinning propeller hitting your throwing hand or
arm. Always FIRST toss the aircraft, and THEN advance the throttle.
In fl ight trimming
During your fi rst fl ight, while fl ying in either Intermediate or Experienced Mode,
trim the aircraft for level fl ight at 3/4 throttle. Make small trim adjustments with
your transmitter trim switches to straighten the aircraft’s fl ight path.
NOTICE: DO NOT attempt to trim the aircraft in Launch Mode.
After landing, adjust the linkages mechanically to account for trim changes and
then reset the trims to neutral. Ensure the aircraft will fl y straight and level with no
trim or sub-trim.
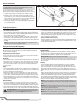
Landing
For your fi rst fl ights with the recommended battery pack, set your transmitter
timer to 3 minutes. After three minutes, land the aircraft. Adjust your timer for
longer or shorter fl ights once you have fl own the model. If at any time the motor
pulses, land the aircraft immediately to recharge the fl ight battery. See the Low
Voltage Cutoff (LVC) section for more details on maximizing battery health and run
time.
Land the aircraft into the wind in a soft area, such as tall grass. Use a small amount
of throttle for the initial approach. Once the aircraft is on a proper approach angle,
and the aircraft will land in the proper area, remove all throttle, but maintain the
descent. During approach and landing, keep the wings level and the aircraft pointed
into the wind. As you approach 2-3 feet in altitude, begin your fl are. Continue easing
back on the elevator to bring the aircraft down gently on the belly.
NOTICE: If a crash is imminent, reduce the throttle and trim fully. Failure to do so
could result in extra damage to the airframe, as well as damage to the ESC and
motor.
NOTICE: After any impact, always ensure the receiver is secure in the fuselage.
If you replace the receiver, install the new receiver in the same orientation as the
original receiver or damage may result.
NOTICE: Crash damage is not covered under warranty.
NOTICE: When you are fi nished fl ying, never leave the aircraft in direct sunlight
or in a hot, enclosed area such as a car. Doing so can damage the aircraft.
Flying the Theory Type W Flying Wing