
Blade Theory Type W Manual - US


7
EN
NOTICE: Remove the propeller from the motor shaft during control
surface adjustments. Any movement of the throttle (even accidental)
will cause the propeller to spin.
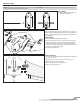
With the receiver powered on, center the controls and trims. When the
controls are neutral, the outer tip of the elevons should align with the
trailing edge of the winglets, as shown in the illustration.
Disconnect the clevis from the control horn and adjust the clevis on the
control rod mechanically until the defl ection of the elevon is correct.
When the elevon neutral position is correct, power off the receiver.
This test ensures that the AS3X control system is functioning properly.
Assemble the aircraft and make sure your transmitter is properly bound
to the receiver before performing this test.
1. Firmly grip the airframe, keeping hands and loose clothing away from
the propeller.
2. Advance the throttle to just above 25% and then lower the throttle to
activate the AS3X system.
3. Move the entire aircraft as shown, paying attention to the elevons as
you move it. The elevons should move in the directions indicated in the
illustration. If they do not respond as shown, DO NOT fl y the aircraft.
Refer to the receiver manual for information on how to reverse the
elevon channels.
Once the AS3X system is activated, the control surfaces may move
rapidly. This is normal. The AS3X system is active until the battery is
disconnected.
After completing the control direction test, power off the receiver.
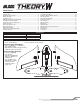
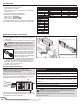
Control Surface Centering and Throws
AS3X
®
Control Direction Test
Aircraft Movement Elevon Reaction
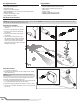
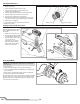
Install the Propeller
NOTICE: Your aircraft utilizes a standard rotation propeller. DO NOT
install a “pusher” style propeller. When looking at the aircraft from
behind, the propeller should spin in a clockwise direction. The use of
a pusher style propeller rotating the opposite direction will cause the
motor to detach from the locking mount.
The stock 2350Kv motor setup uses a 5 x 4 propeller. If you install the
optional 2650Kv motor, a 5 x 3 propeller is required.
Install the propeller and 5 mm fl ange nut on the motor shaft as shown.
The front of the propeller should face toward the motor and the front of
the aircraft. Placing the propeller on backwards will cause a dramatic
decrease in performance.
Do not overtighten the fl ange nut as damage to the propeller or motor
shaft may result.
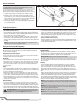
Set the fl ight mode switch to Experienced Mode (position 2). Measure
the control throw at the furthest point inbord at the trailing edge of the
elevon. At full defl ection the elevons should have 10mm up and down
throw, as shown in the illustration.
10mm
10mm