
Blade Theory Type W Manual - US


4
EN
First Flight Preparation
• Remove and inspect contents
• Begin charging the fl ight battery
• Assemble the aircraft
• Program your computer transmitter
• Install the fl ight battery in the aircraft (once it has been fully charged)
• Bind your transmitter
• Familiarize yourself with the controls
• Find a suitable area for fl ying
Flying Checklist
❏ Always turn the transmitter on fi rst
❏ Plug the fl ight battery into the lead from the ESC
❏ Allow the ESC to initialize and arm properly
❏ Fly the model
❏ Land the model
❏ Unplug the fl ight battery from the ESC
❏ Always turn the transmitter off last
FPV Ready Version Assembly
NOTICE: When using cyanoacrylate (CA) adhesive to join or repair the airframe, DO NOT allow the adhesive to contact or get close to the fpv camera lens. The vapors
from the adhesive will permanently fog the camera lens.
If you purchased the FPV ready version of the Theory Type W fl ying wing, use the following instructions to install your FPV components to the airframe.
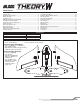
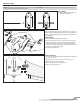
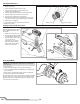
Install the Video Transmitter
1. Attach the video transmitter antenna to the
transmitter.
2. Connect the 6-port jst plug to the transmitter.
3. Connect the power lead to the battery lead
from the ESC.
4. Route the camera lead into the fpv camera
compartment.
5. Use hook and loop material to secure the
video transmitter in the bottom of the battery
compartment, routing the antenna to fi t out
of the top of the canopy. Ensure the digital
display and channel select button on the video
transmitter are facing up.
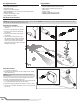
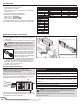
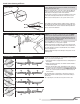
Install the FPV Camera
1. Loosen the lens locking ring.
2. Carefully unscrew the lens from the camera body. Leave the locking
ring on the lens barrel.
NOTICE: Do not allow dust or debris into the camera body when the
lens is removed.
3. Connect the camera lead from the video transmitter to the camera.
4. Slide the camera body behind the ring mount.
5. Screw the lens barrel through the ring mount into the camera body. Do
not completely tighten the barrel into the camera body.
6. Tighten the locking ring against the ring mount to secure the camera.
7. Proceed to the Focusing the FPV Camera section to correctly focus the
camera lens.
12 3
45