
Blade Theory Type W Manual - US


10
EN
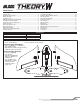
Focusing the FPV Camera
Installing an Optional HD Video Camera
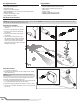
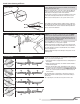
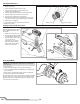
Removing the Motor
NOTICE: Remove the fl ight battery and propeller before attempting to
service the motor.
To remove the motor:
1. Unplug the motor wire bullet connectors from the ESC leads.
2. Use the optional Motor Holder Tool (BLHA1013) to carefully grasp the
base of the motor.
3. Rotate the base clockwise until it unlocks from the mounting plate.
4. Pull the motor away from the mounting plate.
Motor installation is the reverse of the removal process. After re-installing
the motor, test the motor rotation direction prior to attempting your fi rst
fl ight. If the motor does not rotate the proper direction, disconnect and
reverse any two of the motor leads.
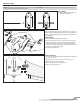
To focus your FPV camera:
1. Remove the propeller.
2. Tape the provided focus pattern page to a wall.
3. Place your camera 8-10 feet (2.5-3m) from the wall,
pointing at the focus pattern page.
4. Power on your transmitter, fpv monitor or headset and aircraft.
5. Center the image of the focus pattern on your screen.
6. Loosen the focus locking ring on the FPV camera.
7. While looking at the fpv monitor or headset, turn the camera lens
in or out to focus the center of the pattern as sharp as possible.
8. Tighten the focus locking ring.
9. Power off the aircraft, FPV monitor and your transmitter.
10. Replace the propeller.
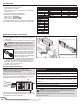
The aircraft is compatible with most
fl at, rectangular shaped video cameras
such as the Mobius Action Camera or
Runcam HD.
1. Remove the center section cover.
2. Place your camera on the mount and
secure with the hook and loop strap.
3. Place the alternate center section
cover over the camera.
If necessary, the cover may be
trimmed to suit your particular
camera and to give the optimal
fi eld of view for your video.
FPO
FPO
Focus Lock RingCamera Lens