mQX RTF READY-TO-FLY
NOTICE All instructions, warranties and other collateral documents are subject to change at the sole discretion of Horizon Hobby, Inc. For up-to-date product literature, visit horizonhobby.com and click on the support tab for this product.
Introduction Thank you for purchasing the Blade® mQX Quad-Copter—a great new Horizon Hobby RC product designed by experts in RC to make your flying experience as unique as it is rewarding. The mQX comes out of the box completely assembled and flight tested. If you’ve already moved up through coaxial machines to single-rotor models like the mSR or 120 SR, you’re going to find the mQX just as stable and predictable. Chances are you’ll feel like a pro after just a few minutes on the sticks.
First Flight Preparation Flying Checklist • Remove and inspect contents • Begin charging the flight battery • Install the flight battery in the Quad-Copter (once it has been fully charged) • Program your computer transmitter (BNF Only) • Bind your transmitter (BNF Only) • Familiarize yourself with the controls • Find a suitable area for flying Battery Warnings and Guidelines ❏❏ Always turn the transmitter on first ❏❏ Plug the flight battery into the lead from the 4-in-1 control unit ❏❏ Allow the 4-in
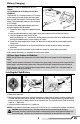
Battery Charging Celectra™ 1-Cell 3.7V Variable Rate DC Li-Po Charger 1S 3.7V 500mAh 12C Li-Po Battery Pack (E-flite EFLB5001S) The Blade mQX 1S Li-Po battery features a JST connector that allows you to safely charge your battery pack when used with the included Li-Po charger and charge adapter. The included flight battery is safe to charge up to 2C (1.0 Amp). Use only Horizon Hobby approved battery packs and chargers compatible with this product. 1. Connect the power supply to an appropriate power source.
Transmitter and Receiver Binding Binding is the process of programming the receiver of the control unit to recognize the GUID (Globally Unique Identifier) code of a specific transmitter. You need to ‘bind’ your chosen Spektrum™ or JR® DSM® technology equipped aircraft transmitter to the receiver for proper operation. If you purchased an RTF model, the transmitter is bound to the model at the factory. To bind or re-bind your mQX to your chosen transmitter, please follow the directions below.
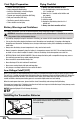
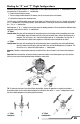
Binding for “X” and “+” Flight Configurations Your mQX comes out of the box in “X” configuration. It is also capable of being flown in “+” configuration, if that is your preference. To fly the mQX in “+” configuration: 1. Remove the Quad-Copter canopy 2. Turn the canopy counterclockwise 45 degrees (refer to the arrows on the circuit board) 3. Reinstall the canopy on the mounting frame. The LED status will indicate which mode your Quad-Copter is in.
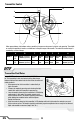
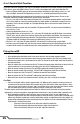
Transmitter Control B A H C G F D E When pressed down, trim buttons make a sound that increases or decreases in pitch at each pressing. The middle or neutral trim position is heard as a middle tone in the pitch range of the sounds. The end of the control range is sounded by a series of beeps.
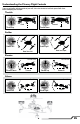
Understanding the Primary Flight Controls If you are not familiar with the controls of your mQX, take a few minutes to familiarize yourself with them before attempting your first flight.
4-in-1 Control Unit Function The unique Control Unit installed in your mQX is a lightweight combination of main motor electronic speed controls (ESCs), mixers, gyros and a DSM2 receiver. The 4-in-1 unit is also equipped with a blue status indicator LED. • Before each flight, ALWAYS power on the transmitter before connecting the flight battery to the 4-in-1 unit. After each flight, disconnect the flight battery from the 4-in-1 unit before powering off the transmitter.
Continue making minor trim adjustments until the machine hovers at a low altitude with very little drifting and directional control input. If the mQX is your first Quad-Copter-type model, seek the help of an experienced pilot to trim the model for you before making your first flight. • With your mQX properly trimmed and maintaining a stable low-level hover, practice using the rudder, elevator and aileron controls to familiarize yourself with the machine’s responses to control inputs.
Exploded View EN 12
Parts Listings Part # Description Part # Description A BLH7501 4-in-1 Control Unit, Rx/ESCs/Mixer/ Gyros: mQX M BLH7562 Motor Mount Cover (2): mQX B BLH7502 Thruster Boom with Wiring (2): mQX N BLH3506 Main Gear: BMSR/X, mCP X, mQX O BLH3515, EFLH2215 Outer Shaft Bearing 3 x 6 x 2mm(2): BMCX/2/MSR/X, FHX, MH-35, MCP X, mQX P EFLB 5001S30 500mAh 1-Cell 3.7V 30C Li-Po BLH3126 JST-RCY to Ultra Micro Battery Adapter lead EFLC1005/ UK/EU/AU AC to 6VDC 1.
Troubleshooting Guide Problem mQX control response is inconsistent or requires extra trim to neutralize movement mQX will not respond to throttle mQX does not function and smells burnt after connecting the flight battery mQX has reduced flight time or is underpowered LED on receiver flashes rapidly and aircraft will not respond to transmitter (during binding) LED on the receiver flashes rapidly and the mQX will not respond to the transmitter (after binding) Crashes immediately upon lift-off EN Possi
Limited Warranty What this Warranty Covers Horizon Hobby, Inc. (“Horizon”) warrants to the original purchaser that the product purchased (the “Product”) will be free from defects in materials and workmanship at the date of purchase.
Warranty and Service Contact Information Country of Purchase Horizon Hobby Address 4105 Fieldstone Rd Horizon Service Center Champaign, Illinois (Electronics and engines) 61822 USA United States of America 4105 Fieldstone Rd Horizon Product Support Champaign, Illinois (All other products) 61822 USA Units 1-4 Ployters Rd Staple Tye United Kingdom Horizon Hobby Limited Harlow, Essex CM18 7NS United Kingdom Christian-Junge-Straße 1 Horizon Technischer 25337 Elmshorn Germany Service Germany 14 Rue Gustave Ei
FCC Information This device complies with part 15 of the FCC rules. Operation is subject to the following two conditions: (1) This device may not cause harmful interference, and (2) this device must accept any interference received, including interference that may cause undesired operation. Caution: Changes or modifications not expressly approved by the party responsible for compliance could void the user’s authority to operate the equipment.