Instruction Manuall Bedienungsanleitung Manuel d’utilisation Manuale di Istruzioni RTF READY-TO-FLY
NOTICE All instructions, warranties and other collateral documents are subject to change at the sole discretion of Horizon Hobby, LLC. For up-to-date product literature, visit horizonhobby.com and click on the support tab for this product.
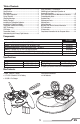
Table of Contents Components ....................................................................3 Specifications ..................................................................3 Box Contents ...................................................................3 First Flight Preparation .....................................................4 Flying Checklist ...............................................................4 Charging Warnings...........................................................
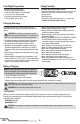
First Flight Preparation Flying Checklist • Remove and inspect contents • Begin charging the flight battery • Install the flight battery in the quadcopter (once it has been fully charged) • Familiarize yourself with the controls • Find a suitable area for flying ❏ Always turn the transmitter on first ❏ Plug the flight battery into the lead from the control unit ❏ Allow the control unit to initialize and arm properly ❏ Fly the model ❏ Land the model ❏ Unplug the flight battery from the 5-in-1 control unit ❏ Alw
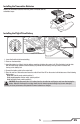
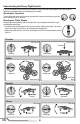
Installing the Transmitter Batteries Replace the transmitter batteries when the power LED flashes and the transmitter beeps. Installing the Flight/Drive Battery 1 2 3 4 1. Lower the throttle to the lowest setting. 2. Power on the transmitter. 3. Install the battery by sliding it into the battery mounting slot below the control unit. Slide the battery into the slots with the label facing upward so that the battery key molded into the battery end-cap comes in contact with the key on the battery slot. 4.
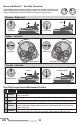
Transmitter and Receiver Binding RTF Your RTF transmitter comes prebound to the model. If you need to re-bind, follow the directions below. MLP4DSM Binding Procedure 1. Disconnect the flight battery from the quadcopter. 2. Center all trims on your transmitter. 3. Power off the transmitter and move the throttle stick to the down/off position. 4. Connect the flight battery in the quadcopter. The LED on the control unit flashes after 5 seconds. 5.
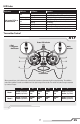
LED Codes Equipment LED Color LED Status Solid Blue Blinking Purple/magenta Solid Solid Flight control LEDs on Red the control board Blinking White Blinking Green Solid Amber Solid Operation Quadcopter stability mode, switch position 0 Loss of RF / Transmitter OFF Quadcopter Horizon mode, switch position 1 Quadcopter agility mode, switch position 2 Low Battery Disarmed, Ready Hovercraft mode 1 (single-stick operation) Hovercraft mode 2 (two-stick operation) Transmitter Control RTF Power LED indicator •
Understanding the Primary Flight Controls If you are not familiar with the controls of your Inductrix® Switch hovercraft and quadcopter, take a few minutes to familiarize yourself with them before attempting your first flight. Quadcopter Operation To selct Quadcopter mode, with the aircraft and transmitter powered on and bound, press both sticks down and out for 10 seconds. Quadcopter Flight Modes Change flight modes by pushing down on the right stick.
Flying the Switch Quadcopter Takeoff Increase the throttle until the model is approximately 2 ft. (600mm) off the ground and check the trim so the model flies as desired. Once the trim is adjusted, begin flying the model. Typical flight times for the included battery range from 3 to 4 minutes. Low Voltage Cutoff (LVC) LVC decreases the power to the motors when the battery voltage gets low.
Hovercraft (Mode 2 - Two Stick Operation) To select Mode 2, press both sticks up and in for 10 seconds. The flight mode LED will glow amber to indicate Mode 2, two stick operation. In Mode 2, the right stick controls lifting fans only and all directional movement is controlled by the left stick, as shown below.
Troubleshooting Guide Problem Possible Cause Aircraft not initialized on a level surface. Quadcopter control response is inconsistent or requires extra trim Battery not correctly placed in to neutralize movement. battery slot. Throttle too high and/or throttle trim is too high. Quadcopter will not respond to throttle. Quadcopter moved during initialization. Throttle channel is reversed. Quadcopter does not function Flight battery connected with the wrong and smells burnt after connecting polarity.
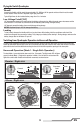
Exploded View Hovercraft 4 Quadcopter 6 11 8 2 9 1 14 14 5 2 9 3 1 13 7 12 10 11 Replacement Parts 1 2 3 4 5 6 7 8 Part # Description BLH8503 BLH8705 BLH9805 BLH9807 BLH9803 BLH9802 BLH9806 BLH9804 Inductrix Motor, CCW (1) Propeller Set, White (4) Base Plate Canopy, Red Duct Set (2) Control Board Foam Skirt Main Frame 9 10 11 12 Part # Description BLH9801 BLH9808 EFLB1501S25 EFLC1008 Propeller Set (4) Screw Set (8) 3.
Limited Warranty What this Warranty Covers Horizon Hobby, LLC, (Horizon) warrants to the original purchaser that the product purchased (the "Product") will be free from defects in materials and workmanship at the date of purchase.
Warranty and Service Contact Information Country of Purchase United States of America Horizon Hobby Contact Information Horizon Service Center (Repairs and Repair Requests) Horizon Technischer Service servicecenter.horizonhobby.com/ RequestForm/ productsupport@horizonhobby.com 877-504-0233 websales@horizonhobby.com 800-338-4639 service@horizonhobby.
©2018 Horizon Hobby, LLC. Blade, the Blade logo, Inductrix, E-flite, SAFE, DSM, DSM2, DSMX, ModelMatch and the Horizon Hobby logo are trademarks or registered trademarks of Horizon Hobby, LLC. The Spektrum trademark is used with permission of Bachmann Industries, Inc. Futaba is a registered trademark of Futaba Denshi Kogyo Kabushiki Kaisha Corporation of Japan. All other trademarks, service marks or logos are property of their respective owners. Patents pending.