
Chroma BNF Camera Quad Manual
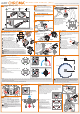

Charging
Balancing
Charging
complete
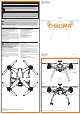
For best results while using Smart Mode, it is recommended
that the pilot always turn to face the quadcopter while ying.
Refer to the Radio Setup video at www.KnowChroma.com to
program your Spektrum
™
DSM2
®
/DSMX
®
technology compatible
transmitter.
NOTICE: This aircraft is not compatible with the Blade ST-10+
Personal Ground Station Transmitter.
Install the landing gear legs by sliding them into the bottom of the
quadcopter until they lock in position.
For instructions on how to bind the Chroma to your transmitter, see the
included Reference Guide or the online video at www.KnowChroma.com.
Power
connected
Charger LED codes
Charge the Flight Battery (~75 min)
Assemble the GoPro
®
Compatible Static Mount
Program Your Transmitter Install the propellers
Power Up
Understanding the Flight Modes
1
6
2
8
7
5
9
10 11
CAUTION: All instructions and warnings must be followed exactly. Mishandling of Li-Po batteries can
result in a re, personal injury and/or property damage.
CAUTION: Do not use a GoPro
®
camera in the camera mount without using the
copper foil shielding.
CAUTION: The GoPro
®
Wi-Fi will interfere with the quadcopter receiver and may
cause a loss of signal and crash. Follow the camera instructions to turn the Wi-Fi off
before attempting to power on the quadcopter. Crash damage is not covered under warranty.
Smart Mode
AP Mode
16 ft
(5 m)
Front
Pilot location
Home position
Placement at startup
SAFE Circle
™
Pilot location
Right transmitter stick
Stick commands move
the Chroma
™
quadcopter
relative to the pilot location
Stick commands move
the Chroma
™
quadcopter
relative to its orientation
Right transmitter stick
Left transmitter stick
Front
=
=
Place the quadcopter outdoors on a at,
level surface.
Set the transmitter ight mode switch to Smart Mode.
Power on the transmitter.
Power on the Chroma.
Complete the Compass
Calibration prior to ight.
For instructions, see the included
Reference Guide or the online video
at www.KnowChroma.com.
The LEDs will show green, rotating counter-clockwise around
the motor pods while the quadcopter acquires a GPS signal.
The front LEDs will show white and the rear will show green when the
quadcopter is ready for ight.
e
f
d
c
b
a
e
f
d
c
b
a
e
f
d
c
b
a
e
f
d
c
b
a
12a
12b
Motor Start Throttle control Flying and Landing After Your Flight
Motor Stop
• The props and motor pods have a letter
code, either “A” or “B” molded in. Match
the “A” props to the “A” motor pods and the
“B” props to the “B” motor pods.
• The “A” props thread on counter-clockwise.
• The “B” props thread on clockwise.
• Tighten the props only nger tight.
DO NOT overtighten.
13 1514
NOTICE: If you begin to lose control, release the control sticks and the model will
self-level.
NOTICE: Return home will only function if
the quadcopter has GPS lock.
Climb
Descend
To land, either slowly lower the left transmitter
stick to descend and land, then stopping the
motors as shown in step 12b:
• To maintain the current
altitude, allow the left
transmitter stick to return
to center.
or select “Return Home” on the ight mode
switch on your transmitter.
The quadcopter will return to the start
position, land and stop the motors. To
cancel the return home function prior to
the quadcopter landing, switch to Smart or
AP Mode on the ight mode switch on your
transmitter.
Solid red
e
f
d
c
b
a
e
f
d
c
b
a
Away from
the pilot
Toward
the pilot
CAUTION: When the home location is set, the quadcopter must be approximately
16 feet (5 meters) from where the pilot will stand during ight, pointing away from
the pilot. If the aircraft is pointed in any other direction, the SAFE Circle™ feature will not
function as expected and may result in personal injury or damage to property. Once the
aircraft’s motors are started, do not change your position.
e
f
d
c
b
a
e
f
d
c
b
a
e
f
d
c
b
a
e
f
d
c
b
a
INSTRUCTION MANUAL (BNF)
e
f
d
c
b
a
A
A
A
B
B
B
e
f
d
c
b
a
e
f
d
c
b
a
e
f
d
c
b
a
WARNING: Stopping the motors while the quadcopter is still in
ight will cause the quadcopter to crash. Crash damage is not
covered under warranty.
After landing, hold the motor stop button, programmed during the
transmitter setup, to stop the motors.
If the quadcopter is less than 20 ft above the original starting
altitude, hold the stop button for 1.5 seconds to stop the motors.
If the quadcopter is more than 20 ft above the original starting
altitude, hold the stop button for 3 seconds to stop the motors.
To restart the motors, position the transmitter sticks
as shown in step 12a.
Install the Flight Battery
Extend the GPS Mast
Install the Landing Gear Legs
4
3
• Slide the fully charged
battery in until it locks.
• Remove the battery by
pressing the locking tab
and sliding the battery
to the rear of the
quadcopter.
• A green LED cycles around the motor pods counter-clockwise until
GPS is acquired
• Once GPS is acquired, the front LEDs are white and the rear are green
• Intended for the beginner pilot
• Maximum distance of 200 m from the pilot
• A purple LED cycles around the motor pods counter-clockwise until
GPS is acquired
• Once GPS is acquired, the front LEDs are white and the rear are purple
• Intended for the intermediate pilot
• Maximum distance of 200 m from the pilot
NOTICE: If the Chroma
™
quadcopter loses GPS signal while ying in either Smart or AP Mode, the LEDs will ash rapidly for 2 seconds and then once every second. The quadcopter will
default to a stable ight mode with similar control response as AP Mode. Return Home will not function. Please familiarize yourself with the controls in AP Mode to ensure a safe return of
the quadcopter in the event of GPS signal loss.
For information on additional ight modes, see the online video at www.KnowChroma.com.
Pay close attention to the LEDs while ying. If at any time the LEDs indicate
the ight battery voltage is low, as shown in the LED reference guide, land the
quadcopter immediately and charge the ight battery.
This aircraft is not compatible with the Blade ST-10+ Personal Ground Station Transmitter.
Fold the inner “T” sheet (A) around the
camera, with the metallic side facing away
from the camera, so it covers the top, sides and
back. DO NOT peel off the backing.
Peel the backing off the rectangular sheet (B).
Wrap sheet B around the back of sheet A,
sealing the rear edges and holding the sides together.
The shield is removable and is held in place by the camera
mount. The front and bottom of the camera are left unshielded
to allow any RF noise to radiate out and away from the quadcopter.
Install the camera mount to the isolation bracket using the provided thumb screw and nut.
The included static camera mount is compatible with
GoPro
®
HERO 3 and 4 cameras.
The Blade
®
Chroma
™
quadcopter includes two
adhesive-backed, metal-foil sheets to provide GoPro
®
users with an extra measure of RF-shielding.
• Slide the assembled camera
mount onto the pre-installed
rail until it locks.
Install the Camera Mount Assembly
to the Mounting Rail
A
A
B
B
e
f
d
c
b
a
e
f
d
c
b
a
e
f
d
c
b
a
e
f
d
c
b
a
e
f
d
c
b
a
e
f
d
c
b
a
e
f
d
c
b
a
e
f
d
c
b
a
e
f
d
c
b
a
e
f
d
c
b
a