® Instruction Manual Bedienungsanleitung Manuel d’utilisation Manuale di Istruzioni
NOTICE All instructions, warranties and other collateral documents are subject to change at the sole discretion of Horizon Hobby, LLC. For up-to-date product literature, visit horizonhobby.com and click on the support tab for this product.
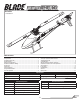
® Box Contents: • Blade 360 CFX Table of Contents Blade Helicopter Belt Tension ............................................................................... 8 Post-Flight Inspections and Maintenance ............................................................. 8 Troubleshooting Guide ......................................................................................... 8 Limited Warranty .................................................................................................
First Flight Preparation • • • • • • • Flying Checklist ❏ Always turn the transmitter on first ❏ Plug the flight battery into the lead from the ESC ❏ Allow the ESC to initialize and arm properly ❏ Fly the model ❏ Land the model ❏ Unplug the flight battery from the ESC ❏ Always turn the transmitter off last Remove and inspect contents Begin charging the flight battery Install the flight battery in the helicopter (once it has been fully charged) Program your computer transmitter Bind your transmitter Familiarize
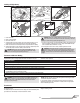
Installing the Flight Battery 1. Lower the throttle. 2. Power on the transmitter. 3. Center the throttle trim. 4. To allow the ESC to arm and to keep rotors from initiating at startup, turn on throttle hold and normal flight mode before connecting the flight battery. 5. Attach hook material to the helicopter frame and loop material to the battery. 6. Install the flight battery on the helicopter frame. Secure the flight battery with a hook and loop strap. Connect the battery cable to the ESC.
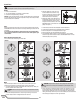
Control Tests CAUTION: You must complete the Rudder and Cyclic tests prior to flight. Failure to complete the tests ensuring the sensor directions are not reversed can cause the helicopter to crash, resulting in property damage and injury. Rudder 1. Power on the transmitter. 2. Turn TH HOLD ON and put transmitter in normal mode. 3. Connect the helicopter battery to the ESC. 4. Move the rudder stick to the right. The tail rotor blades move as shown.
Pre-Flight Checklist ❏ Check all wire connections ❏ Check gears and make sure no teeth are missing ❏ Do a complete control test ❏ Check that servos are functioning properly ❏ Check to make sure flight battery is properly secured ❏ Check to make sure AR7200BX is properly secured ❏ Check all screws and ensure that they are tight ❏ Check belt tension and ensure that it is not too tight or too loose ❏ Check main and tail blades to ensure they are not damaged ❏ Check all links and make sure they move freely but
Gyro Gain Adjustment • If the tail wags or oscillates, lower the gain on the gyro. • If the tail is drifting while hovering, increase the gain on the gyro. On your transmitter’s gyro menu, decrease the gyro gain values a small amount at a time until the helicopter is stable within a particular flight mode. On your transmitter, increase the gyro gain values a small amount at a time until the tail starts to wag/oscillate.
Problem Possible Cause Flight battery has low voltage Flight battery is old or damaged Helicopter power is lacking Flight battery cells are unbalanced Excessive current is being drawn through the BEC Tail drive belt tension is not correct Main rotor head is not spinning in the correct direction Transmitter settings are not correct Helicopter will not lift off Flight battery has low voltage Main rotor blades are installed backwards Rudder control and/or sensor direction reversed The helicopter tail spins o
Warranty Requirements For Warranty consideration, you must include your original sales receipt verifying the proof-of-purchase date. Provided warranty conditions have been met, your Product will be serviced or replaced free of charge. Service or replacement decisions are at the sole discretion of Horizon.
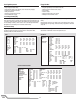
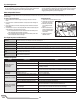
Exploded View / Explosionszeichnung / Vue Éclatée / Vista Esplosa 47 20 16 19 17 20 16 15 21 18 20 25 22 23 26 24 13 27 40
36 51 49 31 29 39 49 38 40 30 49 32 14 37 46 33 34 34 2 41 34
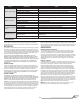
12 6 6 6 45 5 6 12 10 7 11 11 11 42 8 9 8 11 18 6 8 4 5 10 3 44 41 11 11 11 50 11 10 43 45 Parts List / Ersatzteile / Pièces de Rechange / Pezzi di Ricambio # Part # 13 BLH1901 14 BLH1904 English Control/Linkage Ball, Short (10): 360 CFX Landing Gear Set: 360 CFX Tail Servo Boom Mount (2): 360 CFX Tail Pushrod Support/Guide Set: 360 CFX Aluminum Horizontal Stab Fin Mount: 360 CFX Tail Case Set: 360 CFX Tail Rotor Shaft and Drive Pulley (2): 360 CFX Tail Rotor Pitch Lever Set: 3
# Part # 19 BLH4704 20 BLH4705 21 BLH4706 22 BLH4707 23 BLH4708 24 BLH4709 English Fbl Aluminum Head Block: 360 CFX Spindle Set (2): 360 CFX Dampers (4): 360 CFX Deutsch Français Rotorkopfblock Alu: 360 CFX Axe de pieds de pales: 360 CFX Amortisseurs (4): 360 CFX Italiano Blocco testa Fbl in alluminio: 360 CFX Set alberino (2): 360 CFX Smorzatori (4): 360 CFX Bras FBL: 360 CFX Fbl Squadretta rinvio: 360 CFX Moyeu de tête en aluminium: 360 CFX Spindelset (2): 360 CFX Dämpfer (4): 360 CFX Taumelsc
©2014 Horizon Hobby, LLC. Blade, DSM, DSM2, DSMX, Celectra, ModelMatch, AirWare and EC3 are trademarks or registered trademarks of Horizon Hobby, LLC. The Spektrum trademark is used with permission of Bachmann Industries, Inc. BeastX is a registered trademark of Markus Schaack and is used with permission. The Spektrum AR7200BX employs technology exclusively licensed to Horizon Hobby, LLC from freakware GmbH.