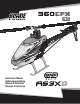
® ® Instruction Manual Bedienungsanleitung Manuel d’utilisation Manuale di Istruzioni
NOTICE All instructions, warranties and other collateral documents are subject to change at the sole discretion of Horizon Hobby, LLC. For up-to-date product literature, visit horizonhobby.com and click on the support tab for this product.
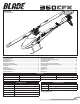
® Box Contents: • Blade 360 CFX 3S Table of Contents First Flight Preparation . ....................................................................................... 4 Flying Checklist ................................................................................................... 4 Low Voltage Cutoff (LVC)....................................................................................... 4 Transmitter Setup........................................................................................
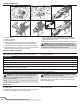
First Flight Preparation Flying Checklist • Remove and inspect contents • Charge the flight battery • Install the flight battery in the helicopter (once it has been fully charged) • Program your computer transmitter • Bind your transmitter • Familiarize yourself with the controls • Find a suitable area for flying ❏❏ Always turn the transmitter on first ❏❏ Turn throttle hold On ❏❏ Plug the flight battery into the lead from the ESC ❏❏ Allow the ESC to initialize and arm properly ❏❏ Perform control t
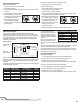
DX7s, DX8 SYSTEM SETUP FUNCTION LIST Model Type Swash Type HELI 1 servo 90 F-Mode Setup Flight Mode Hold F Mode Hold SW Select Trainer F Mode Gyro Mix Hold Knob Aux 2 Gear INH INH INH INH Frame Rate 11ms DSMX Servo Setup Chan Travel THR 100/100 AIL 100/100 ELE 100/100 RUD 100/100 Reverse Normal Normal Normal Normal D/R & Expo Chan Switch Pos (Ail D/R) 0 AILE 1 2 0 ELEV 1 2 0 RUDD 1 2 Chan GER PIT AX2 D/R 100/100 85/85 85/85 100/100 85/85 85/85 100/100 85/85 85/85 Throttle Hold Throttle Expo
Installing the Flight Battery 1. Lower the throttle. 2. Power on the transmitter. 3. Center the throttle trim. 4. To allow the ESC to arm and to keep rotors from initiating at startup, turn on throttle hold and normal flight mode before connecting the flight battery. 5. Attach hook material to the helicopter frame and loop material to the battery. 6. Install the flight battery on the helicopter frame. Secure the flight battery with a hook and loop strap. Connect the battery cable to the ESC. 7.
Control Tests CAUTION: You must complete the Tail Rotor and Cyclic tests prior to every flight. Failure to complete the tests and ensuring the sensor corrects in the proper direction can cause the helicopter to crash, resulting in property damage and injury. Tail Rotor 4. Move the rudder stick to the right. The pitch slider on the tail shaft should move toward the tail case.
Pre-Flight Checklist ❏❏Check all screws and ensure that they are tight ❏❏Check belt tension and ensure that it is not too tight or too loose ❏❏Check main and tail blades to ensure they are not damaged ❏❏Check all links and make sure they move freely but do not pop off easily ❏❏Check that flight battery and transmitter battery are fully charged ❏❏ Check all wires to ensure that they are not cut, pinched, or chaffed and are properly secured ❏❏Check all wire connections ❏❏Check gears and make sure no teeth a
Post-Flight Inspections and Maintenance Ball Links Make sure the plastic ball link holds the control ball, but is not tight (binding) on the ball. When a link is too loose on the ball, it can separate from the ball during flight and cause a crash. Replace worn ball links before they fail. Cleaning Make sure the battery is not connected before cleaning. Remove dust and debris with a soft brush or a dry lint free cloth. Bearings Replace bearings when they become damaged.
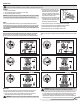
Entering Gain Adjustment Mode DX7s / DX7 G2 / DX8 / DX8 G2 / DX9 / DX18 / DX20 Users: 1. Lower the throttle stick to the lowest position. DX6G2, DX6e and DX6i Users: 1. Lower the throttle stick to the lowest position. 2. Power ON the transmitter. 2. Power ON the transmitter. 3. Install the flight battery on the helicopter frame, securing it with the hook and loop strap. 3. Install the flight battery on the helicopter frame, securing it with the hook and loop strap. 4.
Servo Adjustment The Blade 360 CFX 3S is setup at the factory and test flown. The servo adjustment steps are usually only necessary in special circumstances, such as after a crash or if a servo or linkage is replaced. DX7s / DX7 G2 / DX8 / DX8 G2 / DX9 / DX18 / DX20 Users: 1. Lower the throttle stick to the lowest position. 2. Power ON the transmitter. WARNING: To ensure your safety, always disconnect the motor wires from the ESC before performing the following steps.
Troubleshooting Guide Problem Helicopter will not bind to the transmitter (during binding) Helicopter will not link to the transmitter (after binding) AR636A will not initialize Helicopter will not respond to the throttle but responds to other controls Helicopter power is lacking Helicopter will not lift off The helicopter tail spins out of control The helicopter wobbles in flight Possible Cause Low flight battery or transmitter battery voltage AR636A is not in bind mode Transmitter is not in bin
Inspection or Services If this Product needs to be inspected or serviced and is compliant in the country you live and use the Product in, please use the Horizon Online Service Request submission process found on our website or call Horizon to obtain a Return Merchandise Authorization (RMA) number. Pack the Product securely using a shipping carton. Please note that original boxes may be included, but are not designed to withstand the rigors of shipping without additional protection.
Exploded View / Explosionszeichnung / Vue Éclatée / Vista Esplosa 47 20 16 19 17 20 21 20 16 18 15 25 22 23 26 13 27 50 24
36 51 49 31 29 39 49 38 40 30 49 32 14 37 46 33 34 34 2 51 34
12 6 6 5 53 12 7 42 8 9 55 6 8 55 4 5 10 41 11 11 54 3 44 55 50 11 10 43 43 Parts List / Ersatzteile / Pièces de Rechange / Pezzi di Ricambio # Part # 13 BLH1901 14 BLH1902 English Control/Linkage Ball, Short (10): 360 CFX Landing Gear Set: 360 CFX Tail Servo Boom Mount (2): 360 CFX Tail Pushrod Support/Guide Set: 360 CFX Aluminum Horizontal Stab Fin Mount: 360 CFX Tail Case Set: 360 CFX Tail Rotor Shaft and Drive Pulley (2): 360 CFX Tail Rotor Pitch Lever Set: 360 CFX Tail Rotor Pitch
# Part # 19 BLH4704 20 BLH4705 21 BLH4706 22 BLH4707 23 BLH4708 24 BLH4709 English Fbl Aluminum Head Block: 360 CFX Spindle Set (2): 360 CFX Dampers (4): 360 CFX Deutsch Français Rotorkopfblock Alu: 360 CFX Axe de pieds de pales: 360 CFX Amortisseurs (4): 360 CFX Italiano Blocco testa Fbl in alluminio: 360 CFX Set alberino (2): 360 CFX Smorzatori (4): 360 CFX Bras FBL: 360 CFX Fbl Squadretta rinvio: 360 CFX Moyeu de tête en aluminium: 360 CFX Spindelset (2): 360 CFX Dämpfer (4): 360 CFX Taumelsc
©2018 Horizon Hobby, LLC. Blade, DSM, DSM2, DSMX, AS3X, ModelMatch, Spektrum AirWare, EC3, BNF, and the BNF logo are trademarks or registered trademarks of Horizon Hobby, LLC. The Spektrum trademark is used with permission of Bachmann Industries, Inc. Futaba is a registered trademark of Futaba Denshi Kogyo Kabushiki Kaisha Corporation of Japan. All other trademarks, service marks and logos are property of their respective owners. Patents pending. Created 01/18 55137.