® ® Instruction Manual Bedienungsanleitung Manuel d’utilisation Manuale di Istruzioni
NOTICE All instructions, warranties and other collateral documents are subject to change at the sole discretion of Horizon Hobby, LLC. For up-to-date product literature, visit horizonhobby.com and click on the support tab for this product.
® Box Contents: • Blade 360 CFX 3S Table of Contents Blade Helicopter Belt Tension ............................................................................... 8 Post-Flight Inspections and Maintenance ............................................................. 9 Troubleshooting Guide ....................................................................................... 12 Limited Warranty ...............................................................................................
First Flight Preparation Flying Checklist • • • • • • • ❏ Always turn the transmitter on first ❏ Turn throttle hold On ❏ Plug the flight battery into the lead from the ESC ❏ Allow the ESC to initialize and arm properly ❏ Perform control test ❏ Place the model onto flat ground at least 10 meters from the pilot.
DX7s, DX8 SYSTEM SETUP FUNCTION LIST Model Type Swash Type HELI 1 servo 90 F-Mode Setup Flight Mode Hold F Mode Hold SW Select Trainer F Mode Gyro Mix Hold Knob Aux 2 Gear INH INH INH INH Frame Rate 11ms DSMX Servo Setup Chan Travel THR 100/100 AIL 100/100 ELE 100/100 RUD 100/100 Reverse Normal Normal Normal Normal D/R & Expo Chan Switch Pos (Ail D/R) 0 AILE 1 2 0 ELEV 1 2 0 RUDD 1 2 Chan GER PIT AX2 D/R 100/100 85/85 85/85 100/100 85/85 85/85 100/100 85/85 85/85 Throttle Hold Throttle Expo 0
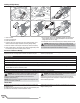
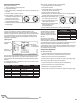
Installing the Flight Battery 1. 2. 3. 4. Lower the throttle. Power on the transmitter. Center the throttle trim. To allow the ESC to arm and to keep rotors from initiating at startup, turn on throttle hold and normal flight mode before connecting the flight battery. 5. Attach hook material to the helicopter frame and loop material to the battery. 6. Install the flight battery on the helicopter frame. Secure the flight battery with a hook and loop strap. Connect the battery cable to the ESC. 7.
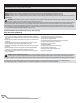
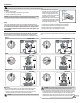
Control Tests CAUTION: You must complete the Tail Rotor and Cyclic tests prior to every flight. Failure to complete the tests and ensuring the sensor corrects in the proper direction can cause the helicopter to crash, resulting in property damage and injury. 4. Move the rudder stick to the right. The pitch slider on the tail shaft should move toward the tail case. If the pitch slider moves in the opposite direction, ensure the rudder channel reverse setting within the transmitter is set to normal. 5.
Pre-Flight Checklist ❏ Check all wire connections ❏ Check gears and make sure no teeth are missing ❏ Do a complete control test ❏ Verify the AR636A sensor is correcting in the proper directions ❏ Check that servos are functioning properly ❏ Check to make sure flight battery is properly secured ❏ Check to make sure AR636A is properly secured ❏ Check all screws and ensure that they are tight ❏ Check belt tension and ensure that it is not too tight or too loose ❏ Check main and tail blades to ensure they are n
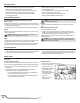
Post-Flight Inspections and Maintenance Ball Links Make sure the plastic ball link holds the control ball, but is not tight (binding) on the ball. When a link is too loose on the ball, it can separate from the ball during flight and cause a crash. Replace worn ball links before they fail. Cleaning Make sure the battery is not connected before cleaning. Remove dust and debris with a soft brush or a dry lint free cloth. Bearings Replace bearings when they become damaged.
DX7s / DX7 G2 / DX8 / DX8 G2 / DX9 / DX18 / DX20 Users: 1. Lower the throttle stick to the lowest position. Entering Gain Adjustment Mode DX6G2, DX6e and DX6i Users: 1. Lower the throttle stick to the lowest position. 2. Power ON the transmitter. 2. Power ON the transmitter. 3. Install the flight battery on the helicopter frame, securing it with the hook and loop strap. 3. Install the flight battery on the helicopter frame, securing it with the hook and loop strap. 4.
Servo Adjustment Your Blade 360 CFX 3S was setup at the factory and test flown. The servo adjustment steps are usually only necessary in special circumstances, such as after a crash or if a servo or linkage is replaced. 7. Release the sticks and proceed to Adjusting the Servo Neutral Position to make any desired changes. DX7s / DX7 G2 / DX8 / DX8 G2 / DX9 / DX18 / DX20 Users: 1. Lower the throttle stick to the lowest position.
Troubleshooting Guide Problem Helicopter will not bind to the transmitter (during binding) Helicopter will not link to the transmitter (after binding) AR636A will not initialize Helicopter will not respond to the throttle but responds to other controls Helicopter power is lacking Helicopter will not lift off The helicopter tail spins out of control The helicopter wobbles in flight Possible Cause Low flight battery or transmitter battery voltage AR636A is not in bind mode Transmitter is not in bind mod
Warranty Requirements For Warranty consideration, you must include your original sales receipt verifying the proof-of-purchase date. Provided warranty conditions have been met, your Product will be serviced or replaced free of charge. Service or replacement decisions are at the sole discretion of Horizon.
HINWEIS Alle Anweisungen, Garantien und anderen zugehörigen Dokumente können im eigenen Ermessen von Horizon Hobby, LLC jederzeit geändert werden. Die aktuelle Produktliteratur finden Sie auf horizonhobby.com unter der Registerkarte „Support“ für das betreffende Produkt.
® Lieferumfang: • Blade 360 CFX 3S Inhaltsverzeichnis Einstellung des Gyro-Gain (Gyro-Empfindlichkeit) ............................................... 20 Riemenspannung des Blade Helikopters ........................................................... 20 Kontrollen nach dem Flug und Wartung .............................................................. 20 Leitfaden zur Fehlerbehebung ............................................................................ 24 Garantie und Service Informationen ..........
Vorbereitung auf den ersten Flug Checkliste für den Flug • • • • • • • ❏ Stets den Sender zuerst einschalten. ❏ Den Throttle-Hold auf EIN stellen. ❏ Den Flug-Akku in die Leitung vom Geschwindigkeitsregler stecken. ❏ Den Geschwindigkeitsregler ordnungsgemäß initialisieren und aktivieren lassen. ❏ Steuerungstest durchführen. ❏ Das Modell mindestens 10 m entfernt vom Piloten auf ebenem Grund abstellen. Sicherstellen, dass der Bereich frei von Hindernissen ist. ❏ Das Modell fliegen. ❏ Das Modell landen.
DX7s, DX8 Systemeinstellung Modelltyp Taumelscheibentyp Funktionsliste HELI 1 servo Normal Flugzustand Setup Flugzustand F Mode Autorotation Halt Schalterauswahl Trainer F Mode Gyro Mix Hold Knob Aux 2(K7) FW Aus Aus Aus Aus Pulsrate Servoeinstellung Kanal Servoweg Gas 100/100 ROL 100/100 NCK 100/100 HCK 100/100 Kanal FW PIT K7 D/R & Expo Kanal AILE ELEV RUDD 11ms DSMX Laufrichtung Normal Normal Normal Normal Schalter Pos (Ail D/R) 0 1 2 0 1 2 0 1 2 D/R 100/100 85/85 85/85 100/100 85/85 85/
Installieren des Flugakkus 1. Reduzieren Sie das Gas. 2. Schalten Sie den Sender ein. 3. Zentrieren Sie die Gastrimmung. 4. Um zu ermöglichen, dass sich die ESC aktiviert und verhindert, dass die Rotoren beim Start initialisiert werden, schalten Sie die Autorotation ein und aktivieren Sie den normalen Flugmodus, bevor Sie den Flugakku einsetzen. 5. Befestigen Sie das Hakenmaterial am Helikopterrahmen und das Flauschmaterial am Akku. 6. Installieren Sie den Flugakku am Helikopterrahmen.
Kontrolltests ACHTUNG: Sie müssen den Seitenruder- und zyklischen Test durchführen, bevor Sie einen Flug starten. Wenn Sie die Tests nicht durchführen und sich somit nicht der korrekten Sensorrichtungen vergewissern, kann der Helikopter abstürzen und Sachschäden sowie Verletzungen verursachen. bewegen. Wenn sich der Schieber für Heckrotor den Fluglagenwinkel in die entgegen1. Schalten Sie den Sender ein. gesetzte Richtung bewegt, stellen Sie 2.
Checkliste für den Flug ❏ Überprüfen Sie alle Stecker und Kabelverbindungen ❏ Überprüfen Sie die Zahnräder auf fehlende Zähne ❏ Führen Sie einen vollständigen Test der Steuerung durch ❏ Überprüfen Sie die Servos auf deren Funktionsfähigkeit ❏ Überprüfen Sie, ob der Flugakku ordnungsgemäß befestigt ist ❏ Überprüfen Sie, ob der AR636A ordnungsgemäß befestigt ist ❏ Überprüfen Sie, ob alle Schrauben fest angezogen sind ❏ Überprüfen Sie, ob die Riemenspannung richtig eingestellt ist ❏ Überprüfen Sie die Haupt-
Kontrollen nach dem Flug und Wartung Gelenkköpfe Stellen Sie sicher, dass der Kunststoff-Gelenkkopf die Rollkugel hält, aber nicht an der Kugel haftet (fest verbunden). Wenn ein Gelenkkopf zu locker auf der Kugel sitzt, kann er sich während des Fluges von der Kugel lösen und einen Absturz verursachen. Tauschen Sie abgenutzte Gelenkköpfe aus, bevor sie ausfallen. Reinigung Stellen Sie vor einer Reinigung sicher, dass der Akku nicht angeschlossen ist.
In den Gain-Anpassungsmodus übergehen Benutzer von DX6, DX6e und DX6i: Benutzer von DX7s, DX7 (G2), DX8, DX8 (G2), DX9, DX18 und DX20: 1. Den Gashebel in die niedrigste Position bringen. 1. Den Gashebel in die niedrigste Position bringen. 2. Den Sender einschalten. 2. Den Sender einschalten. 3. Den Flug-Akku auf dem Hubschrauberrahmen montieren und mit Klettband sichern. 3. Den Flug-Akku auf dem Hubschrauberrahmen montieren und mit Klettband sichern. 4.
Servo-Anpassung Der Blade Trio 360 CFX 3S wurde werksseitig eingerichtet und für den Flug getestet. Die Schritte für die Servo-Anpassungen sind nur unter besonderen Umständen notwendig, wie nach einem Absturz oder wenn ein Servo oder ein Gestänge ersetzt wird. WARNUNG: Zur Wahrung der Sicherheit immer die Motorkabel vom Geschwindigkeitsregler entfernen, ehe die folgenden Schritte durchgeführt werden.
Leitfaden zur Fehlerbehebung Problem Mögliche Ursache Lösung Geringe Spannung des Flugakkus oder der Senderbatterie Der Helikopter kann die Bindung zum Sender nicht herstellen (während der Bindung) Der Helikopter kann die Bindung zum Sender nicht herstellen (nach der Bindung) Laden Sie den Flugakku bzw. die Senderbatterien vollständig auf oder ersetzen Sie Flugakku bzw.
Die Garantie schließt Schäden, die durch falschen Einbau, falsche Handhabung, Unfälle, Betrieb, Service oder Reparaturversuche, die nicht von Horizon ausgeführt wurden aus. Ausgeschlossen sind auch Fälle die bedingt durch (vii) eine Nutzung sind, die gegen geltendes Recht, Gesetze oder Regularien verstoßen haben. Rücksendungen durch den Käufer direkt an Horizon oder eine seiner Landesvertretung bedürfen der Schriftform.
REMARQUE La totalité des instructions, garanties et autres documents est sujette à modification à la seule discrétion d’Horizon Hobby, LLC. Pour obtenir la documentation à jour, rendez-vous sur le site horizonhobby.com et cliquez sur l’onglet de support de ce produit.
® Contenu de la boîte: • Blade 360 CFX 3S Table des matières Préparation au premier vol ................................................................................. 28 Procédure de vol ................................................................................................ 28 Coupure par tension faible (LVC) ........................................................................ 28 Réglage de l’émetteur........................................................................................
Préparation avant le premier vol Liste de vérification avant le vol • Retirez et inspectez le contenu • Chargez la batterie de vol • Installez la batterie de vol dans l'hélicoptère (une fois celle-ci entièrement chargée) • Programmez votre émetteur • Affectez votre émetteur • Familiarisez-vous avez les commandes • Choisissez un espace de vol adapté ❏ Allumez toujours l'émetteur en premier ❏ Activez le verrouillage des gaz ❏ Branchez la batterie de vol sur le câble du variateur ESC ❏ Laissez le variateur E
DX7s, DX8 PARAMETRES SYSTEME LISTE DES FONCTIONS Type de modèle Type de plateau cyclique Course des servos Voie Course Gaz 100/100 Ailerons 100/100 Profondeur 100/100 Dérive 100/100 Mode de vol Mode de vol Auto-rotation Choix interrupteur Écolage Mode de vol Gyro Mix Mode auto-rotation Potentiomètre HELI 1 servo 90 F Mode Hold Inversion Normal Normal Normal Normal Voie Train Pas AX2 D/R & Expo Aux 2 Train INH INH INH Voie Ailerons Profondeur INH Taux de rafraîchissement 11ms DSMX Dérive Inter.
Installation de la batterie de vol au CEV (ESC). 7. Ne faites pas bouger l’hélicoptère pendant l’initialisation du AR636A. Le plateau de cyclique se déplacera vers le haut et vers le bas indiquant ainsi que le module est paré. L’AR636A allumera en outre sa DEL de statut en orange fixe. lorsqu’il est paré. 8. Le moteur de l’hélicoptère émettra deux signaux indiquant ainsi que le CEV (ESC) est armé. 1. Ramenez à fond vers l’arrière la manette des gaz. 2. Mettez l’émetteur en fonction. 3.
Test des commandes ATTENTION : Il vous faut, avant d’effectuer un vol, avoir effectué les tests de Direction et de Cyclique. Ne pas avoir effectué ces tests qui permettent de s’assurer que les directions du capteur ne sont pas inversées, comporte le risque d’écrasement au sol de l’hélicoptère, avec pour conséquences des dégâts matériels et des blessures corporelles.
Check-list avant vol ❏ Contrôlez tous les câbles pour vous assurer qu’ils ne sont ni coupés, ni coincés, ni mis à nu par frottement et qu’ils sont sécurisés correctement ❏ Contrôlez toutes des connexions de câbles ❏ Contrôlez les engrenages et assurez-vous qu’il ne manque pas la moindre dent ❏ Effectuez un test de commande complet ❏ Contrôlez le fonctionnement correct des servos ❏ Contrôlez la sécurisation correcte de la batterie de vol ❏ Contrôlez la sécurisation correcte du AR636A ❏ Contrôlez toutes les
Inspections après-vol et Maintenance Articulations à bille Assurez-vous que l'articulation à bille en plastique maintient la rotule de commande en place, mais sans la comprimer (grippage). En revanche, un serrage insuffisant de l'articulation peut entraîner sa séparation de la rotule pendant un vol et provoquer la chute de l'appareil. Remplacez les articulations à bille usées avant qu’elles ne deviennent défectueuses.
Utilisateurs de DX7s, DX7 (G2), DX8, DX8 (G2), DX9, DX18 et DX20: 1. Baissez le manche des gaz à fond. Accès au Mode ajustement des gains Utilisateurs de DX6, DX6e et DX6i: 1. Baissez le manche des gaz à fond. 2. Mettez l’émetteur sous tension. 2. Mettez l’émetteur sous tension. 3. Installez la batterie sur le châssis de l’hélicoptère, fixez-la à l’aide de la sangle auto-agrippante. 3. Installez la batterie sur le châssis de l’hélicoptère, fixez-la à l’aide de la sangle auto-agrippante. 4.
Paramétrage de servo du Blade 360 CFX 3S Utilisateurs de DX7s, DX7 (G2), DX8, DX8 (G2), DX9, DX18 et DX20: 1. Baissez le manche des gaz à fond. Votre Blade Trio 360 CFX 3S a été réglé et testé en usine. Le réglage du neutre des servos est nécessaire que dans certaines circonstances comme après un crash ou le remplacement d’un servo ou de sa tringlerie. 2. Mettez l’émetteur sous tension.
Guide de dépannage Problème Cause possible Solution Rechargez complètement ou remplacez la batterie de vol et/ou les piles de l'émetTension de batterie de vol ou de batterie d'émetteur faible teur Assurez-vous que la prise d'affectation est branchée dans le port BND/DAT du L'AR636A ne se trouve pas en mode d'affectation (bind) AR636A L'hélicoptère ne veut pas s'affecter à l'émetteur (en Référez-vous au manuel d'instructions de votre émetteur pour des informations L'émetteur ne se trouve pas en mode d'aff
Limitation des dommages Horizon ne saurait être tenu pour responsable de dommages conséquents directs ou indirects, de pertes de revenus ou de pertes commerciales, liés de quelque manière que ce soit au produit et ce, indépendamment du fait qu’un recours puisse être formulé en relation avec un contrat, la garantie ou l’obligation de garantie. Par ailleurs, Horizon n’acceptera pas de recours issus d’un cas de garantie lorsque ces recours dépassent la valeur unitaire du produit.
AVVISO Tutte le istruzioni, le garanzie e gli altri documenti pertinenti sono soggetti a cambiamenti a totale discrezione di Horizon Hobby, LLC. Per una documentazione aggiornata sul prodotto, visitare il sito horizonhobby.com e fare clic sulla sezione Support del prodotto.
® Contenuto della scatola: • Blade 360 CFX 3S Indice Preparazione al primo volo ................................................................................. 40 Lista dei controlli prevolo ................................................................................... 40 Taglio di bassa tensione (LVC) ............................................................................ 40 Configurazione del trasmettitore ........................................................................
Preparazione al primo volo Controlli prima del volo • Estrarre il contenuto dalla scatola e controllarlo. • Caricare la batteria di volo • Installare la batteria di volo sull'elicottero (dopo averla caricata completamente) ❏ Accendere sempre prima la trasmittente ❏ Attivare la funzione Throttle Hold.
DX7s, DX8 SYSTEM SETUP FUNCTION LIST Tipo di modello Tipo di piatto HELI 1 servo 90 F-Mode Setup Modalità di volo Hold F Mode Hold SW Select Trainer F Mode Gyro Mix Hold Knob Aux 2 Gear INH INH INH INH Frame Rate 11ms DSMX Servo Setup Can. Corsa THR 100/100 AIL 100/100 ELE 100/100 RUD 100/100 Reverse Normal Normal Normal Normal D/R & Expo Chan Pos. Interr. (Ail D/R) 0 AILE 1 2 0 ELEV 1 2 0 RUDD 1 2 Can.
Installazione della batteria di volo 1. Abbassare il throttle. 2. Accendere il trasmettitore. 3. Centrare il trim del throttle. 4. Per consentire al regolatore di velocità (ESC) di armarsi e per evitare che i rotori inizino a ruotare all’avvio, attivare il Throttle Hold e la modalità di volo normale prima di collegare la batteria di volo. Fare riferimento al manuale del trasmettitore per ulteriori informazioni sulla programmazione del Throttle Hold e sulla modalità di volo normale. 5.
Test di controllo ATTENZIONE: è necessario eseguire i test del timone e del comando ciclico prima di effettuare il volo. La mancata esecuzione dei test per verificare che la direzione dei sensori non sia invertita può far schiantare l’elicottero provocando lesioni e danni materiali. cotto scorrevole si muove nella direzione opposta, accertarsi che l'inversione del canale del direzionale sia impostata su normale. 5. Rilasciare il comando del direzionale.
Elenco di controllo prima del volo ❏ Controllare tutti i cavi assicurandosi che non siano tagliati, stretti o schiacciati e che siano adeguatamente protetti ❏ Controllare che tutti i cavi siano collegati ❏ Controllare gli ingranaggi e assicurarsi che non manchino denti ❏ Eseguire un test completo dei comandi ❏ Controllare che i servo funzionino correttamente ❏ Verificare che la batteria di volo sia correttamente fissata ❏ Verificare che il ricevitore AR7200BX sia correttamente fissato ❏ Controllare tutte le vi
Ispezioni dopo il volo e manutenzione Attacchi a sfera Verificare che le sfere siano tenute saldamente, ma che non siano troppo strette. Se un attacco è troppo largo, potrebbe staccarsi in volo e causare un incidente. Sostituire gli attacchi usurati prima che cedano. Pulizia Accertarsi che la batteria non sia collegata prima di effettuare la pulizia. Rimuovere polvere e depositi con una spazzola morbida o un panno asciutto che non lascia residui. Cuscinetti Sostituire i cuscinetti se sono danneggiati.
Utenti DX7s, DX7 (G2), DX8, DX8 (G2), DX9, DX18 e DX20: 1. Abbassare completamente lo stick del gas. Impostazione della modalità di regolazione della sensibilità Utenti DX6, DX6e e DX6i: 1. Abbassare completamente lo stick del gas. 2. Accendere la trasmittente. 2. Accendere la trasmittente. 3. Installare la batteria di volo nel telaio dell'elicottero, fissandola con la fascetta a strappo. 3. Installare la batteria di volo nel telaio dell'elicottero, fissandola con la fascetta a strappo. 4.
Regolazione servocomandi Blade 360 CFX 3S Il Blade 360 CFX 3S è stato configurato in fabbrica e testato in volo. La regolazione dei servi è necessaria solo in circostanze particolari, ad esempio dopo un impatto o in caso di sostituzione di un servo o di un rinvio. AVVERTENZA: per ragioni di sicurezza scollegare sempre i fili del motore dall'ESC prima di procedere come segue. Dopo aver completato le regolazioni, ricollegare i fili del motore all'ESC prima di far volare il modello.
Guida alla risoluzione dei problemi Problema Possibile causa Tensione bassa della batteria di volo o della batteria del trasmettitore L'elicottero non riesce a stabilire il binding con il Il ricevitore AR7200BX non è in modalità di binding trasmettitore (durante la Il trasmettitore non è in modalità di binding procedura di binding) Trasmettitore troppo vicino l'elicottero durante il processo di binding Elicottero è associato a un diverso modello in L'elicottero non riesce a stabilire il collegamento memori
Indicazioni di sicurezza Questo è un prodotto sofisticato di hobbistica e non è un giocattolo. Esso deve essere manipolato con cautela, con giudizio e richiede delle conoscenze basilari di meccanica e delle facoltà mentali di base. Se il prodotto non verrà manipolato in maniera sicura e responsabile potrebbero risultare delle lesioni, dei gravi danni a persone, al prodotto o all’ambiente circostante. Questo prodotto non è concepito per essere usato dai bambini senza una diretta supervisione di un adulto.
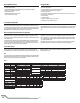
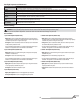
Exploded View / Explosionszeichnung / Vue Éclatée / Vista Esplosa 47 20 16 19 17 20 21 20 16 18 15 25 22 23 26 24 13 27 50
36 51 49 31 29 39 49 38 40 30 49 32 14 37 46 33 34 34 2 51 34
12 6 6 6 45 5 6 12 10 7 11 11 11 42 8 9 8 11 18 6 8 4 5 10 11 11 3 44 41 11 50 11 10 43 45 Parts List / Ersatzteile / Pièces de Rechange / Pezzi di Ricambio # Part # 13 BLH1901 14 BLH1902 English Control/Linkage Ball, Short (10): 360 CFX Landing Gear Set: 360 CFX Tail Servo Boom Mount (2): 360 CFX Tail Pushrod Support/Guide Set: 360 CFX Aluminum Horizontal Stab Fin Mount: 360 CFX Tail Case Set: 360 CFX Tail Rotor Shaft and Drive Pulley (2): 360 CFX Tail Rotor Pitch Lever Set: 36
# Part # 19 BLH4704 20 BLH4705 21 BLH4706 22 BLH4707 23 BLH4708 24 BLH4709 English Fbl Aluminum Head Block: 360 CFX Spindle Set (2): 360 CFX Dampers (4): 360 CFX Deutsch Français Rotorkopfblock Alu: 360 CFX Axe de pieds de pales: 360 CFX Amortisseurs (4): 360 CFX Italiano Blocco testa Fbl in alluminio: 360 CFX Set alberino (2): 360 CFX Smorzatori (4): 360 CFX Bras FBL: 360 CFX Fbl Squadretta rinvio: 360 CFX Moyeu de tête en aluminium: 360 CFX Spindelset (2): 360 CFX Dämpfer (4): 360 CFX Taumelsc
©2017 Horizon Hobby, LLC. Blade, DSM, DSM2, DSMX, AS3X, ModelMatch, Spektrum AirWare, EC3, BNF, and the BNF logo are trademarks or registered trademarks of Horizon Hobby, LLC. The Spektrum trademark is used with permission of Bachmann Industries, Inc. Futaba is a registered trademark of Futaba Denshi Kogyo Kabushiki Kaisha Corporation of Japan. All other trademarks, service marks and logos are property of their respective owners. Patents pending.