® Instruction Manual
NOTICE All instructions, warranties and other collateral documents are subject to change at the sole discretion of Horizon Hobby, Inc. For up-to-date product literature, visit horizonhobby.com and click on the support tab for this product.
® hank you for purchasing the Blade 350 QX quadcopter. You are in for an exciting experience with this exceptional flying machine. With GPS, pressure and compass sensors added to the SAFE™ (Sensor Assisted Flight Envelope) system, the 350 QX has some incredible features. Position hold, altitude command and self-leveling provide you with a smooth and manageable flight performance.
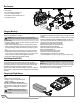
Box Contents • Blade 350 QX • Camera Mount • 3S 11.1V 2200mAh Li-Po Battery Pack • 2–3S DC Li-Po Balancing Charger • DX5e DSMX 5-Channel Transmitter (RTF only) • 4 AA Batteries (RTF only) Charging Warnings The Battery Charger (EFLC3010) included with your quadcopter has been designed to safely charge the Li-Po battery. CAUTION: All instructions and warnings must be followed exactly. Mishandling of Li-Po batteries can result in a fire, personal injury and/or property damage.
The Battery Charging Process 1. Charge only batteries that are cool to the touch and are not damaged. Look at the battery to make sure it is not damaged e.g., swollen, bent, broken or punctured. 2. Attach the input cord of the charger to an appropriate power supply, such as a 12V battery or 12V DC power supply. 3. When the Li-Po charger has been correctly powered up, there will be an approximate 3-second delay, then an audible “beep” and the green (ready) LED will flash. 4.
Transmitter Setup (BNF) CAUTION: When using a Futaba transmitter with a Spektrum DSM module, you must reverse the throttle channel and rebind. Refer to your Spektrum module manual for binding and failsafe instructions. Refer to your Futaba transmitter manual for instructions on reversing the throttle channel.
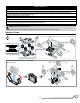
Transmitter Control Layout (RTF) Dual Rate Switch (Mode 1) not shown Bind/Trainer Switch (Mode 2) Flight Mode Switch (Mode 2) Rudder/Yaw (Modes 2 and 1) Dual Rate Switch (Mode 2) Bind/Trainer Switch (Mode 1) not shown Flight Mode Switch (Mode 1) not shown Aileron/Roll (Modes 2 and 1) Throttle/Altitude (Mode 2) Elevator/Pitch (Mode 1) Elevator/Pitch (Mode 2) Throttle/Altitude (Mode 1) Rudder Trim Aileron Trim Throttle Trim (Mode 2) Elevator Trim (Mode 1) Elevator Trim (Mode 2) Throttle Trim (Mode 1) P
Binding • If you purchased the ready-to-fly (RTF) model, the transmitter is bound to the model at the factory. If for any reason the model needs to be re-bound, follow the directions for the Bind-N-Fly® (BNF) version below. ® To bind or re-bind your 350 QX to your chosen DSM2/DSMX transmitter, please follow the directions below along with the binding instructions included with your transmitter: Entering Bind Mode The Binding Process 1.
Flight Mode Switches GPS Enabled Functions Return Home (Rapid Red flashing LED on the 350 QX) TRAINER Smart Mode (Solid Green LED on the 350 QX) Stability Mode (Solid Blue LED on the 350 QX) Agility Mode (Solid Red LED on the 350 QX) Flight Modes M d E Explained l i d Stick Relativity Elevator input Aileron input Left Right Forward Back Aircraft response relative to the pilot location SAFE Circle Flight Mode 1– Stability Mode (Solid Blue Indicator LED) • Self-Leveling– Brings the 350 QX to a level atti
Audible Alerts and LED Codes The motors will Beep under the following conditions: • Any time the props stop spinning after they have been initialized. • After 30 seconds of no throttle input (waiting armed on the ground).
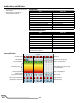
Flying LED Codes Sequence Solid green Smart Mode, with GPS lock Smart Mode, no GPS lock 3 green flashes, pause Stability Mode, with pressure Slow green flash Stability Mode, with GPS lock Solid blue Stability Mode, no GPS lock 3 blue flashes, pause Stability Mode, GPS disabled Slow blue flash Solid red Agility Mode, with GPS lock Agility Mode, no GPS lock 3 red flashes, pause Agility Mode, GPS disabled Slow red flash Flight mode set to Smart Mode Flight mode set to Stability Mode Shows flight mode
GPS Functionality of the 350 QX To acquire a reliable GPS signal, it is important the 350 QX has a clear view of the sky. Obstructions that can affect the aircraft’s ability to acquire an acceptable signal include: • Flying close to or around tall/big buildings • Flying under dense vegetation • Flying indoors or under a structure If you lose or cannot acquire a GPS lock and home position, the aircraft will not have Stick Relativity, SAFE Circle, Position Hold or Return Home functions available.
Preparing the 350 QX For Flight Smart Mode Flying 350 QX home location SAFE Circle 16 feet (5 meters) Pilot location 1. Power on the transmitter with the flight mode set to Smart Mode, the throttle stick down and the throttle trim at neutral. 2. Install a charged battery, plug it in and close the hatch. 3. With the quad on a level surface, turn on the power switch and allow the 350 QX to initialize. If the GPS is enabled, wait for the GPS signal to be acquired, which is indicated by a solid green LED.
Landing To land the 350 QX there are two options: • Guide the aircraft to where you wish to land and reduce the throttle. Reduce the throttle trim after landing to disarm the motors. • Activate the Return Home function to return the 350 QX to the assigned home location and land automatically. CAUTION: Do not activate the Return Home function if the 350 QX is showing the low battery indication. Manually land the aircraft immediately.
Airframe Maintenance Replacing the body Body Screw Locations Disassembly of the old airframe 1. Ensure the battery is disconnected from the quadcopter. 2. Remove the 2 machine screws from each propeller and remove the propellers. 3. Remove the 32 1.5mm hex screws from the bottom of the frame to separate the upper and lower body pieces. 4. Unplug the compass sensor from the flight control board. Remove the landing gear with compass sensor and place it in a safe area away from magnets.
Compass Calibration The Flight Controller on the 350 QX has automatic magnetic declination calibration, so you will not have to worry about looking up the magnetic declination at your location and changing settings on your 350 QX to get accurate compass measurements. It is possible, however, that your compass may need to be calibrated if it is exposed to strong magnetic fields. Compass calibration procedure: 1. Go to an open space outdoors away from metal.
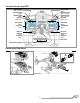
ESC and Motor Assignment Procedure Motor Numbers Motor number 1 Motor number 2 Motor number 4 Motor number 3 1. Begin with the transmitter off and connect a flight battery to the 350 QX. 2. Power on the quadcopter on a level surface and wait for the rapid blue flashing LED to indicate the aircraft has entered bind mode. 3. With the throttle stick in the full throttle position, press/ pull the bind button/switch and power on your transmitter.
Limited Warranty What this Warranty Covers Horizon Hobby, Inc., (Horizon) warrants to the original purchaser that the product purchased (the “Product”) will be free from defects in materials and workmanship at the date of purchase.
FCC Information This device complies with part 15 of the FCC rules. Operation is subject to the following two conditions: (1) This device may not cause harmful interference, and (2) this device must accept any interference received, including interference that may cause undesired operation. CAUTION: Changes or modifications not expressly approved by the party responsible for compliance could void the user’s authority to operate the equipment.
©2013 Horizon Hobby, Inc. Blade, SAFE, SAFE Circle, the SAFE logo, Bind-N-Fly, the BNF logo, E-flite, Celectra, DSM, DSM2, DSMX, and the Horizon Hobby logo are trademarks or registered trademarks of Horizon Hobby, Inc. The Spektrum trademark is used with permission of Bachmann Industries, Inc. US 7,391,320. Other patents pending.