
User Manual

5
EN
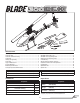
Installing the Flight Battery
CAUTION: Always disconnect the Li-Po battery from the aircraft receiver when not fl ying to avoid over-discharging the battery. Batteries discharged to a
voltage lower than the lowest approved voltage may become damaged, resulting in loss of performance and potential fi re when batteries are charged.
1. Lower the throttle.
2. Power on the transmitter.
3. Center the throttle trim.
4. To allow the ESC to arm and to keep rotors from initiating at startup, turn
on throttle hold and normal fl ight mode before connecting the fl ight battery.
Please refer to your transmitter manual for more information on program-
ming throttle hold and normal fl ight mode.
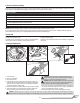
5. Attach hook material to the helicopter frame and loop material to the battery.
6. Install the fl ight battery on the helicopter frame. Secure the fl ight battery
with a hook and loop strap. Connect the battery cable to the ESC.
CAUTION: Always keep the power lead positioned AWAY from the
elevator servo. Failure to do so could cause the lead to get caught
and will result in crash causing property damage and injury.
CAUTION: Make sure the fl ight battery does not come in contact with
the motor. Failure to do so will cause the motor, ESC and battery to
overheat, resulting in crash, causing property damage and injury.
7. Do not move the helicopter until the AR7200BX initializes. The swashplate
will move up and down indicating that the unit is ready. The AR7200BX will
also emit a solid BLUE Status LED when it is ready.
8. The helicopter motor will emit 2 tones, indicating the ESC is armed.
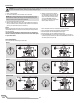
Binding Procedure
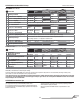
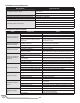
1. Program your transmitter using the Transmitter Setup found in this manual.
2. Insert the bind plug in the BND/DAT port on the receiver.
3. Connect the fl ight battery to the ESC. The H menu LED should be fl ashing, indicating the AR7200BX is in bind mode.
4. Move the throttle stick to the desired failsafe position (low throttle position in normal mode).
5. Follow the procedures of your specifi c transmitter to enter Bind Mode. The system will connect within a few seconds. Once connected, the H LED will turn
off and the AR7200BX will start the initialization process.
6. When the initialization process is complete, the Status LED light will come ON solid BLUE.
7. Disconnect the fl ight battery and remove the bind plug from the AR7200BX. Store the bind plug in a convenient place.
NOTICE: Remove the bind plug to prevent the system from entering bind mode the next time the power is turned on.
If you encounter problems, obey binding instructions and refer to transmitter troubleshooting guide for other instructions. If needed, contact the appropriate
Horizon Product Support offi ce. For a list of compatible DSM transmitters, please visit www.bindnfl y.com.
Binding is the process of programming the receiver to recognize the GUID (Globally Unique Identifi er) code of a single specifi c transmitter. You need to ‘bind’ your
chosen Spektrum™ DSM2/DSMX technology equipped aircraft transmitter to the receiver for proper operation.
Transmitter and Receiver Binding
Throttle Hold
Throttle hold only turns off the motor on an electric helicopter. You must
maintain pitch and direction control.
The blades will spin if throttle hold is OFF. For safety, turn throttle hold ON any
time you need to touch the helicopter or check the direction controls.
Throttle hold is also used to turn off the motor if the helicopter is out of control,
in danger of crashing, or both.
Please refer to your transmitter manual for more information on programming
throttle hold.