® Instruction Manual Bedienungsanleitung Manuel d’utilisation Manuale di Istruzioni
NOTICE All instructions, warranties and other collateral documents are subject to change at the sole discretion of Horizon Hobby, LLC. For up-to-date product literature, visit horizonhobby.com and click on the support tab for this product.
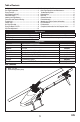
Table of Contents Box Contents ....................................................................3 First Flight Preparation ......................................................4 Flying Checklist ................................................................4 Low Voltage Cutoff (LVC) ...................................................4 Transmitter Setup .............................................................4 Installing the Flight Battery ...............................................
First Flight Preparation Flying Checklist • Remove and inspect contents • Begin charging the flight battery (not included) • Install the flight battery in the helicopter (once it has been fully charged) • Program your computer transmitter • Bind your transmitter • Familiarize yourself with the controls • Find a suitable area for flying ❏ ❏ ❏ ❏ ❏ ❏ ❏ Always turn the transmitter on first Plug the flight battery into the lead from the ESC Allow the ESC to initialize and arm properly Fly the model Land the model
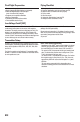
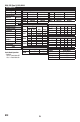
DX6i SETUP LIST ADJUST LIST Model Type HELI Swash Type 1 servo 90 TRAVEL ADJ Channel THRO AILE ELEV RUDD GYRO PITC REVERSE Channel THRO AILE ELEV RUDD GYRO PITC Direction N N R R N R Modulation Type AUTO DSMX-ENABLE D/R COMBI D/R SW Timer Down Timer Switch AILE 4:00 THR CUT Travel 100/110 100/100 100/100 100/100 100/100 100/100 D/R & Expo Chan Sw Pos 0 AILE 1 0 ELEV 1 0 RUDD 1 Throttle Curve Switch Pos Pos Pos Pos Pos Pos (F Mode) 1 2 3 4 5 NORM 0 30 30 30 30 STUNT 100 100 100 100 100 HOLD 0 D/R
DX6, DX7 (Gen 2), DX9, DX18 FUNCTION LIST SYSTEM SETUP Model Type Swash Type HELI Normal F-Mode Setup Switch 1 Switch B Switch 2 Inhibit Hold Switch Switch H 1 0 Channel Assign Channel Input 1 Throttle 2 Aileron 3 Elevator 4 Rudder 5 Gear Gyro 6 AUX 1 Pitch 7 AUX 2 AUX 2 Frame Rate 11ms DSMX Panic Mode Operation Switch A Pos 0 = Panic Mode Off Pos 1 = Panic Mode On EN Servo Setup Chan Travel THR 111/124 AIL 100/100 ELE 100/100 RUD 100/100 GER 100/100 Reverse Normal Normal Reverse Normal Normal D/R &
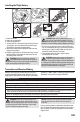
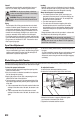
Installing the Flight Battery 1. Lower the throttle. 2. Power on the transmitter. 3. Center the throttle trim. 4. To allow the ESC to arm and to keep rotors from initiating at startup, turn on throttle hold and normal flight mode before connecting the flight battery. 5. Attach hook material to the helicopter frame and loop material to the battery. 6. Install the flight battery on the helicopter frame. Secure the flight battery with a hook and loop strap. Connect the battery cable to the ESC.
Throttle Hold Throttle hold only turns off the motor on an electric helicopter. You maintain pitch and direction control. The blades will spin if throttle hold is OFF. For safety, turn throttle hold ON any time you need to touch the helicopter or check the direction controls. Throttle hold is also used to turn off the motor if the helicopter is out of control, in danger of crashing, or both. Control Tests CAUTION: You must complete the Rudder and Cyclic tests prior to flight.
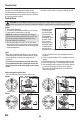
Collective Pitch Front View Front View Collective pitch up Motor Place the helicopter outdoors on a clean, flat and level surface (concrete or asphalt) free of obstructions. Always stay clear of moving rotor blades. 1. The motor emits a series of tones when the helicopter’s ESC arms properly. Before you continue, confirm that TH HOLD is ON. WARNING: The motor will spin when throttle is increased while TH HOLD is OFF. 2. Check the swashplate directions to ensure they are moving in the correct direction.
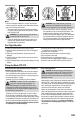
Takeoff Deliberately increase throttle and establish a hover at least 24” (0.6 meter) high, outside of ground effect. Landing Establish a low level hover. Deliberately lower the throttle until the helicopter lands. Do not give any aileron, elevator or rudder commands when the helicopter is landing. When the helicopter is in stunt mode: • The Castle Creations Talon 35 ESC comes pre-programmed in Governor mode. To alter the settings, use the Castle Creations “Castle Link”.
Post-Flight Inspections and Maintenance Make sure the plastic ball link holds the control ball, but is not tight (binding) on the ball. When a link is Ball Links too loose on the ball, it can separate from the ball during flight and cause a crash. Replace worn ball links before they fail. Make sure the battery is not connected before cleaning. Remove dust and debris with a soft brush or a dry Cleaning lint free cloth.
Problem Possible Cause Solution Main rotor head is not spinning in the correct Make sure the main rotor head is spinning clockwise.
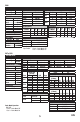
Exploded View 31 43 31 24 43 20 42 15 43 31 13 31 10 44 22 11 28 23 14 16 40 13 21 24 41 17 12 18 13 EN
1 29 6 7 4 2 5 2 6 1 7 3 19 5 3 9 1 8 27 38 39 34 39 35 37 35 36 25 33 30 26 32 EN 14
Parts List # 1 2 3 4 5 6 7 8 9 10 11 12 13 14 15 16 17 18 19 20 21 22 23 Part # BLH4801 BLH4802 BLH4803 BLH4804 BLH4805 BLH4806 BLH4807 BLH4808 BLH4809 BLH4810 BLH4811 BLH4812 BLH4814 BLH4815 BLH4816 BLH4817 BLH4818 BLH4520 BLH4819 BLH4820 BLH4821 BLH4822 BLH4823 Description Aluminum Blade Grips Aluminum Grip Arms Grip Linkage Set Aluminum Head Block Spindle Set (2) Dampners (4) Aluminum Follower Arm (2) Mainshaft (2) Aluminum Swashplate Front Drive Pulley 45t Aluminum Drive Hub Fiberglass Canopy (Teal) C
BEEN ADVISED OF THE POSSIBILITY OF SUCH DAMAGES. Further, in no event shall the liability of Horizon exceed the individual price of the Product on which liability is asserted. As Horizon has no control over use, setup, final assembly, modification or misuse, no liability shall be assumed nor accepted for any resulting damage or injury. By the act of use, setup or assembly, the user accepts all resulting liability.
FCC Information This device complies with part 15 of the FCC rules. Operation is subject to the following two conditions: (1) This device may not cause harmful interference, and (2) this device must accept any interference received, including interference that may cause undesired operation. CAUTION: Changes or modifications not expressly approved by the party responsible for compliance could void the user’s authority to operate the equipment.
©2015 Horizon Hobby, LLC Blade, the BNF logo, DSM, DSM2, DSMX, SAFE, AirWare and ModelMatch are trademarks or registered trademarks of Horizon Hobby, LLC. The Spektrum trademark is used with permission of Bachmann Industries, Inc. BEASTX is a registered trademark of Markus Schaack and is used with permission.The Spektrum AR7210BX employs technology exclusively licensed to Horizon Hobby, LLC. from freakware GmbH. All other trademarks, service marks and logos are property of their respective owners.